
3 posts tagged with "templates"

View All Tags

Template diagrams with previews, subcategories and search

· 3 min read
draw.io
draw.io Team

You can now search for template diagrams and preview templates in the template library in draw.io. The new subcategories make it easier to find a specific template diagram in categories with many diagrams, such as the cloud infrastructure templates.

Open the template manager dialog

When you create a new diagram, the template library dialog will appear by default after you select where you want to store your diagram.
Choose a diagram template when you create a new diagram in draw.io

In the draw.io editor, select Arrange > Insert > Template from the menu.

If you are using the Sketch whiteboard-style diagram editor theme, click the Template tool on the left to open the template library dialog.

Find a template diagram

Templates are organised into categories on the left in the template library. Click on the solid arrow next to a large category to see its subcategories.
Open the template library dialog to see a wide range of diagram templates in draw.io

Preview a template

Click on the magnifying glass icon in the top right of a template in the template library dialog to see a larger preview of it.
Hover over a template in draw.io to see a larger preview of it

You can freely edit a template that you have added to your diagram: change labels, add and connect new shapes, reposition shapes and connectors, change shape styles, and more.

Note: If you are using the whiteboard-style editor theme, the sketch (rough) shape, text and connector styles will be applied by default to the basic shapes in this template.
Hover over a template in draw.io to see a larger preview of it

Search for a template

  1. Click in the Search field at the top of the template library dialog.
  2. Type your search term and press Enter to find any template with your search term in its name. For example, search for class to see class diagram templates.
    Enter a search term in the template library to find matching templates

Add the template to your diagram

You can add more than one template to your diagram.

  1. Select the template in the template library dialog.
  2. Click Insert to add it to the drawing canvas (or click Create if you are creating a new diagram).
    Hover over a template in draw.io to see a larger preview of it

Match the shapes used in a template

If you don't see the shapes that are used in the template diagram you selected in the shapes panel on the left, click on More Shapes at the bottom of this panel, select the shape library you need, then click Apply.

Tip: In the sketch diagram editor theme, click on the Shapes tool or press Ctrl+Shift+K on Windows (Cmd+Shift+K on macOS) to see the shapes panel.

Create a remote kanban board with draw.io

· 7 min read
draw.io
draw.io Team

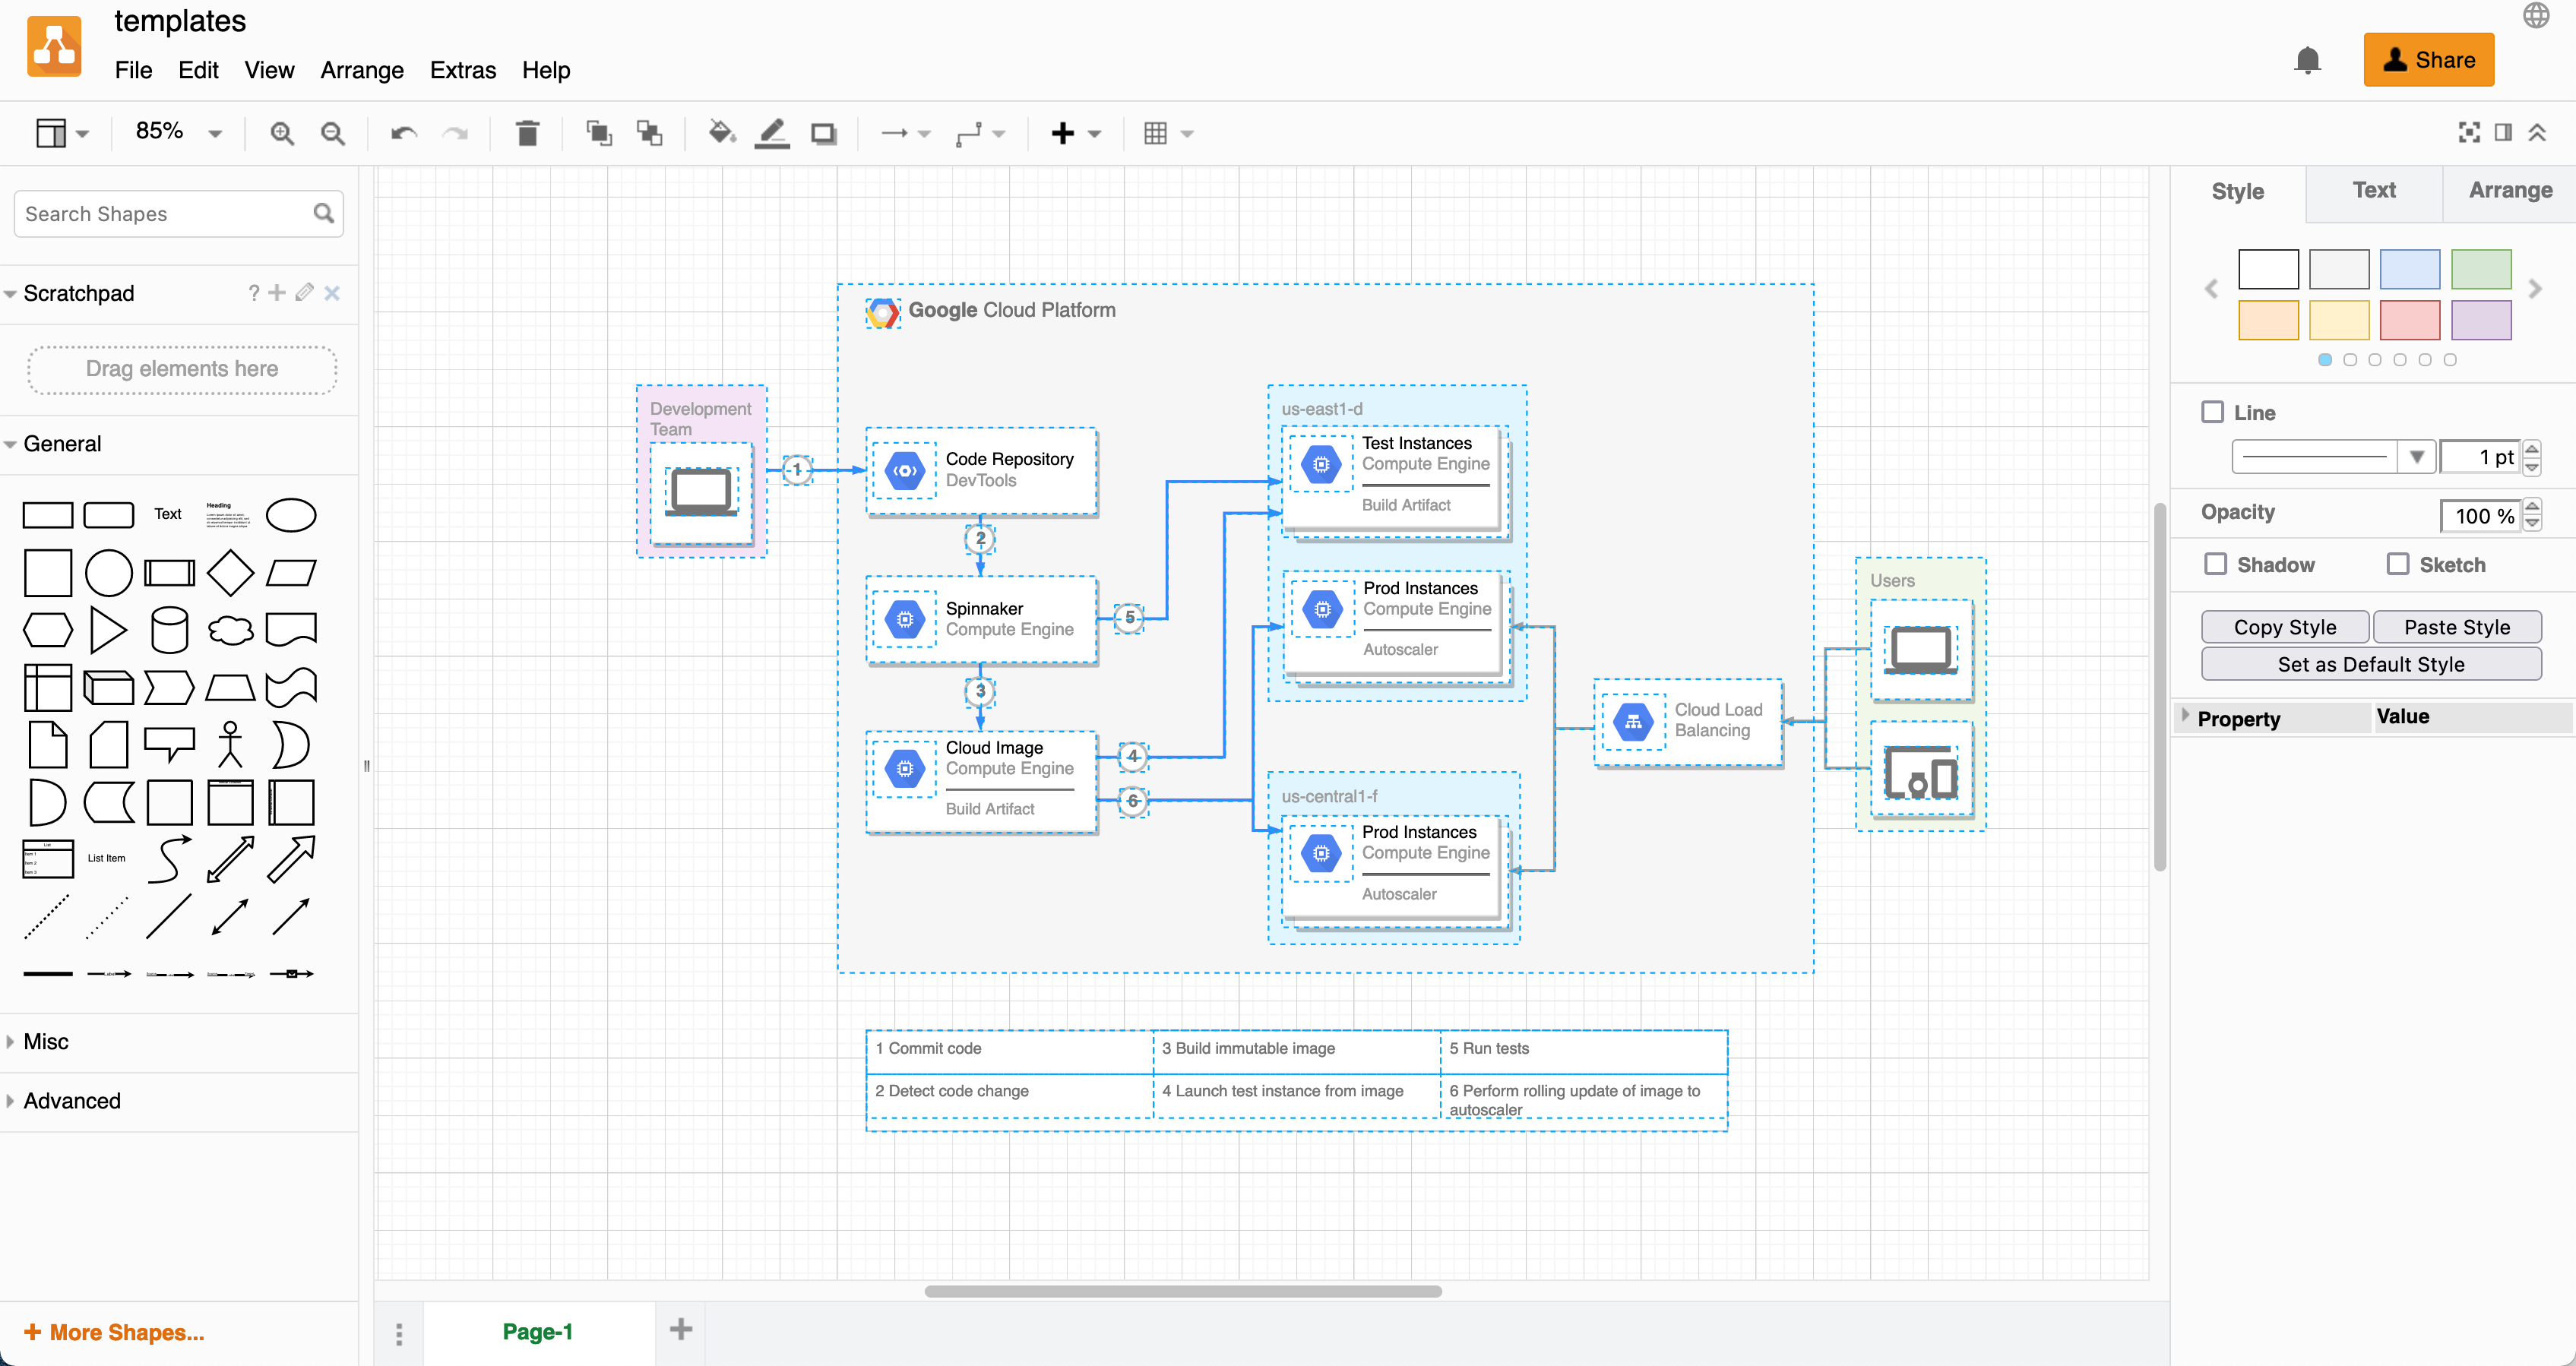
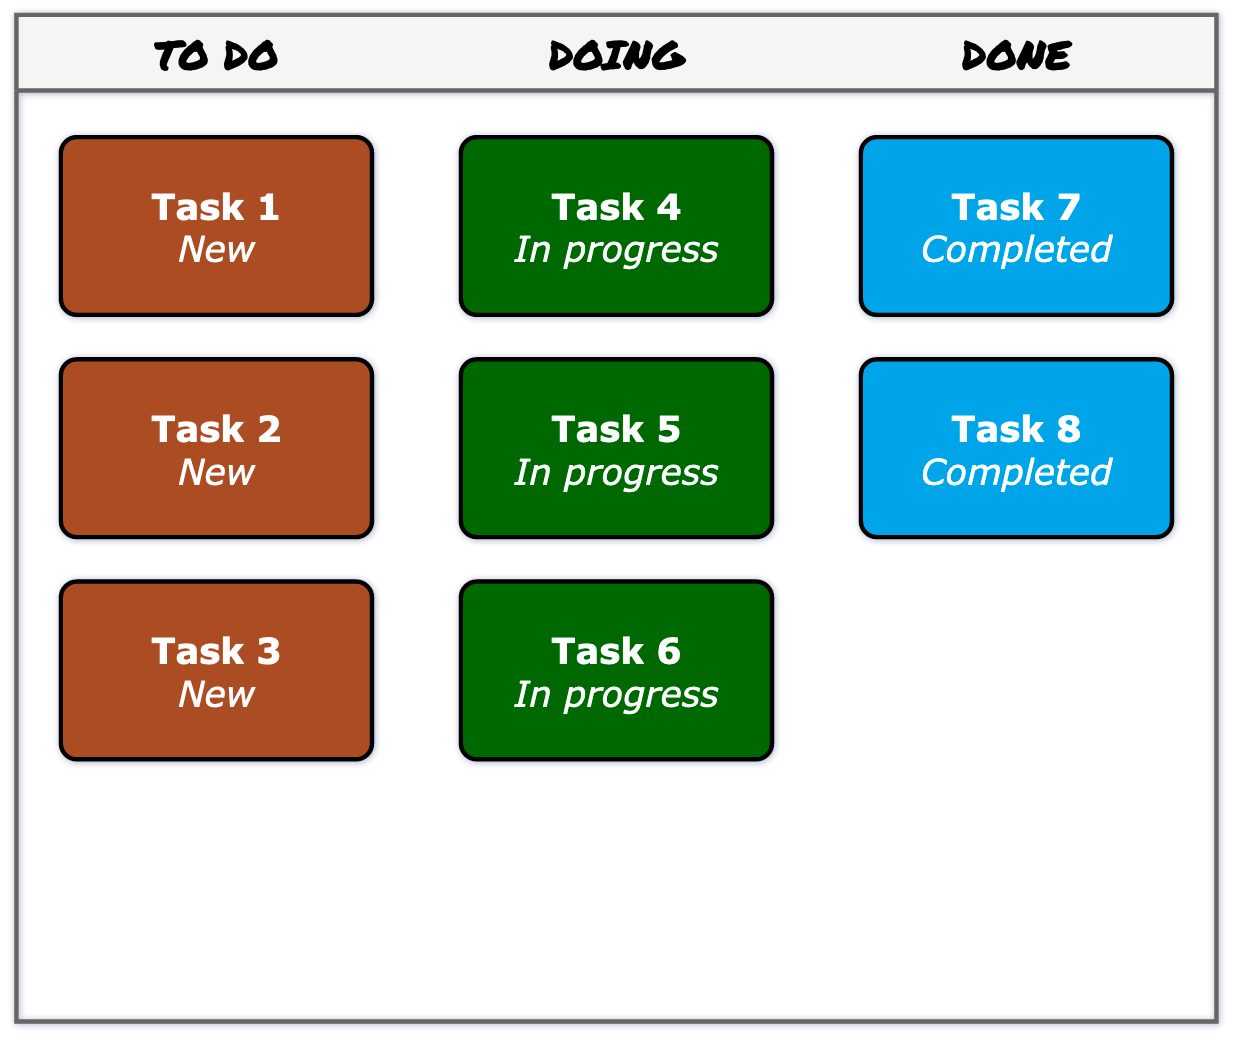
Kanban boards show the breakdown of large projects into smaller tasks that you prioritise and track as they are completed. Collaborative projects benefit from a kanban board as it helps everyone visualise workflows, the state of the project, and the current workload.
The kanban template in draw.io automatically updates colours and labels when you move tasks to another column

The Kanban method or system is commonly used by project and production managers, agile and system developers, designers and content marketers. Almost all areas of a business can use this method to track work, identify bottlenecks, and improve processes.

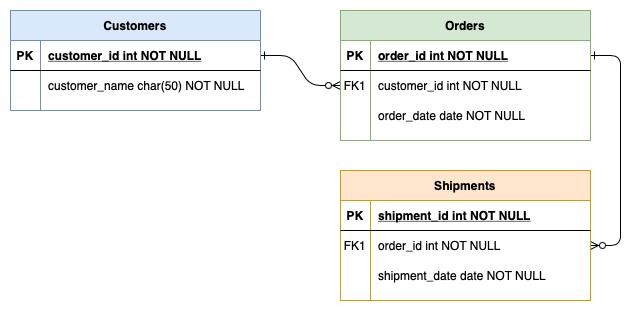
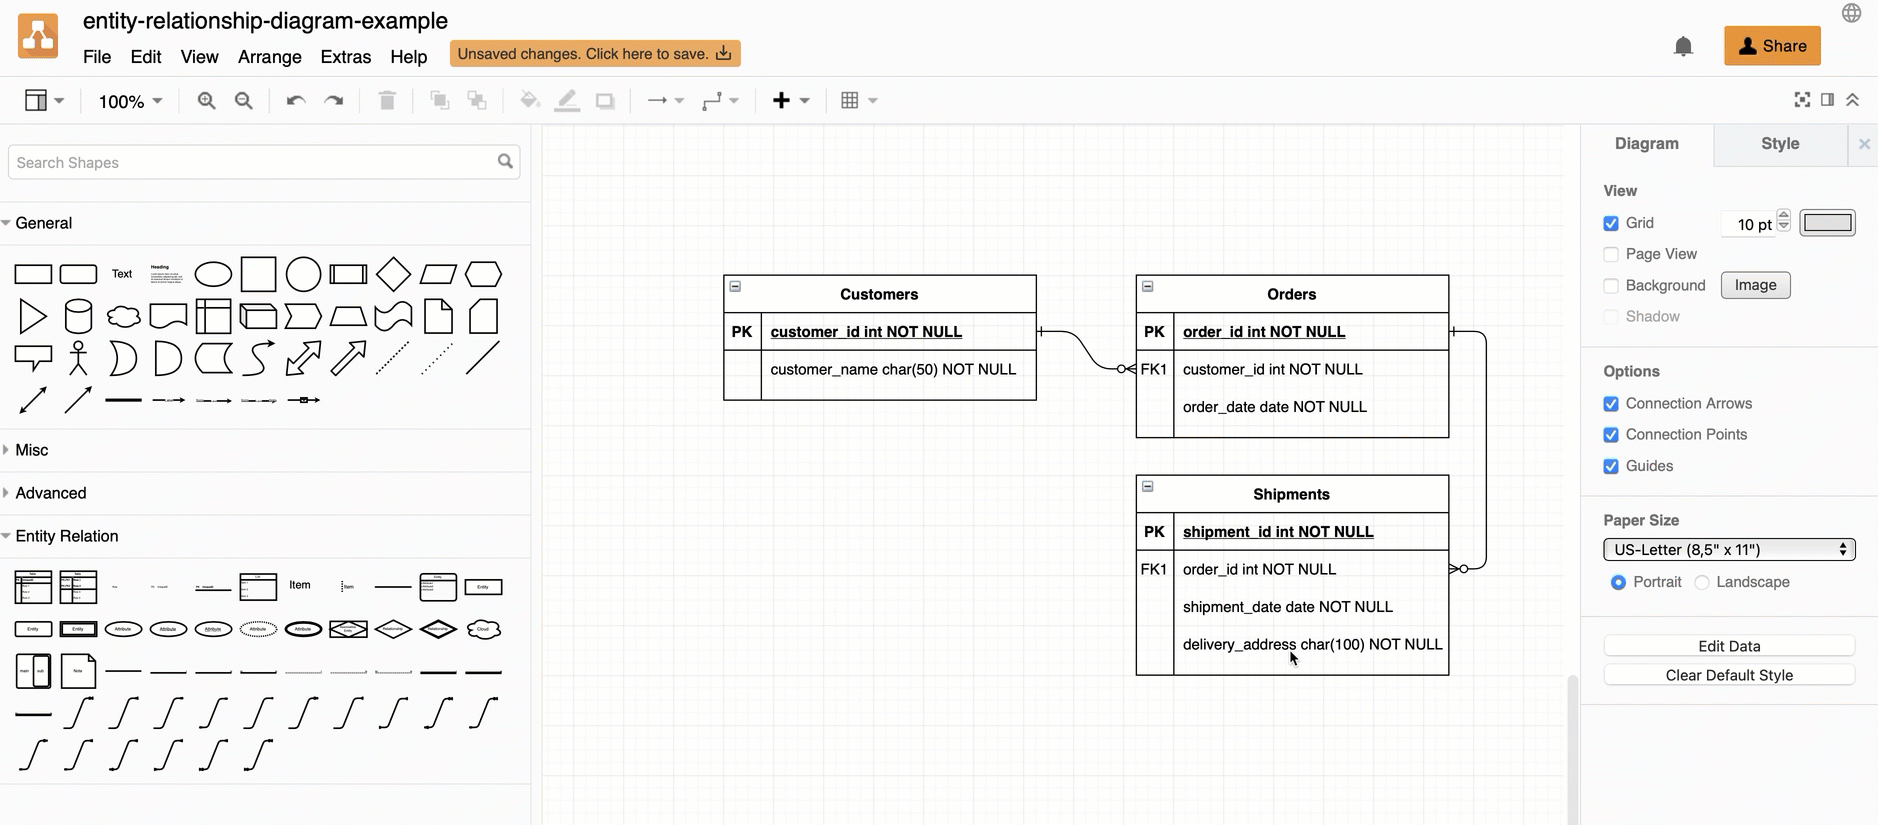
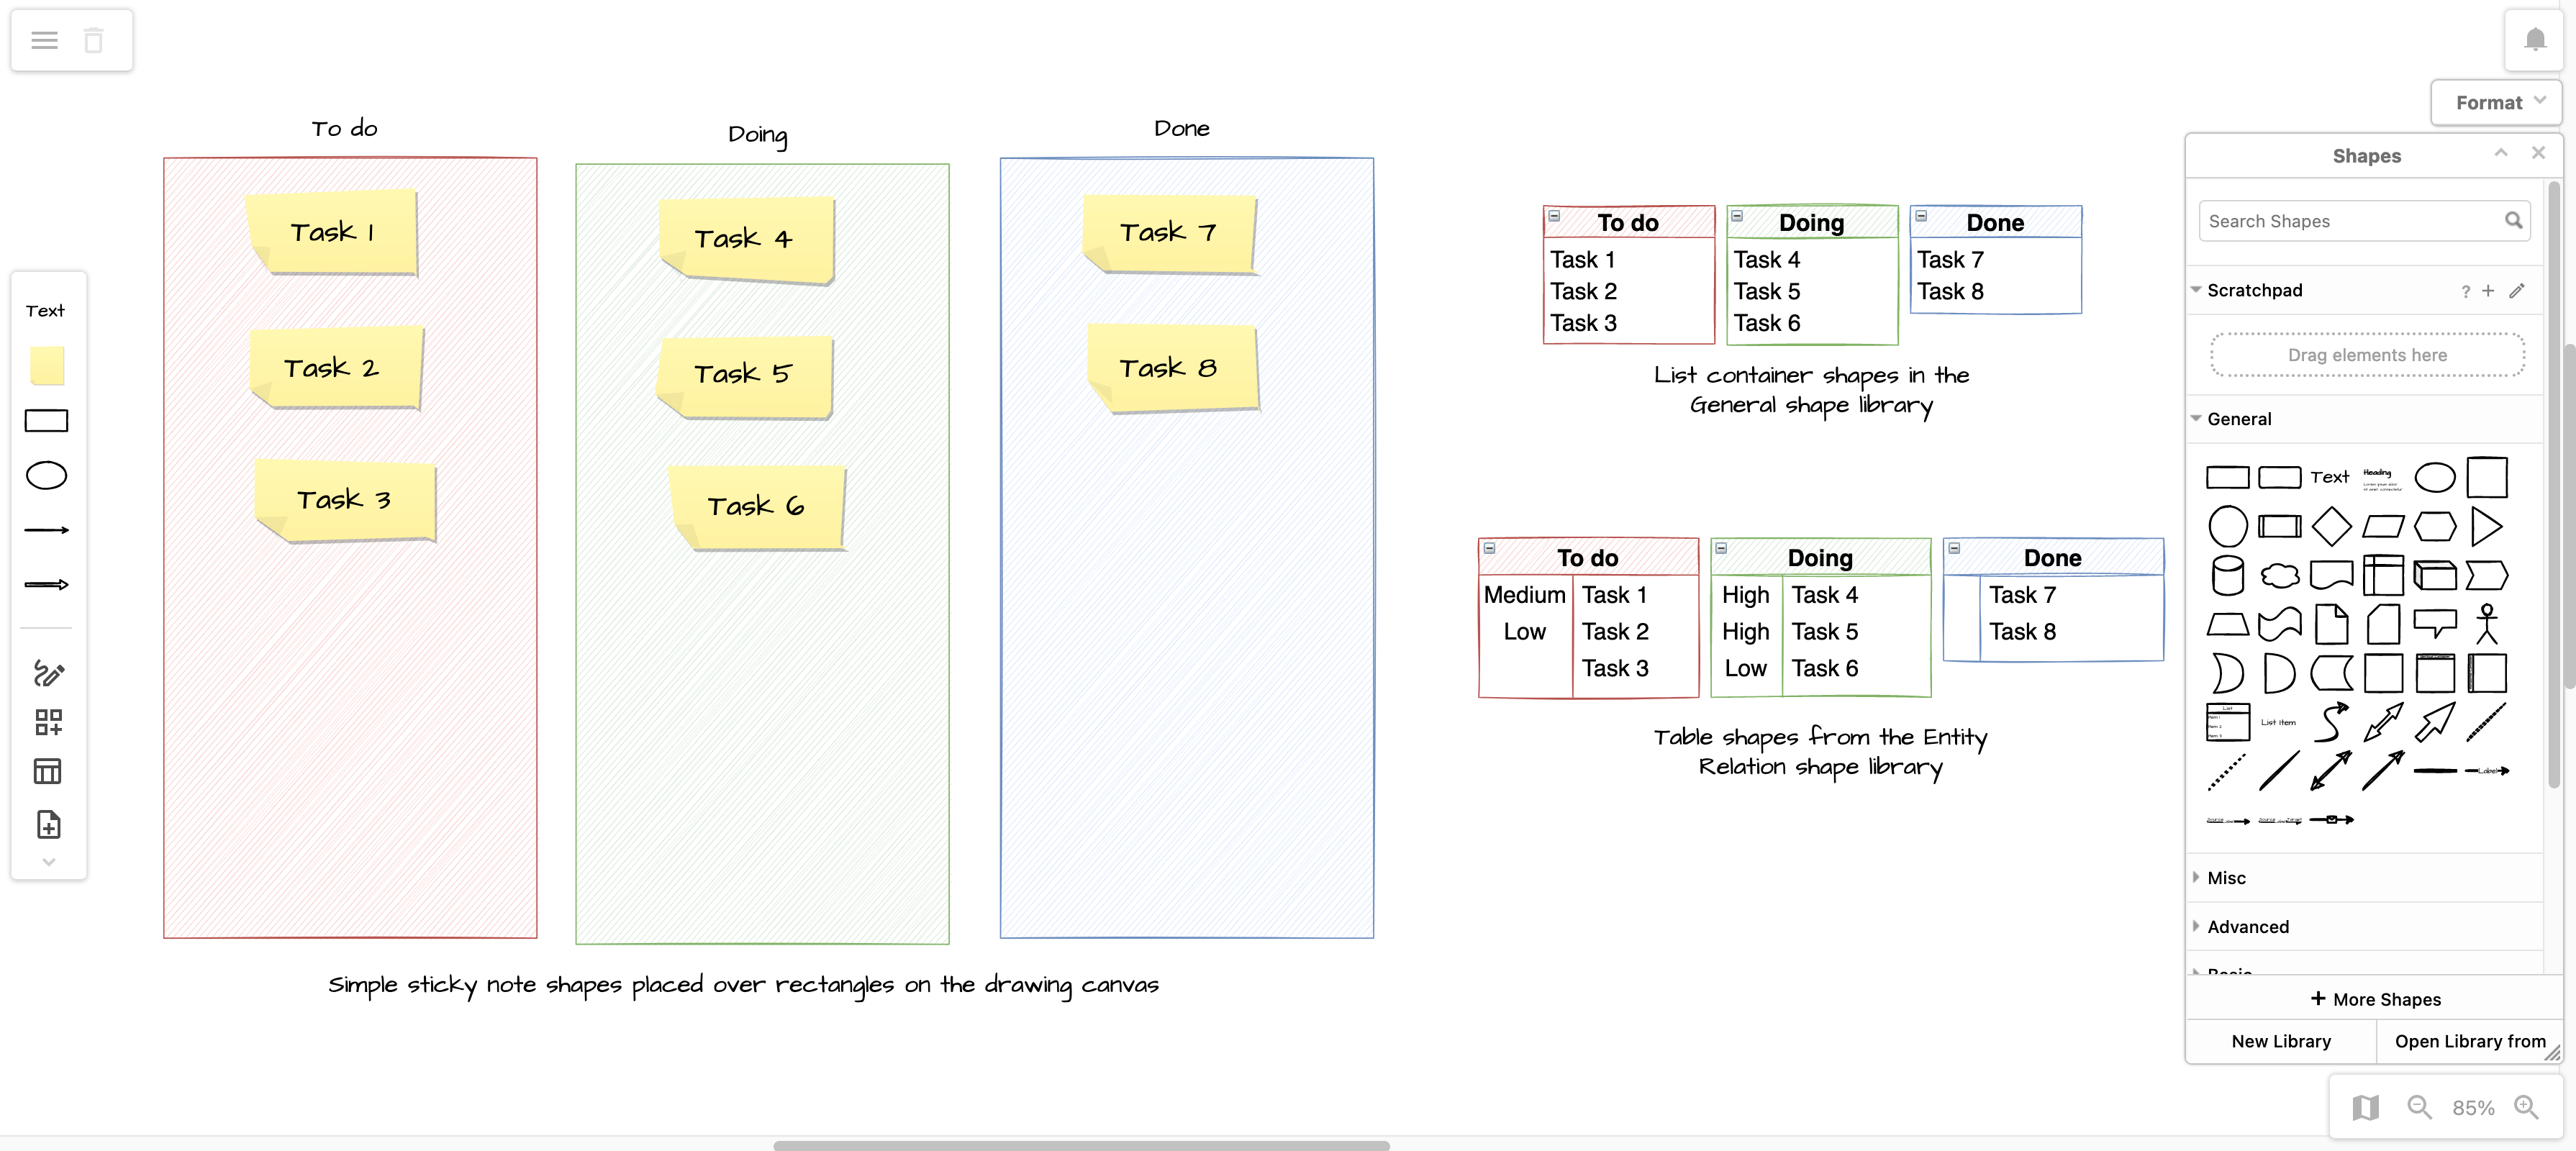
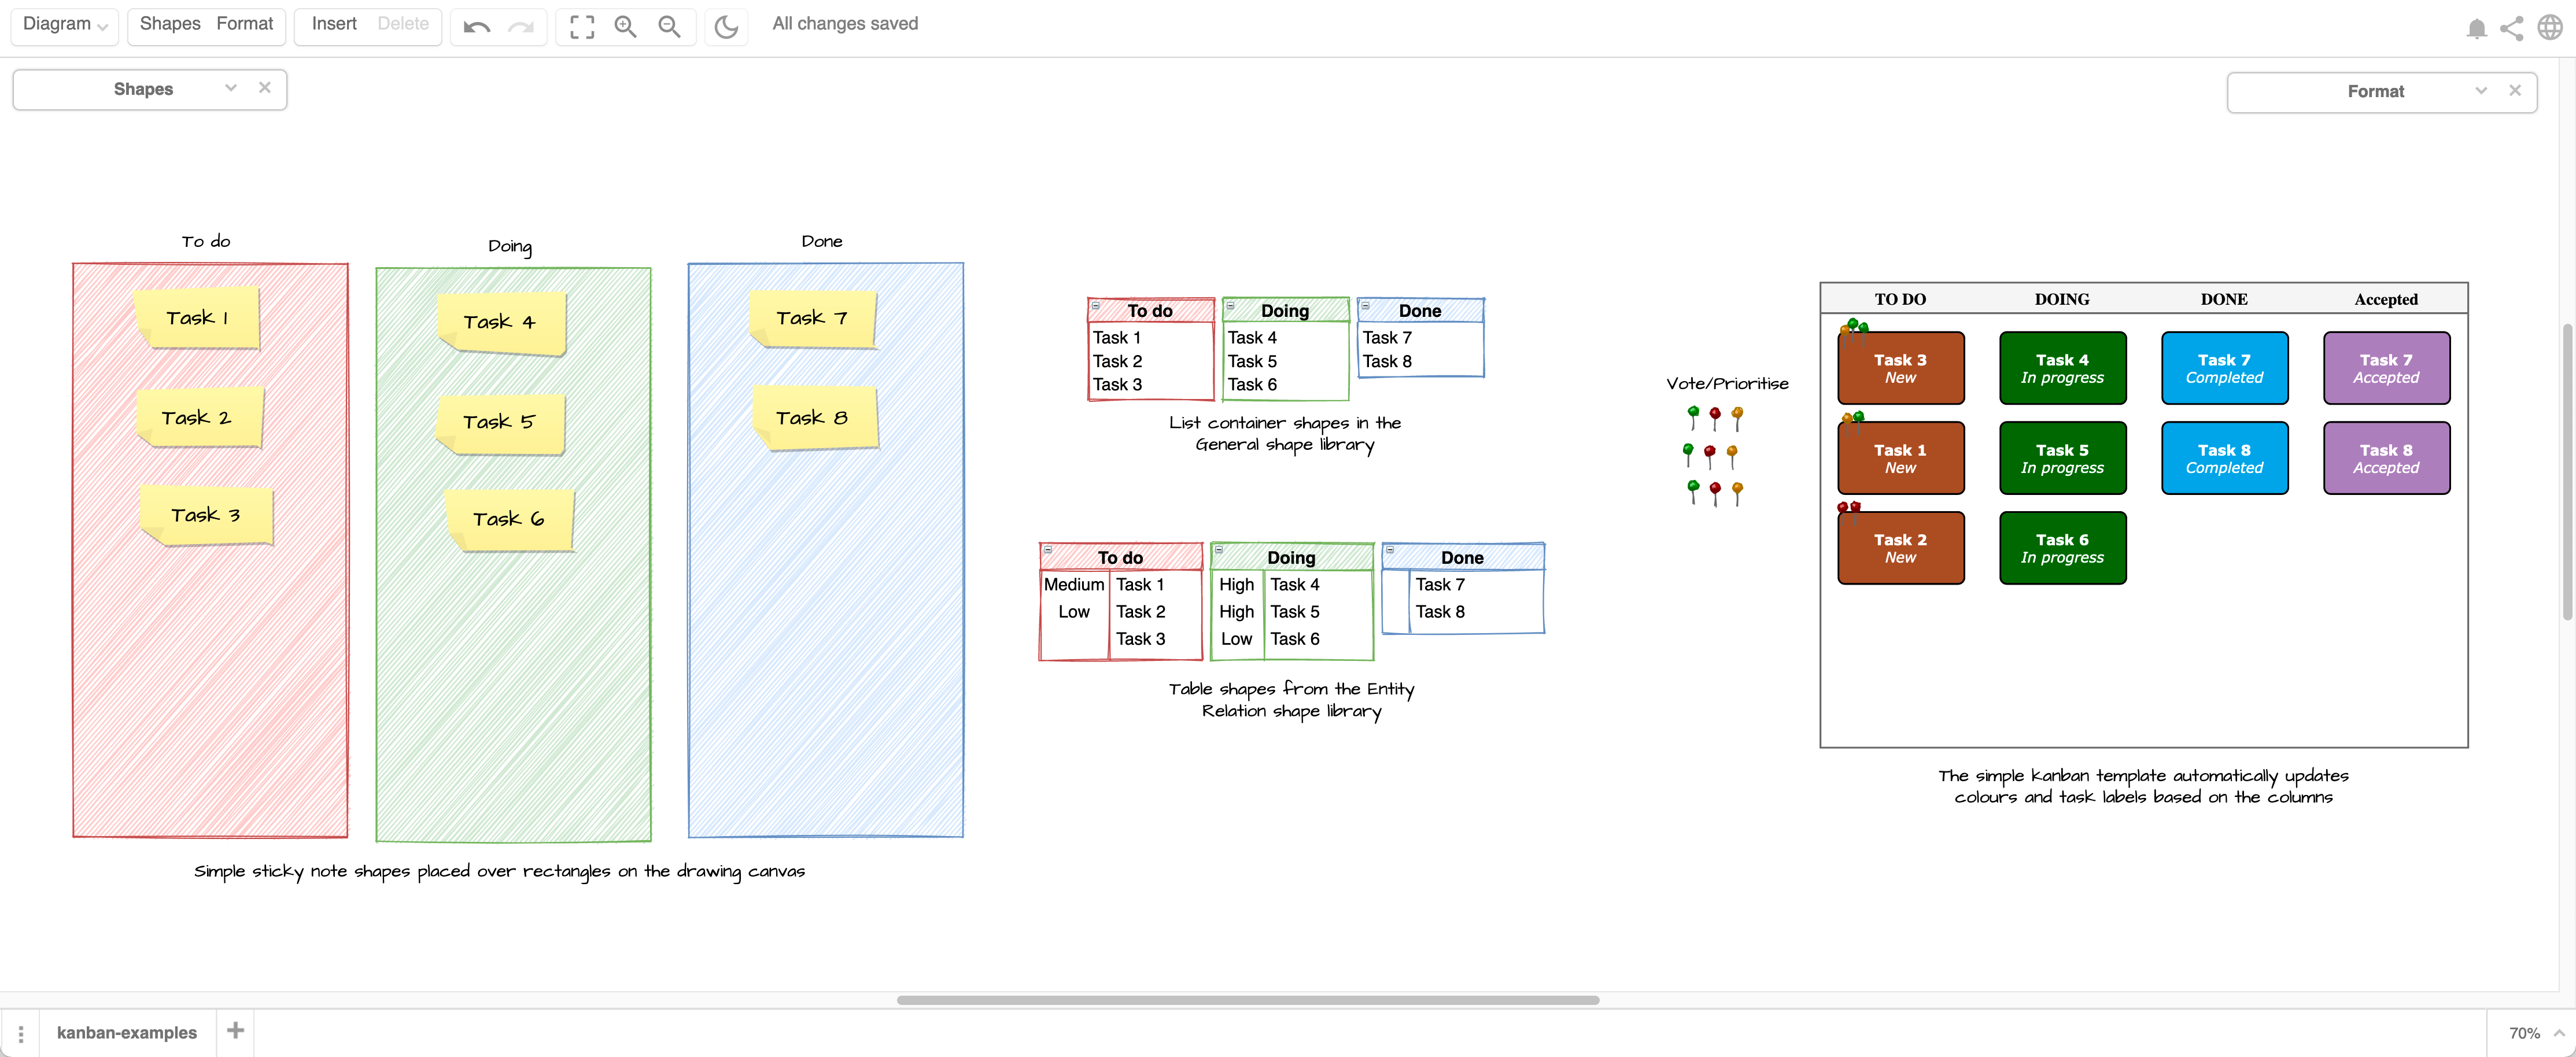
You can draw remote kanban boards in draw.io in many different ways - you don't have to use the simple kanban template as shown above. You can use simple sticky note shapes over coloured rectangles, list elements, or entity table shapes - whichever you find most convenient.

Create your kanban board in draw.io using simple shapes, lists, entity tables or the simple kanban template

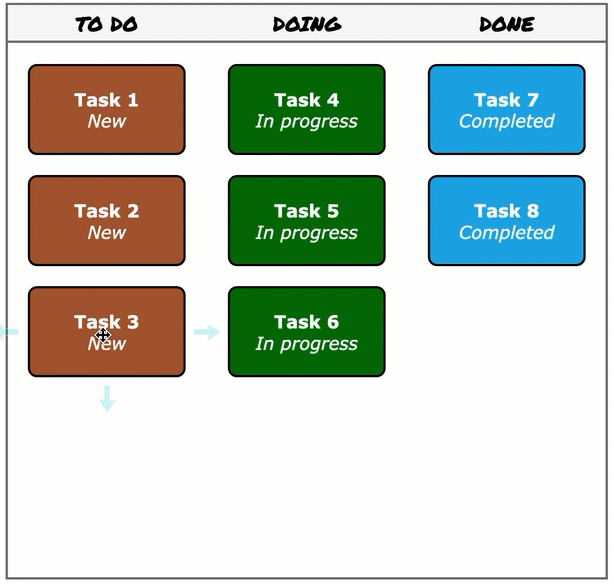
However, the simple kanban board template in draw.io will automatically colour tasks based on the column (the swimlane or state) they are in, and update the label text accordingly.

Using the kanban board template

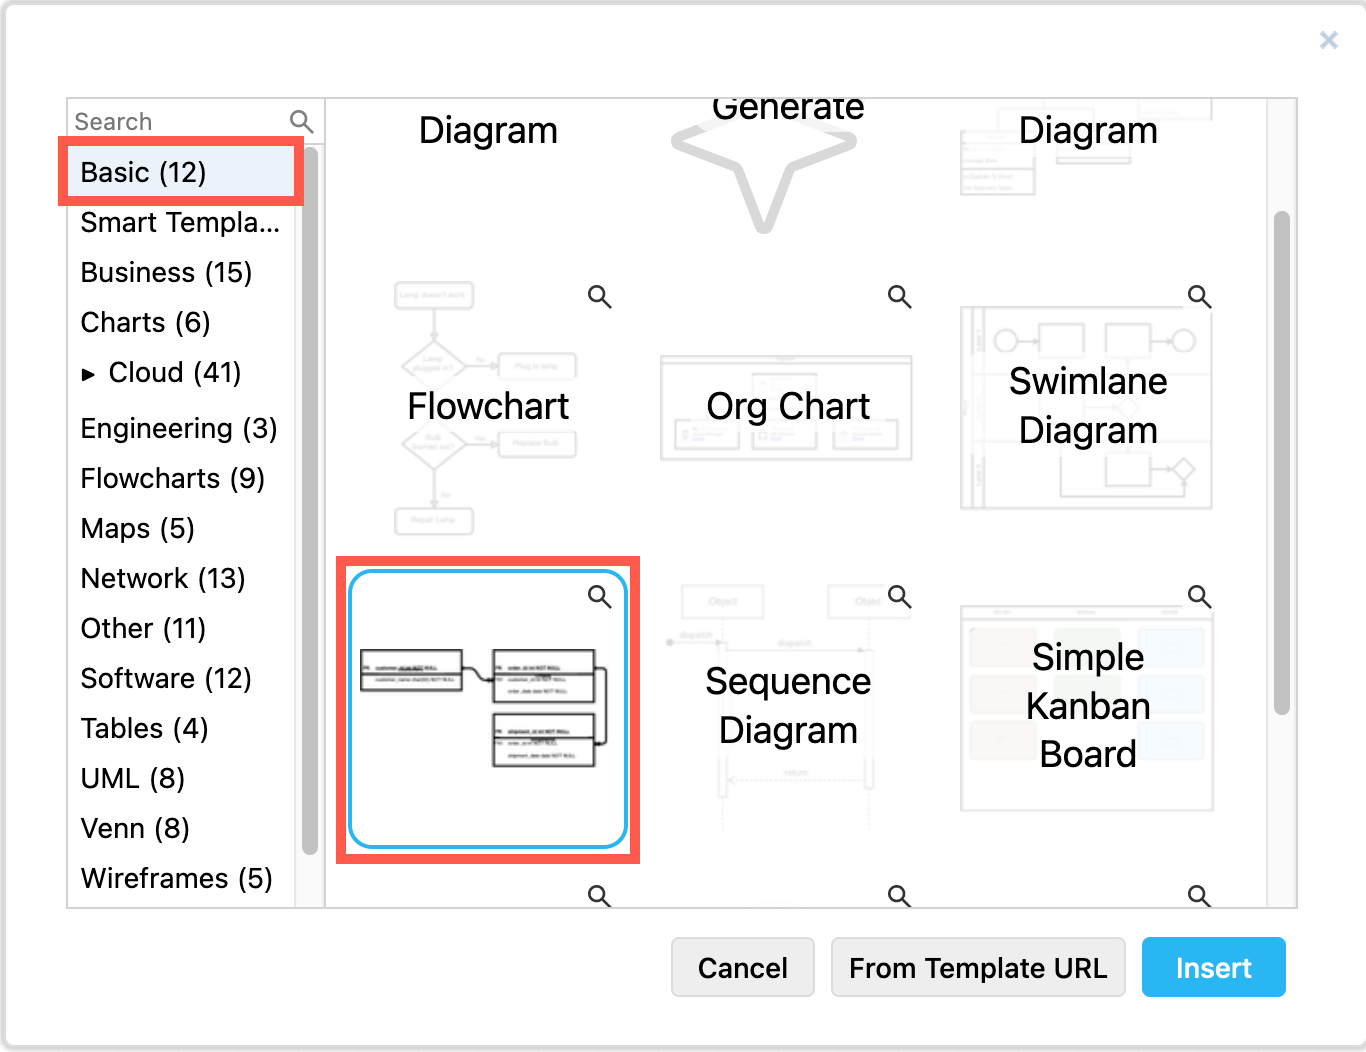
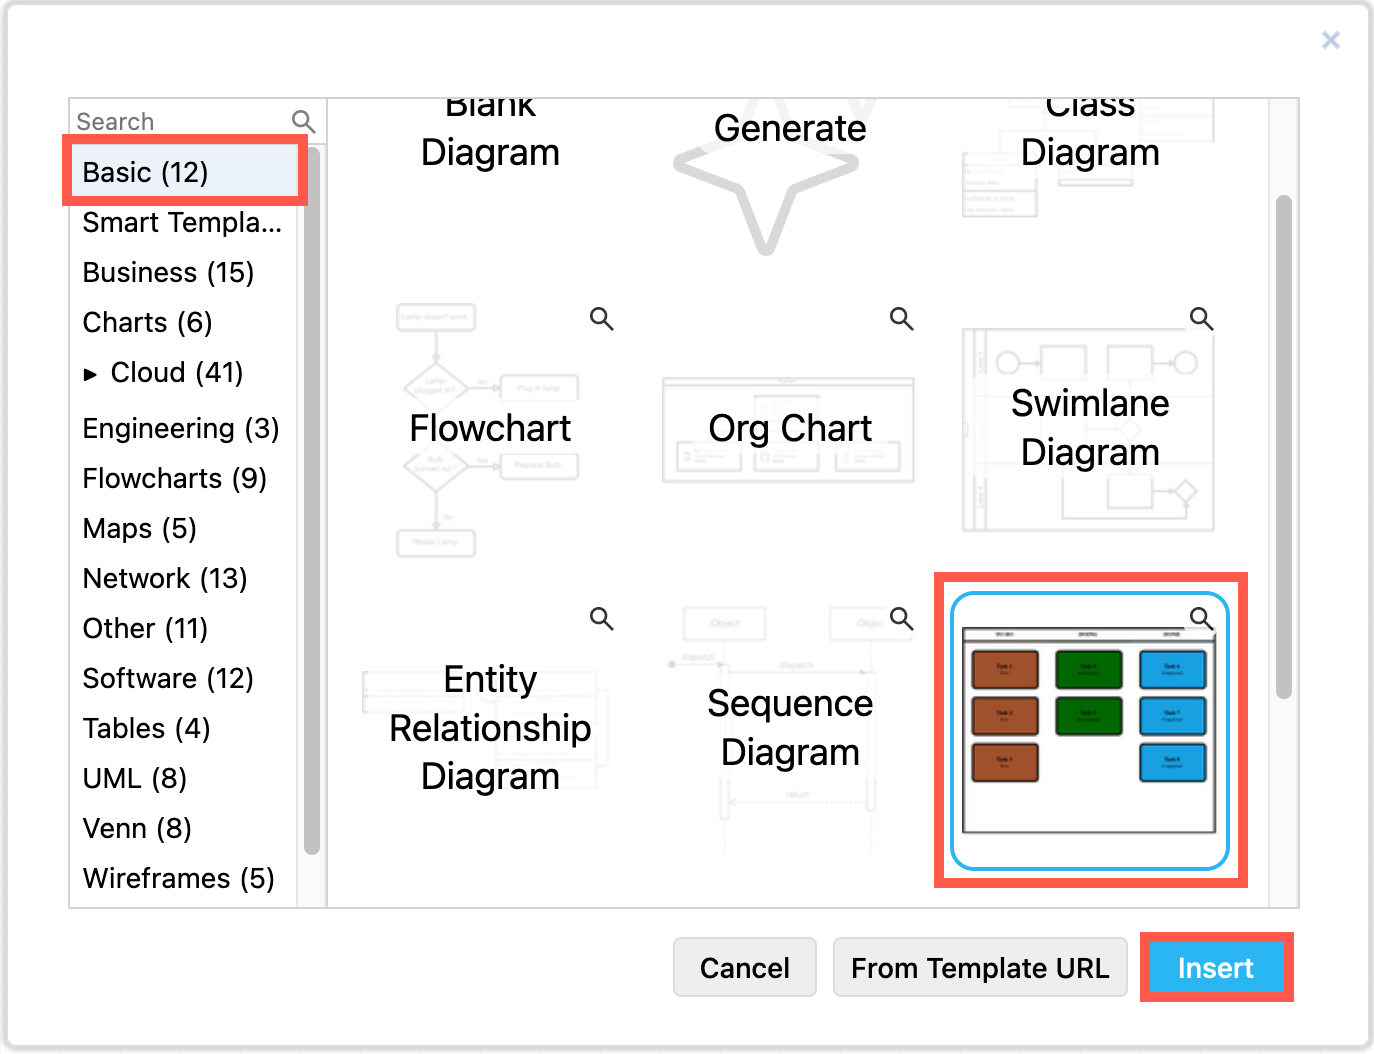
Insert the simple kanban template

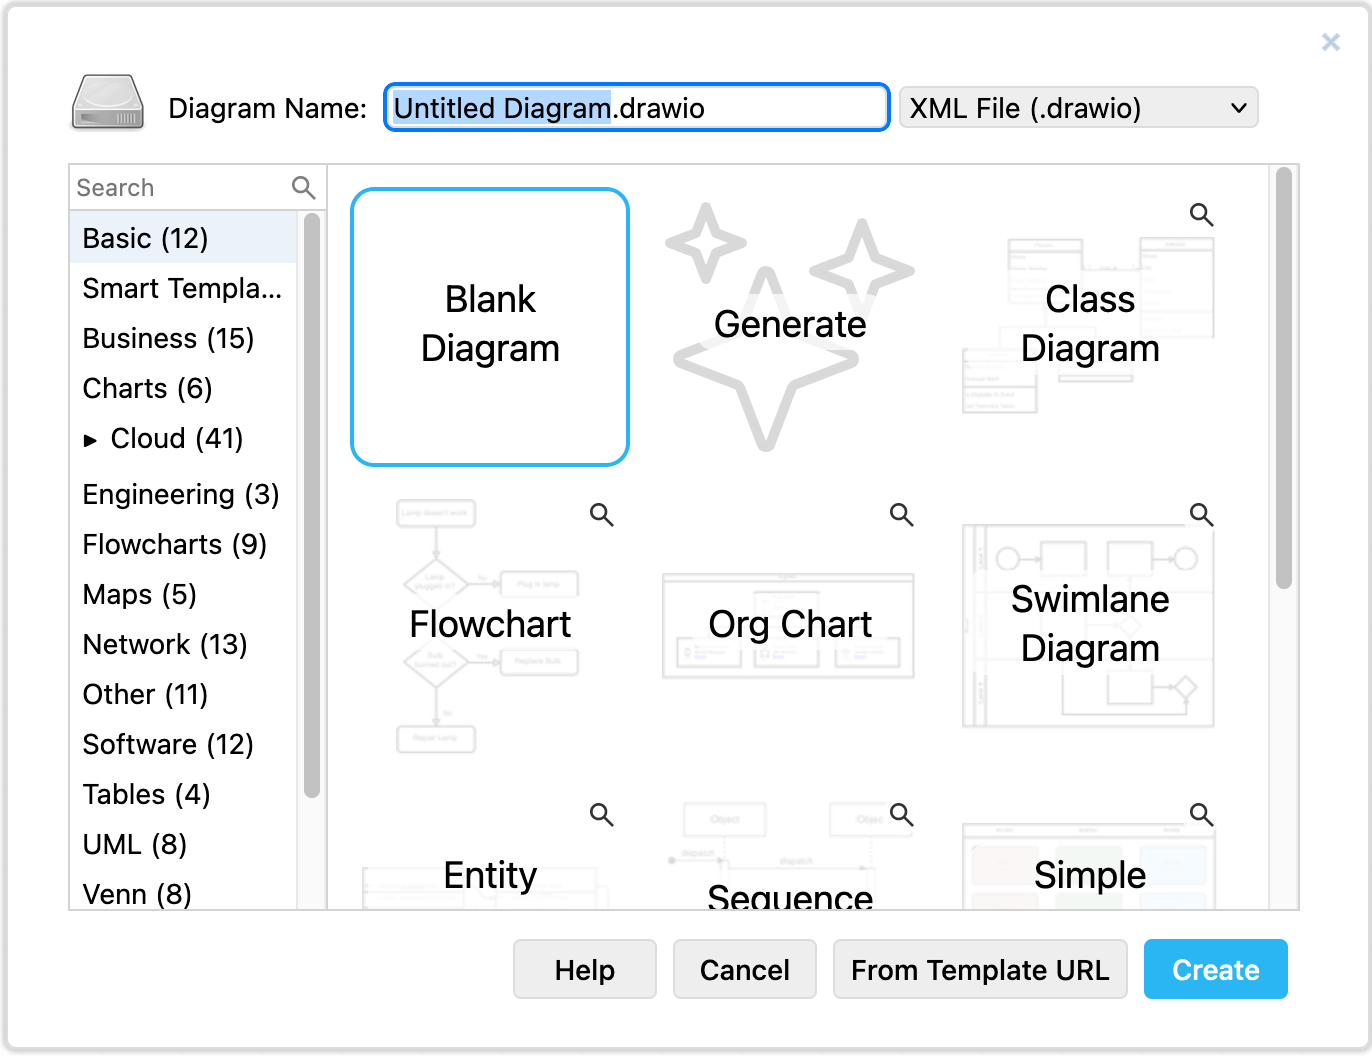
  1. Select Arrange > Insert > Template from the draw.io menu to see the template library.
  2. In the Basic library, select the Kanban template, and click Insert.
    The kanban template in draw.io automatically updates colours and labels when you move tasks to another column

You aren't limited to just three columns in your kanban board. This template uses a custom shape property on the swimlane (column) to set the label text, and the swimlane's fill colour for the tasks.

Add and move tasks

  1. Hover over one of the tasks in a column to see the direction arrows, then click on it. A new task will be added in that direction with a copy of the previous task label.
  2. Double click on the new task and edit their task name
    Tip: Don't edit the %status text - learn more about this placeholder in the section below.
  3. Drag tasks from one column to another to change their state and show where they are in your workflow.
    The kanban template in draw.io automatically updates colours and labels when you add tasks or move them to another column

Delete a task: Select the task, and press Delete or Backspace.

Vote and prioritise on the kanban board

Teams can work remotely and collaboratively on their kanban board diagrams, add links to external sites or documents, add and link to other diagram pages, and vote on priorities.
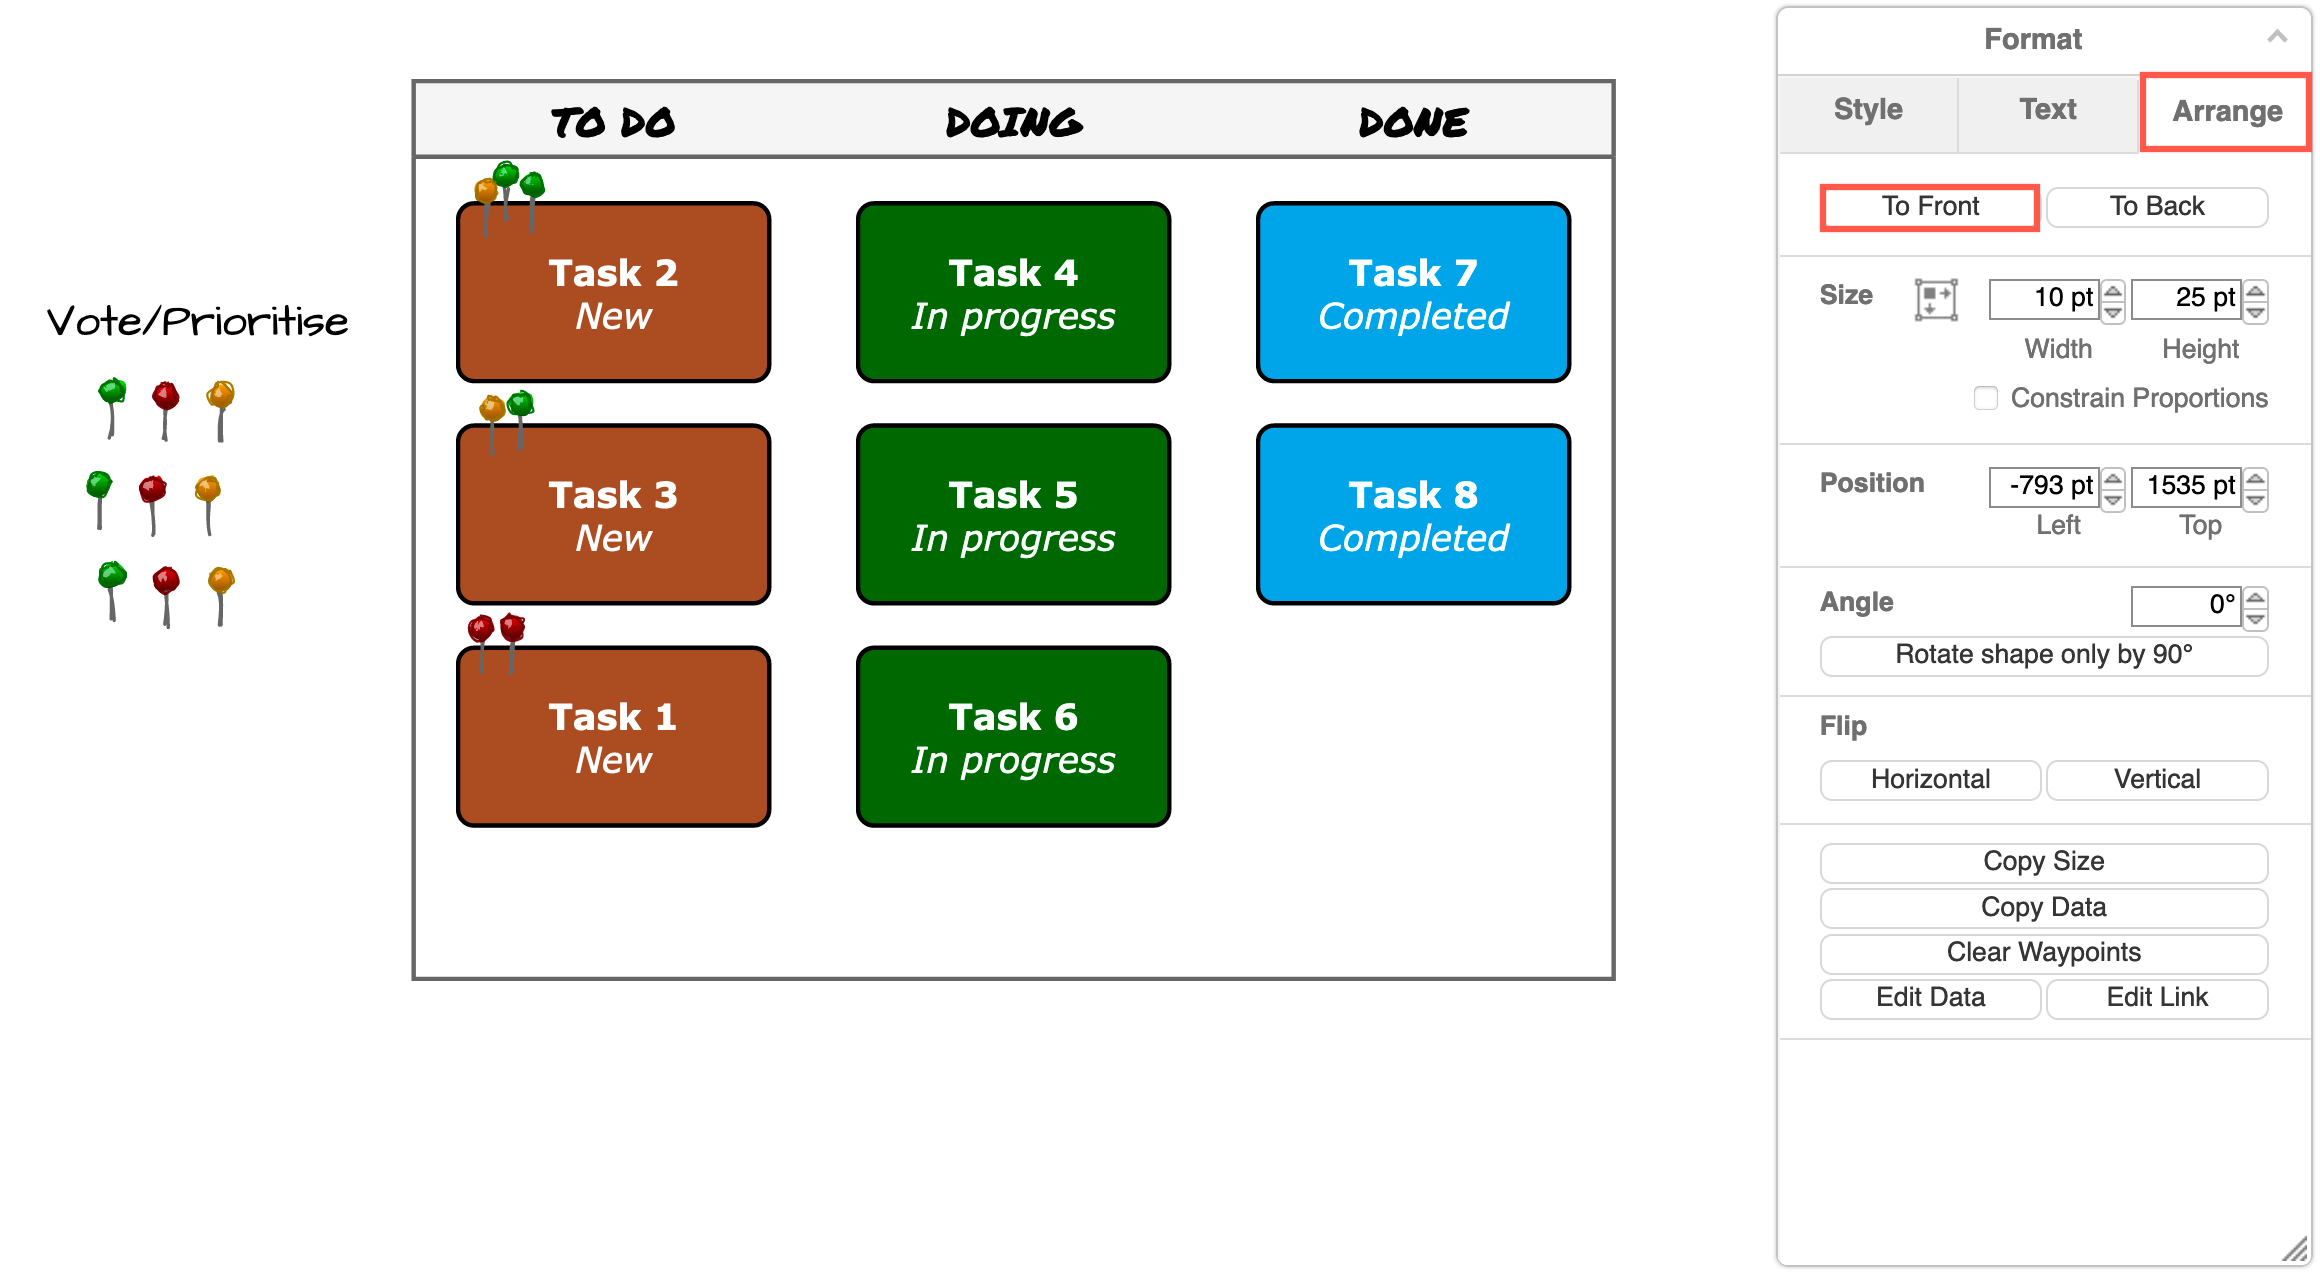
Vote on tasks or set task priorities by placing pins or other simple shapes on your kanban board in draw.io
  • Hold down Alt to overlay shapes on the kanban board, such as when prioritising or voting on the next tasks to implement.
  • To make your kanban board more readable, select all of the voting/pin shapes, go to the Arrange tab on the format panel, and click To Front to make sure they will be visible on top of your tasks.

Tip: Right-click on the drawing canvas and share your mouse cursor with your team in real-time with draw.io for Confluence Cloud, as well as in draw.io when storing shared diagram files in Google Drive or Microsoft OneDrive.

Add a new column to the kanban board

  1. Select a column (one of the swimlanes) and hover over one side to see the direction arrows.
  2. Click on the direction arrow to add a new column in that direction.
    Add a new column to the kanban template in draw.io

Delete a column: Select the column (swimlane), and press Delete or Backspace.

Change the colour of the tasks in a column

Task colours are automatically set to match the swimlane's fill colour.

  1. Select the column (swimlane), then in the Style tab of the format panel, click on the Fill colour button.
    Change the colour of the tasks in a column to the kanban template in draw.io
  2. Select a new colour from the palette, and click Apply.

Change the status text in the task label

As you saw in above, the status text in the simple kanban board template is a placeholder. When you select the text in one of the tasks, you'll see the word status surrounded by percentage characters: %status%.
Placeholders are used to set text automatically in the simple kanban template in draw.io

The text that replaces this placeholder is set in the swimlane's custom properties.

  1. Select the column (swimlane), then press Ctrl+M on Windows or Cmd+M on macOS to open the shape properties dialog.
    Placeholders are used to set text automatically in the simple kanban template in draw.io
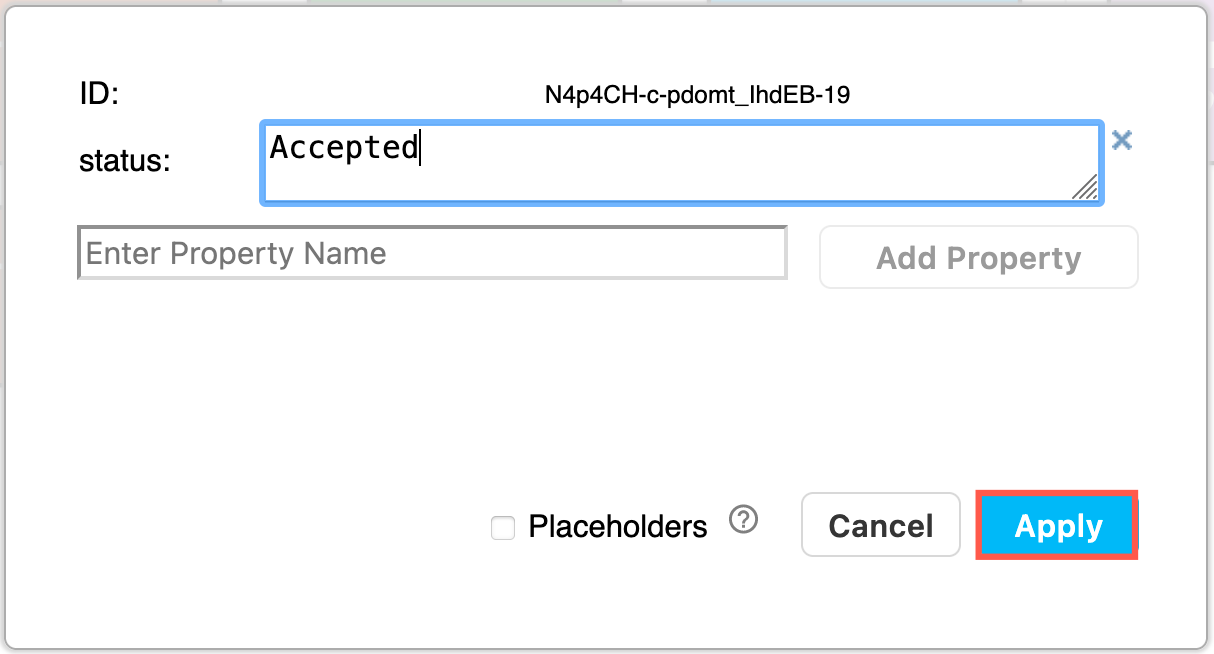
  2. Change the status text, and click Apply.

Note: The title of the column is not set automatically. Select the column and start typing to replace the column's title.

Learn more about custom properties and placeholders

Embed your kanban board

The many different draw.io integrations let you use your kanban boards with the tools you use.

Embed your kanban diagram wherever you are working: HTML pages, VSCode and GitHub projects, Google Workplace and Microsoft Office documents and slides, Atlassian Confluence, Notion pages, and more.

See the draw.io editor embedding walkthrough if you want to embed your kanban board and the draw.io editor in another application.

Kanban in a simpler diagram editor

Use the Minimal or Sketch editor theme, with the editor grid turned off to make your kanban board feel more like sticky notes on a whiteboard. Use the draw.io Board macro in Confluence to use the Sketch editor theme by default.
Use the Minimal or Sketch editor themes in draw.io to make your remote kanban board feel more like a whiteboard
Open these examples in the minimal draw.io editor

Work with entity relationship table shapes in draw.io

· 7 min read
draw.io
draw.io Team

Entity relationship diagrams or ER models in software engineering show the structure of and relationships between database objects. They are used extensively in database modelling to plan new systems, and document existing systems for maintenance and updates.
Use the basic entity relationship diagram template as your starting place
Open this ER model in the draw.io editor

In draw.io, entity relationship diagrams have their own shape library, and use the new extended table tools in the Arrange tab of the format panel. These tools and keyboard shortcuts let you quickly add and delete rows from your relational database model.

Enable the Entity Relation shape library: Click on More shapes at the bottom of the left panel, select the Entity Relation shape library in the Software section and click Apply.
Enable the Entity Relation shape libary via More shapes in the left panel in draw.io

If you prefer to work from a template diagram, see the end of this post to access one of the many ER diagram templates in draw.io.

Select a row inside a table: Click on an entity once to select the entire table. Click a second time, this time on a row inside that table, to select that cell within the row. Click a third time to select the entire row.

Add a row to a table or ERD table shape

There are many ways you can add new rows to your entity table shape in draw.io.

  • Add a blank row: In the Arrange tab of the format panel, click the Insert Row After or the Insert Row Above button. If you had selected the entire table shape, a blank row will be inserted at the end or at the start of your table, otherwise it will be inserted before or after the selected cell.
  • Add a row from the shape library: Drag a row (with or without a primary or foreign key) from the Entity Relation shape library and drop it on an existing entity (highlighted in purple*).
  • Clone a row: Select a row, and press the keyboard shortcut Ctrl+Enter on Windows or Cmd+Enter on macOS to insert a clone of the selected row immediately below. The Ctrl+D/Cmd+D keyboard shortcut or right-clicking on the row and selecting Duplicate from the context menu work in the same way.
  • Move a row from another entity: Drag a row from one existing entity and drop it on another, just as you would a new row from a shape library.
    Add new rows to entity tables in an ER model in draw.io many different ways

Tip: To reposition rows inside the table shapes, simply drag them to a new position.

Combine entity relationship tables and delete rows

When you want to reorganise your database entities, you can drag and drop an existing table onto another table shape to combine all of their rows. The primary key and foreign keys may not make sense after this, so make sure you delete any unnecessary rows.

  1. Drag and drop one table onto another table.
  2. Select the extra primary and foreign key rows and click the delete row tool in the Arrange tab of the format panel on the right. Just pressing the Delete key will delete the row's content, but not the row itself.
    Combine entity tables and delete rows in an ER model in draw.io

Tip: When you fully delete a row that has a connector attached to it (rather than just delete its contents), the connector is automatically deleted.

Connect to entity tables or rows

Some people prefer to connect primary to foreign keys across entities in an ER diagram to better show which elements are related. Use the connectors in the Entity relation shape library to show what type of a relationship exists.

  • Drag a connector end and hover over the entity's name to add a floating connector to the outside of the table shape. You can move rows around inside the table without moving the connector.
  • Drag a connector end and hover over a row inside the entity table, and drop the connector when the row is highlighted to connect it to that row. When you move that row, the connector will stay attached to it.
    Draw floating connectors between entity tables, or connect them directly to rows inside the table

Tip: You can either set the ends of the connectors using the style tab, or use the connectors in the Entity Relation shape library. Hover over the connector shapes in this shape library to see which relationship they represent.
Hover over a connector in the Entity Relation shape library to see how it is used to show a relationship

There are various notations you can use for the connector ends. The most common is crow's foot notation.

Work from an ER diagram template

When you create a new diagram, you can choose from a wide variety of templates, including many different entity relationship models. You can also insert one of these templates into an existing diagram.

Select Arrange > Insert > Template from the draw.io menu to open the template manager.

There are two categories of templates containing ER diagrams:

  • Select Basic, then select the simple Entity Relationship Diagram template for a simple model with three tables.
    Select the basic Entity Relationship Diagram template in the draw.io template manager
  • Select Software, then choose one of the many different example ER diagram templates. These are much more complex than the basic ER diagram template. Click on the magnifying glass icon in the top right of a template to see a larger preview.
    Select one of the many more complex entity relationship diagrams in the Software section of the draw.io template manager

Generate a custom smart template

You could also generate a custom smart template diagram based on a text description of your system and process.

  1. Open the template library (Arrange > Insert > Template) and select Smart Templates.
  2. Select Entity Relationship Diagram from the list of diagram types.
  3. Describe your system and process and click Generate.
    Generate a custom template from a text description in the Smart Templates section of the draw.io template manager
  4. If you are happy with the generated smart template, click Insert or Create to add it to the drawing canvas.

Create entity table shapes from SQL code

You can insert SQL code to create your entities automatically. Once you've inserted the code and generated the entities on the drawing canvas, all you need to do is draw the connectors between them to show their relationships. This is useful for modelling existing relational database systems.

Insert SQL code then click Insert to create an ER diagram automatically Entity shapes are automatically created based on your SQL code