
Mermaid in draw.io updated to support ELK layout

· 6 min read
draw.io
draw.io Team

Mermaid is a text-based syntax that you can use to describe a diagram, and automatically lay it out neatly on the diagram canvas. Enter your Mermaid diagram description in draw.io via Arrange > Insert > Mermaid in the draw.io menu or + > Mermaid from the toolbar. draw.io has updated to Mermaid version 10.9.1 to support the new ELK automatic layout.
Tell the Mermaid diagram generation tool to use the ELK layout option in your text diagram description

Text to diagram tools in draw.io

There are several text-to-diagram tools built into draw.io:

Paste the Mermaid syntax text version of your diagram and Insert it onto the draw.io canvas An example Gantt chart inserted from Mermaid code
Example Gantt chart generated from Mermaid syntax

Some of these text-to-diagram features generate a diagram as an image on the drawing canvas, and some use draw.io shapes to automatically layout your diagram and let you continue adding draw.io shapes and connectors to it.

You can choose your preferred output when you generate a diagram from Mermaid syntax, although some diagram types - like the Gantt chart above - will only generate to an image.

Insert a Mermaid diagram in draw.io

An example coffee machine debugging flow is described in Mermaid syntax below.

graph TD
A(Coffee machine <br />not working) --> B{Machine has power?}
B -->|No| H(Plug in and turn on)
B -->|Yes| C{Out of beans or water?} -->|Yes| G(Refill beans and water)
C -->|No| D{Filter warning?} -->|Yes| I(Replace or clean filter)
D -->|No| F(Send for repair)

Add this Mermaid diagram to draw.io.

  1. Select Arrange > Insert > Mermaid from the menu or + > Mermaid from the toolbar if you are using the Simple mode or the Sketch editor theme.
    Click Arrange /> Insert > Mermaid to create a diagram from Mermaid Markdown-inspired code
  2. Enter the text description of your diagram using Mermaid syntax in the large text box.
  3. From the drop-down list, select whether you want to insert the diagram with draw.io shapes (Diagram), or as a single image (Image), and click Insert.
    Paste the text in Mermaid syntax, then click Insert

Diagram (default): When you insert the Mermaid diagram using the draw.io shapes, you can connect additional shapes and connectors and style your diagram. To change the original Mermaid syntax, first delete the previously inserted shapes, and re-enter the Mermaid description of your diagram by repeating the steps above.
By default, Mermaid diagrams are added to the drawing canvas with draw.io shapes so you can style and add to your diagram as needed

Image: To generate the Mermaid diagram as a single SVG image on the drawing canvas instead, select Image from the drop-down list before you Insert. If you hover over the SVG image, the Mermaid syntax is visible in the tooltip. Note that you can't edit or style the individual shapes or connectors in this SVG image version.
Hover over a Mermaid diagram image in draw.io to see the Mermaid syntax for that diagram in a tooltip

To change a Mermaid diagram added as an image, double click on the SVG on the drawing canvas and edit the Mermaid syntax to regenerate the image.

Please refer to the Mermaid documentation for the complete syntax and styling options.

New ELK layouts for large flowcharts

The new ELK layout option, introduced in Mermaid version 9.4, can generate compacter versions of large and complex flowcharts.

Add the following renderer directive to the top your Mermaid diagram text description:

%%{init: {"flowchart": {"defaultRenderer": "elk"}} }%%

For example, to layout the example Mermaid graph shown above with the ELK renderer command, the insert Mermaid dialog looks as follows.
Tell the Mermaid diagram generation tool to use the ELK layout option in your text diagram description

Click Insert, and the Mermaid diagram will be generated ad drawn with draw.io shapes.
The ELK layout may be more suited for larger and more complex flows

While this example is small and simple, larger flows with complex decisions and many branches may be displayed better using this ELK renderer option.

Note: As this is an experimental feature from the Mermaid developers, it currently only supports the flowchart layout.

Large Mermaid flowchart with and without ELK

Below, one of the more complex draw.io flowchart templates has described in text using Mermaid syntax and inserted as an image. The more compact version on the left used the new ELK renderer directive, and the one on the right did not.

The ELK layout may be more suited for larger and more complex flows

With the ELK renderer directive, the Mermaid code for this flowchart looks as follows.

%%{init: {"flowchart": {"defaultRenderer": "elk"}} }%%

graph TD
A[\Replenish Value Add stock/] --->C
B(Order product with Value Add) --->C
C{Frequent process?} --->|Yes|D
C --->|No|F
D{New template?} --->|Yes|E
D --->|No|G
E(Create work order template) --->G
F(Create work order) --->H
G(Copy template to work order) --->I
H(Add materials to work order processes) --->J
I(Adjust material quantities) --->J
J(Monitor work orders) --->K
K{Material quantities in stock?} --->|No|L
K --->|Yes|M
L(Procure materials) --->M
M(Change status to In Progress) --->N
N{External Vendor to perform step?} --->|Yes|O
N --->|No|P
O(Add vendor costs) --->Q
P[\Perform work order step/] --->R
Q([Ship materials to Vendor]) --->S --->X
R{Additional processing required?} --->|Yes|N
R--->|No|T
S[\Perform work order step/] --->U
T(Receive final stock) --->V
U(Receive product from vendor) --->W
V(Ship product on order) --->Y
W{Partial quantity received?} --->|Yes|X
W --->|No|Z
X[Create work order backorder] ---> J
Y(Change status to complete) --->AA
Z(Pay vendor invoice) --->R
AA([Finish])

Privacy policy updates

· 3 min read
draw.io
draw.io Team

Data security and privacy are central to our draw.io diagramming tool - using our application platform, your diagram data storage means saving and loading is direct between your browser and whichever location your choose to save your diagram file. We don't allow your diagram data to be stored on our servers.

We take the same privacy and security focused approach to non-diagram data too here at JGraph - we don't use cookies or tracking pixels on our website.

Of course, if you contact us here at JGraph for support via GitHub, Google Groups, or one of our social channels, we will have your contact details - necessary to resolve your query.

In our updated privacy policy, we have now clarified that we will not send you any marketing communication using your details or data. We will also not share your personal data with any third-party company for marketing purposes.

Note: The draw.io app listings in the Atlassian Marketplace for Confluence and Jira are managed by Seibert Group GmbH, and therefore are governed by their privacy policy.

Use draw.io Desktop to diagram offline

Our draw.io desktop app runs fully offline on your local device, and your diagram data stays on your local device. The only external communications from the software are to check for application updates.

draw.io runs on Windows, macOS and Linux - download the draw.io Desktop installer for your operating system.

Configure data transmission lockdown

Set "lockdown": true in the editor configuration. Lockdown options only apply to cloud-based draw.io versions.

This will disable data transmission apart from directly between your browser where you are editing your diagram, and the cloud platform or location you have chosen to store the diagram file.

  1. In the online version of draw.io at app.diagrams.net, select Extras > Configuration in classic mode, ... > Settings > Configuration in Simple mode or the Sketch editor theme to open the configuration.
  2. Enter the "lockdown": true JSON string and click Apply.

In the draw.io app for Confluence Cloud (advanced edition only), go to the administration area, then the draw.io Configuration tab. Add "lockdown": true to the UI Configuration, and click Save changes.
Configure draw.io for Confluence Cloud to lock down your diagram data to match your Atlassian data residency settings

Note: There are few functions that use the draw.io servers to perform operations that browsers are not capable of, including to generate a PDF version of your diagram, and import a diagram file in .gliffy format. These functions won't be available if you lockdown data transmission.

Learn more about configuring the draw.io diagram editor

Collaborative editing in draw.io in Confluence DC

· 4 min read
draw.io
draw.io Team

Collaborative editing has long been possible in draw.io for Confluence Cloud. From the draw.io for Confluence DC release 13.0, you and your team will be able to edit the same diagram and see each other's changes.
Collaborative editing is available in draw.io for Confluence DC (version 8.x)

Collaborative editing works in both the draw.io Diagram macro and the draw.io Board macro in Confluence DC. Note the collaboration isn't real-time, we need to ensure a slower update rate is stable and causes no performance issues in the first release.

Real-time multi-user diagramming

Just like in draw.io for Confluence Cloud, the new collaborative editing feature in draw.io for Confluence DC uses the built-in auto-save feature.

  1. When you make a change to a draw.io diagram - add, style, or delete shapes, text and connectors, the diagram will be automatically saved to the Confluence page attachments.
  2. The draw.io diagram editor regularly polls the Confluence DC instance to see if any changes were made by other users, then loads these changes into your editor.

You don't need to manually save or synchronise the diagrams - changes will automatically appear in the draw.io editor for everyone editing the diagram.

No shared cursors?

As Confluence DC is not a cloud service with web sockets, there is no way to share and synchronise users' cursors as they work inside the diagram editor.

You can still make gestures on the diagram with the freehand brush to discuss a draw.io diagram in online meetings with your team - the freehand shape will appear in the other users' draw.io editor shortly after you draw it.

Collaborative editing is available in draw.io for Confluence DC (version 8.x)

Changes are merged from multiple users

If several users add shapes to the same location on a diagram, draw.io will take all those shapes and simply overlap them.

If one user adds and connects a new shape to an existing shape, but another user deletes the existing shape, both user's changes are saved:

  • The child shape will appear to stand alone as its parent was deleted.
  • The existing parent shape and any connectors from it to new shapes added by other users will be deleted.

This is the same process followed by the collaborative editing function in draw.io for Confluence Cloud.

Because draw.io merges all the changes made to a diagram, and does not overwrite the attachment with the most recent saved state from one user, you won't lose any data when you are editing a diagram as a team.

Change the synchronisation speed and auto-save interval

If your Confluence DC users find that changes appear in diagrams they are editing together too slowly, an administrator can increase the polling speed in the draw.io app configuration, by specifying the number of seconds between each poll in the Add-on Configuration field.

Also, you can shorten the time between auto-saving the diagram. A shorter interval will mean more attachment versions of diagrams will be created and added to a Confluence page.

  1. Go to the administration area of your Confluence DC instance.
  2. Go to the Configuration tab in the draw.io Add-on Configuration section.
  3. Add the following lines to the Add-on Configuration text field: pollingInterval=10000 and maxAutosaveDelay=5000
  4. Click Save changes to update the draw.io configuration.
    Set a faster polling interval for collaborative editing in Confluence DC 8.x via the app configuration in your Confluence administration

In the example above, we have set the polling interval to 10 seconds (which is 10,000 milliseconds).

Note: If you collaborate on extremely large and complex diagrams, you may need to set a longer polling interval.

See how to configure the draw.io editor for Confluence DC

High contrast mode in draw.io

· 4 min read
draw.io
draw.io Team

The new high contrast mode is available in draw.io: High Contrast makes the editor interface easier to read without adjusting your monitor's contrast settings, similar to the accessibility options in your operating system.
High contrast simplifies the draw.io editor interface so that it is easier to read, and improve contrast updates the colours in dark mode to make diagrams easier to see on a dark background

High contrast mode simplifies and removes non-essential backgrounds and increases the definition between interface elements by adding clear outlines. You may find it is easier to read text and it can reduce eye strain.

High Contrast mode

Choose Settings > Appearance > High Contrast from the draw.io menu.

When you enable high contrast modes or themes in your operating system, the range of colours in the interface is reduced and visual elements are simplified. Panels, tools, buttons, and toolbars have simpler backgrounds (white in light mode, black in dark mode), with a clear outline to better separate the various parts of the application's interface.

In the draw.io editor, High Contrast mode works in the same way.

  • Panel backgrounds are simplified to off-white (light mode) or nearly black (dark mode).
  • Text labels, shapes, and tools that were previously grey are clearer - black (light mode) or white (dark mode).
  • Strong contrasting outlines are added around buttons, between the shape libraries, around the format panel tabs and other elements in the editor interface: a crisp white outline in dark mode, and a black outline in light mode.

The default dark mode is on the left in the screenshot below, and High Contrast mode on the right.
High contrast works on all of the draw.io editor themes and in both dark and light mode

High contrast mode works with all draw.io themes in both dark and light mode, including the Sketch online whiteboard theme.
High contrast works on all of the draw.io editor themes

Better colours for dark mode

Dark mode is often used to reduce eye strain - with draw.io you can diagram in dark mode using any of our editor themes (click the sun/moon icon in the top right and select the mode you want to use. Alternatively, select Settings > Appearance > Dark Mode from the menu).

A while back, we updated colours automatically change when working with draw.io in dark mode, but continue to use the light mode palette as the default. When you switch to dark mode, by default, shapes, connectors and text change intensity to ensure an improved contrast that remains readable.

  • To disable adaptive colours for light and dark mode, make sure nothing is selected in your diagram, then in the document Style tab of the format panel, set Adaptive Colors to None. (Also available in the Classic mode menu via Extras > Adaptive Colors).
    Set Adaptive Colors to none if you don't want your diagram to automatically change colours in dark and light modes

  • If you want only the black and white parts of your diagram to invert in dark or light mode, set Adaptive Colors to Simple.

  • If you want to choose specific dark mode colours for shapes, connectors and text instead of using an automatic adaptive colour, add the dark mode colour for that shape in the colour palette under Advanced.

Note: draw.io Desktop uses the original simple adaptive colours. Set Adaptive colour

draw.io in Confluence DC - full version support and regular updates

· 5 min read
draw.io
draw.io Team

The draw.io app for Confluence Data Center provides you with a secure and fully featured diagramming tool for visual documentation, along with a simpler whiteboard macro that also includes everything you need to draw complex technical diagrams.

Works on all supported DC versions

draw.io works on all supported versions of Confluence Data Center, 7.x and later.

Regular updates are released for all supported DC versions, such as updated technical icon sets (shape libraries), new and improved features, and of course bug fixes and optimisations.
The draw.io desktop app has all the same shape libraries and tools as draw.io in Confluence DC - collaborate securely with your external partners using our offline app

Focused on security

While many organisations have opted to move to Confluence Cloud now that Confluence Server has reached its end of life, you may have found that Confluence Data Center is a better fit for your needs, especially if you are in a regulated industry like finance or healthcare.

draw.io is engineered differently to other diagramming apps - we take data security seriously so you can keep your diagram data secure. We participate in Atlassian's bug bounty program and release regular updates for all supported versions of Data Center.

Secure desktop app for external partners

When you do need to collaborate confidentially with external partners, your partners can edit draw.io diagram files securely with the free draw.io desktop app, which keeps the diagram data isolated on their computer. The desktop app has the same shape libraries, templates, and tools, and is designed to work fully offline on Windows, macOS and Linux.
The draw.io desktop app has all the same shape libraries and tools as draw.io in Confluence DC - collaborate securely with your external partners using our offline app

Technical diagrams plus an online whiteboard

draw.io has a wide range of shape libraries with up-to-date icon sets, and a large collection of templates for many different types of technical diagrams.

Even when using the simple draw.io board macro in Confluence, you have access to all the shape libraries, features, and tools. You can use draw.io in meetings and for brainstorming, as well as to document your complex infrastructures and business procedures in great detail.
Access all the technical diagramming shape libraries, templates and tools via + in the toolbar in the draw.io macro for Confluence DC

Migration and import tools

If you choose at some point to migrate to Cloud from DC/Server, to maintain diagram links and embedded diagrams we recommend using the PageID export/import method, now that Atlassian supports 'mass permission change'.

You may find the new draw.io migration tool more convenient to use in your old DC instance, but it may have issues if you rename pages during the migration process.
Start the Confluence DC/Server to Cloud migration preparation for draw.io diagrams in the administration area via draw.io add-on /> Configuration > Cloud Migration

draw.io makes it easy to migrate and import from other diagramming tools in Confluence DC.

Configure the diagram editor and draw.io settings

As an administrator, you can configure the draw.io backend in Confluence Data Center via the app administration and set up custom diagram templates and shape libraries.

If your technical diagramming team always use a set palette of colours or shape styles, you can also configure this for everyone in your instance.
Configure default colours and styles in the draw.io configuration in Confluence Data Center for all users in your instance

draw.io is sponsoring FOSDEM 2024

· 2 min read
draw.io
draw.io Team

We are proud to be be once again sponsoring the popular FOSDEM two-day event for open source software, held at the Université Libre de Bruxelles Solbosch Campus in Brussels, Belgium on 3-4 February 2024. There is no registration and the event is free to attend.

draw.io is sponsoring the FOSDEM'24 conference for open source developers

FOSDEM is organised by a large team of volunteers, and provides a space for open source software developers and users to meet, share ideas, and collaborate on open source projects.

If you would like to join a developer room at FOSDEM'24, keep an eye on list of developers that will be calling for participation shortly and the FOSDEM'24 schedule as speakers and projects are confirmed.

FOSDEM: hundreds of open source speakers and events

With well over 5000 developers and speakers attending from all over the world, it’s easily one of the largest events for open source projects.

As usual, there will be a wide variety of presentations by speakers across several tracks, along with keynotes, developer rooms and hacking sessions, lightning talks, project stands with demos and merchandise, and open discussions. You can attend as few or as many activities as you like for free - just turn up on the day.

Unlike previous events, no certification exams are planned for this year. There will be an area for recruiting and job opportunities for open source positions, and several related fringe events that you may be interested in attending.

Open source diagramming

We greatly appreciate our open source community of developers, bug reporters, translators, contributors and sponsors, as well as the developers of the open source projects that we sponsor directly.

As one of the world’s most widely used browser-based diagramming applications, draw.io can be used online, as a desktop app, deployed locally in a variety of formats. Plus, there is an increasing number of third-party integrations, where developers have embedded our open-source diagram editor into their content and project management tools.

Useful medical diagrams for patients

· 8 min read
draw.io
draw.io Team

Diagrams for the medical industry are often described from the perspective of an organisation or hospital, but how can the most important people in medicine - the patients - use diagrams themselves to get better treatment outcomes?
Add your name, date of birth, and the date you updated each diagram on the three labels of a plain connector

Doctors are under pressure to see as many patients as possible. Plus, it can be quite intimidating for patients during a consultation, and often impossible to describe all relevant symptoms in a way that is concise and clear.

Diagrams that present all the relevant information make life easier for both the patient and doctor.

Humans take in information faster and misunderstand less often when it is presented visually. Plus, if you diagram your medical problems, you can re-use the diagrams with other doctors - it saves you the stress of remembering all the details and explaining them in exactly the same way multiple times.

So, what type of diagrams can patients use?

Concept maps to relate symptoms

A directed graph or concept map can show at a glance which clusters of symptoms are related, and which are secondary. Such a diagram helps doctors evaluate which illnesses could be the underlying problem and find solutions for multiple symptoms.
A symptom graph noting common long covid symptoms - see it in a glance rather than a long spoken explanation

  • Use light fill colours to group related clusters of symptoms, and black text for ease of scanning and printing.
  • Use thicker connectors or shape outlines to show a stronger impact (Line in the Style tab of the format panel).
  • Use arrows or a double connector for symptoms that are triggered by other symptoms.

Concept maps to detail diagnoses

Doctors may find it more helpful to see how diagnoses are related if you are unlucky enough to have been diagnosed with several illnesses, especially where treatments can interfere with other diagnoses.
A symptom graph noting common long covid symptoms - see it in a glance rather than a long spoken explanation

Timelines and symptom cycles

To show when symptoms started and how they have progressed, or how symptoms appear to worsen or get better in cycles, a timeline or a gantt chart is ideal.
A symptom graph noting common long covid symptoms - see it in a glance rather than a long spoken explanation

You could also use such a symptom timeline to show how a medication change has impacted symptoms - important when trialling which medication has the most positive effect.

If you have a recurrent problem that requires repeated surgeries or courses of hefty medication, a visual timeline avoids having to explain a lengthy treatment history in conversation, where things are likely to be forgotten or out of order. Use a gradient fill colour to show how symptoms worsen or improve during the cycle.
Draw a cyclic timeline to show symptoms that appear on a regular schedule

You will need a few cycles of tracking and recording your symptoms to discover a pattern, but doctors say they find this type of diagram helpful for both diagnosis and treatment.

Triggers vs symptoms

There are a number of ways to visualise symptoms that are not tied to a timeline or periodic cycle. You could use a cause and effect diagram like the one below, a concept map or mind map, a cluster graph, relational graph - anything that shows how your triggering situations or substances relate to symptoms.
An Ishikawa or cause and effect diagram is well suited for diagramming triggering situations for medically significant symptoms

Take the time to record when symptoms appear and what caused them. This is increasingly important with the rise of long covid and other post viral problems, as well as for diagnosing arthritis and other autoimmune diseases, and non-specific chronic pain issues.

T-charts and Venn diagrams also let you quickly and visually sort a list of treatments, situations or medications into categories - those that improve or worsen symptoms, or have no impact.

More diagrams for patients

There are many other types of diagrams that may be useful, especially if you are attending a doctor's consultation online.

A chart of blood pressure values, or weight over time. If you use a smart blood pressure monitor, export the graph from your monitoring app as an image and drag the image onto the drawing canvas in draw.io.

Or, track it yourself directly in draw.io using a Pool shape from the Advanced shape library and the Waypoint shape (via a shape search) for each value.
Create a graph with the waypoint and pool shapes in draw.io

A labelled photograph or illustration showing exactly where the symptom occurs, or a freehand sketch. The example below uses shapes from the draw.io library (search for user) with basic shapes on top filled with the sketch style to indicate where different types of headache pain is located.
Label any illustration to visually demonstrate your symptoms

Organise and update your medical diagrams

Turnover of staff and short leaves of absence in medical clinics has increased in recent years. Which means, you will likely not see one doctor regularly. That makes it more important for you as the patient to be able to explain your medical history quickly to any new doctor - diagrams will help you do this.

Include your name, date of birth and the date you updated the diagram on each page - this helps doctors associate a health record with a patient. Use a plain connector with three labels as it is easy to copy.
Add your name, date of birth, and the date you updated each diagram on the three labels of a plain connector

More diagramming tips for patients

  • Encourage your doctors to scan these diagrams, especially if they need to review your history without you present for insurance or welfare purposes.

  • Use one multi-page diagram for your medical diagram - you won't have to hunt through files to find all the relevant information.

  • If you are dealing with inherited or genetic diseases, use the list shape in the General shape library to model a family tree of diagnosed related illnesses.
    Draw your family tree to see which conditions may have a genetic component

  • Use a table shape to record your medication schedule and allergies on one of the diagram pages.
    A table shape is an easy way to record medications and allergies

  • Export each page of your diagram to an image (PNG) to print it neatly on one neat page and include the diagram data - this will include all diagram pages, although only one will be shown in the image. You can then reopen the PNG image in draw.io later to update your multi-page diagram.
    Choose the export settings for the PNG image

New keyboard shortcuts in draw.io

· 3 min read
draw.io
draw.io Team

As new features are added to draw.io and the menu is refined, new keyboard shortcuts are also built into the editor. Here are some of the new and useful shortcuts for diagramming in draw.io.

Move selected shapes and connectors

First, select the shape you want to move, then hold Shift+Alt+drag and drag the cursor to reposition them. You can move shapes, connectors, or multiple selected shapes and connectors this way.
Press Shift+Alt and drag the cursor to move a selected shape, even if your cursor is not over that shape

This shortcut will always move the selected elements, even if they are not currently under the cursor when you drag it.

Note: When you move a connector this way, it will de-attach itself from the source and target shapes, unless they are moved with the connector.

Increase/decrease font size

Select a shape or connector or label, and press Ctrl+Shift +/- (NumPad) to increase or decrease the text size.

This only works with the + and - keys on the number pad.
Press Ctrl+Shift +/- Numpad to increase or decrease the text size of a selected shape or connector label

Alternatively, change the font size in the Text tab of the format panel.

Note: This keyboard shortcut will always change the text size of the entire label, even if you have selected only some text inside a label.

Increase/decrease shape size

Select a shape, and press Ctrl+Shift+arrow key to increase or decrease the right or lower edge of the shape. This increases or decreases the Height or Width of the shape (in the Arrange tab of the format panel).
Press Ctrl+Shift+arrow key to increase or decrease the size of the selected shape

Clear all extra waypoints on a connector

Waypoints are used in connectors to change its path. Sometimes you may want to remove all of them quickly.

Select a connector and press Alt+Shift+R to reset the waypoints back to the default path.
Press Alt+Shift+R to reset the waypoints of a selected connector

More keyboard shortcuts in draw.io

There are many other mouse + keyboard shortcut combinations in draw.io to help you diagram faster, as well as many keyboard shortcuts described in previous posts.

Next time you go through the draw.io menu, or right-click and open the context menu, check and see if there is a keyboard shortcut next to the command you want to use.
There are many keyboard shortcuts available in draw.io

Here's a one-page reference sheet that you can print out containing the most common and useful keyboard shortcuts in draw.io.

Shortcuts available in the draw.io diagramming apps

Updates to draw.io dark mode diagrams improve readability

· 5 min read
draw.io
draw.io Team

draw.io is one of very few diagram editors that lets you work in dark mode. Colours of shapes, text and connectors change automatically when you switch between light and dark modes. Now, instead of changing the hue, all colours in a diagram will remain the same hue in both modes, but their intensity will be altered to significantly improve readability in dark mode.
The new and improved dark mode makes diagrams much more readable on a dark drawing canvas after switching colour intensity automatically

Switch to dark mode in the draw.io editor

Click on the sun icon in the top right and select Dark to change to dark mode. Alternatively, from the draw.io menu select Settings > Appearance > Dark.
Click on the sun/moon in the top right and switch between any of the four editor themes and the simple mode, as well as between dark and light modes

To switch back, click on the moon icon and select Light, or Settings > Appearance > Light from the menu.

Tip: Choose Automatic if you want the editor to reflect your operating system or browser mode.

Dark mode is available in draw.io Desktop, our free online editor at app.diagrams.net, and in integrations such as the unofficial draw.io extension for VSCode, and the draw.io Chrome extension for Notion.

Dark is available in draw.io for Confluence Cloud and Jira Cloud, and diagram thumbnails and the draw.io editor will switch modes automatically when you switch between dark and light themes in Confluence or Jira.

Light and dark colours in draw.io

All colours in a diagram - shapes, text, connectors and the drawing canvas background colour - now have their intensity changed when you switch modes.

This makes sure that text that is readable and connectors that are visible in one mode, are just as legible in the other mode.

All of the style palette colours (in the Style tab of the format panel), and the global diagram styles are changed to reflect the mode you are working in.

Light mode palette colours
All the colours of the Style tab palettes and the global style in light mode in draw.io

Dark mode palette colours
All the colours of the Style tab palettes and the global style in dark mode in draw.io

Set specific colours for light and dark mode

  1. Select a shape or connector, and click on the Fill or Line colour block in the Style tab of the format panel. For text colour, select the colour block in the Text tab of the format panel.
  2. The first value (default) is for light mode. Change this to a new hex colour code.
    By default, this will automatically shift hues to remain readable when someone views or edits the diagram in dark mode.
  3. Expand Advanced and enter a hex colour code for dark mode. Now, when you are in dark mode, the shape or connector will use this defined colour value instead of an automatic shifted hue.

Exporting diagrams from dark mode

When you export a diagram to an image, you can select Dark in the Appearance list. Your diagram will be saved over a dark background in the exported image.
Make sure to leave the Dark checkbox enabled when exporting a diagram as an image from the Dark editor theme

When you export a diagram to a PDF, HTML file, draw.io file or URL, or export to a light-mode image, the diagram will be displayed on a light background with the light colour palette.

Colours in existing diagrams

It is assumed when using dark mode that all diagrams have been created in light mode. As this is by far the most common case, it will ensure the colour intensity change when switching to dark mode will be correct, and your diagram readable.

Note: The mode colour intensity change is a CSS filter - this does not change the colours in your diagram data.

Diagrams not using the right colours?

If you drew a diagram in dark mode and set specific colours to suit the dark background, when you re-open that diagram in the most recent version of the editor, the colours will not be as you originally set.

This is because the algorithm for converting light-mode colour intensity to dark mode is applied to all colours in a diagram when using dark mode. This will affect a minority of users - not many have been using dark mode exclusively to diagram.

If you want to continue using the old dark mode and your customised diagram colours, open the draw.io configuration (Settings > Configuration via the draw.io menu), add the following property, and click Apply.

{
"enableCssDarkMode": false
}


Turn off the new CSS dark mode to use the old system if you have customised colours in diagrams specifically for dark mode

Then, reload the tab or restart draw.io Desktop to load the new configuration. The colours in the diagrams you had customised for dark mode will now look as expected.

For more information, please visit the related discussion in our draw.io GitHub repository.

draw.io automatically applies your Jira Cloud theme to diagram thumbnails

· 4 min read
draw.io
draw.io Team

Atlassian has just released a dark theme for Jira Cloud for users who don't like working on light backgrounds. With Jira's new dark theme, draw.io diagram thumbnails in a Jira issue now automatically reflect your selected theme.
draw.io automatically changes the colours in your diagrams to match your Jira Cloud dark or light theme

draw.io has had a dark mode for some time, but diagrams attached to Jira issues displayed on a light background, whether or not you were using the dark mode in the draw.io editor.

Learn more about diagramming with draw.io in Jira

Diagrams on dark backgrounds

draw.io makes an intelligent guess about text and shape fill colours to keep your diagrams readable when you switch between dark and light.

As your team members can use their preferred dark or light theme, and the diagram thumbnail will match their theme, it's best to double check that your diagram is easy to read in both dark and light mode.

  1. Click on the Edit pencil in the toolbar when you hover over diagram thumbnail in a Jira issue to edit it with draw.io. If you don't see this section, click on the draw.io section at the top.
    Click on the edit button when hovering over a diagram in a Jira issue to open it in draw.io
  2. Click on the sun or moon in the top right to switch to the opposite theme - either Dark or Light_ - and check that your diagram is still readable on that background.
    Click on the sun or moon in the top right of the draw.io editor to change the editor mode to dark or light

Choose Automatic to make the draw.io editor automatically match your operating system's mode (dark mode or light mode).

Note: Switching to dark or light mode in the draw.io editor will not affect the thumbnail on the Jira issue - whether it appears on a dark or light background is based on the Jira theme that the user looking at the issue has chosen.

To use draw.io in dark mode on the web, go to app.diagrams.net/?splash=0&ui=dark, or switch modes via the sun/moon icon in the top right or via the draw.io menu.

Set specific colours in a diagram

Colours in certain types of diagrams may have specific meanings - if you change their colours when adapting to dark mode, the diagram might not make sense.

If you want your diagram to only ever be on a dark or a light background and not automatically adapt colours to match the user's Jira Cloud theme, you'll need to set a background colour, as well as a specific colours for both light and dark modes on the shapes, connectors and text in your diagram.

  1. Open the diagram from the Jira issue in the draw.io editor.
  2. Make sure nothing is selected in your diagram, then enable the Background checkbox in the Diagram tab in the format panel.
  3. Click on the colour button, select a colour from the palette or enter a colour code, and click Apply. Open the Advanced drop down and set the same colour as the dark mode background colour.
    Adding a diagram background ensures your diagram looks the same in both Jira's light and dark themes
  4. Style the shapes and connectors via the Fill and Line colours in the Style tab. Make sure you set both the light colour at the top, and the dark mode colour (under Advanced). Style all text labels via the Text tab.

Now, your diagram will use your defined colours in both dark and light mode.
Adding a diagram background ensures your diagram looks the same in both Jira's light and dark themes

Using diagrams with GitLab

· 4 min read
draw.io
draw.io Team

draw.io will be available as an integration in the web-based GitLab Wiki editor on 22 March with the GitLab 15.10 release and product kickoff. When you add your diagram to a GitLab Wiki page while editing the source of that page, it will be saved as an SVG image containing the diagram code, and displayed in the page content.

Like all files in GitLab, the image with its embedded diagram is versioned, so all changes are tracked.

Note: As this integration is still under development until release, small changes may be made.

Diagram in the GitLab Wiki editor

Add a new diagram: Click on Insert or edit diagram in the toolbar in the Markdown editor.
Add a diagram to GitLab in the Markdown editor

A blank diagram will be opened in the Sketch whiteboard-style editor theme. Use the diagramming toolbar on the left to access templates and shape libraries.
Create your diagram in the Sketch whiteboard-like editor, and save it to return to the GitLab Markdown editor

Save your diagram: It will be added to the page in Markdown as a .drawio.svg file.

Edit an existing diagram: Make sure your cursor is in the diagram file entry in the Markdown code, and select Insert or edit diagram.
Make sure the cursor is in the Markdown reference to the diagram file then edit the diagram in the GitLab Markdown editor

View a diagram in the page: Click on Preview to render the page containing the diagram.
Preview the page to see how the diagram is rendered along with the markdown text content of the GitLab Wiki page

Diagram with the GitLab rich text editor

Edit a diagram: Select the diagram, and click on Edit diagram in the hover toolbar that appears above or below.
Click on a diagram and use the hover toolbar to edit it in the GitLab rich text editor

Add a new diagram: Make sure no other diagram is selected, then click on the + in the toolbar and select Create or edit diagram.
Make sure you have not selected any diagram, click on the + in the toolbar and select Create or edit diagram to add a new diagram in the GitLab rich text editor

Save individual diagram files to GitLab

You can also store your individual diagram files in GitLab. Select GitLab as the save file destination when you create a new diagram, or select Save as from the menu.
Select GitLab as the location where you want to store your files

Alternatively go to our online editor to start diagramming now using GitLab to store your diagrams.

You'll need to authorise access to your GitLab repositories, if you haven't already done so.
Authorize GitLab to save diagram files to this location

Tip:i As draw.io uses secure direct client authorisation, your password is never shared.

Diagram in VSCode with GitLab

  1. Set up the GitLab Workflow extension for Visual Studio Code.
  2. Install Henning Dieterichs' unofficial draw.io extension for Visual Studio Code

The draw.io extension for VSCode lets you view and edit the .drawio diagram files stored in your repositories.
Use the unofficial draw.io extension for VSCode to edit .drawio files stored in a GitLab repository directly in the Visual Studio Code editor

See how this extension works in GitHub - it works in a similar way with GitLab inside VSCode.

Note: The extension only recognises files with the .drawio file extension.

Feature flag development with tags in gitflow diagrams

· 13 min read
draw.io
draw.io Team

Feature-based development and lean release cycles are becoming more common in online software services (SaaS products), where continuous development and continuous deployment are required. Feature flags give administrators and developers fine control over what features are available to which customer segments on release.
Trunk-based development with feature branches works well with feature flags on release - apply tags to shapes to visualise this in draw.io

Traditional software development

Whether you follow an agile development cycle or not, software updates and new applications contain multiple features, bug fixes and improvements. Development of these usually happens on feature branches (or individual developer branches off feature branches). Once a feature is complete, that feature branch is merged into a development (or occasionally a nightly build branch).

After all the planned features are complete and merged to the this development branch, release candidate branches are used to test builds, and then the software is finally released on the main branch, as you can see in the gitflow diagram below.

An example gitflow diagram
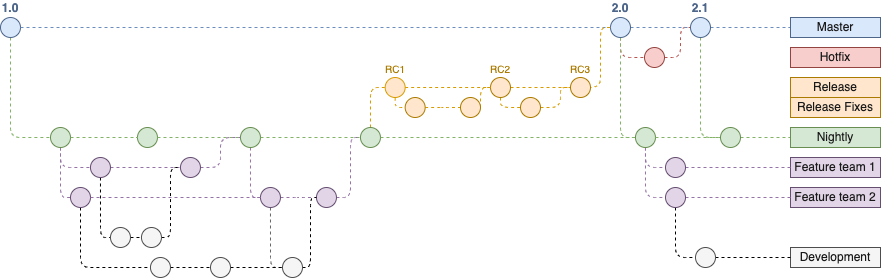
Software development gitflow template using feature branches without feature flags

Once the software is released, you can't control what features the users see - all users gain access to the same features, at the time of release. If something in the software causes a bug, that bug affects all users.

Feature flags provide fine control over released software

With feature flags and a deployment service that gives you control over updates and rollouts based on those flags, you can extend this feature-based development approach into release and deployment.

  • Release a new feature only for a target subset of your SaaS users.

  • Deploy but don't release features that aren't yet ready to test stability and prepare dependent systems.

  • Use front-end flags for UI visibility and back-end flags to control APIs and configurations.

  • Roll out an update incrementally to your user base.

  • Block certain users from accessing certain features.

  • Roll back an unstable update by disabling the problematic feature flag.

  • Release smaller updates more often and incorporate feedback faster.

Feature flags can make continuous development and continuous deployment smoother for both you and your customers.

Use feature flags with feature branches

Feature flags don't replace feature-based development branches, they extend their functionality.

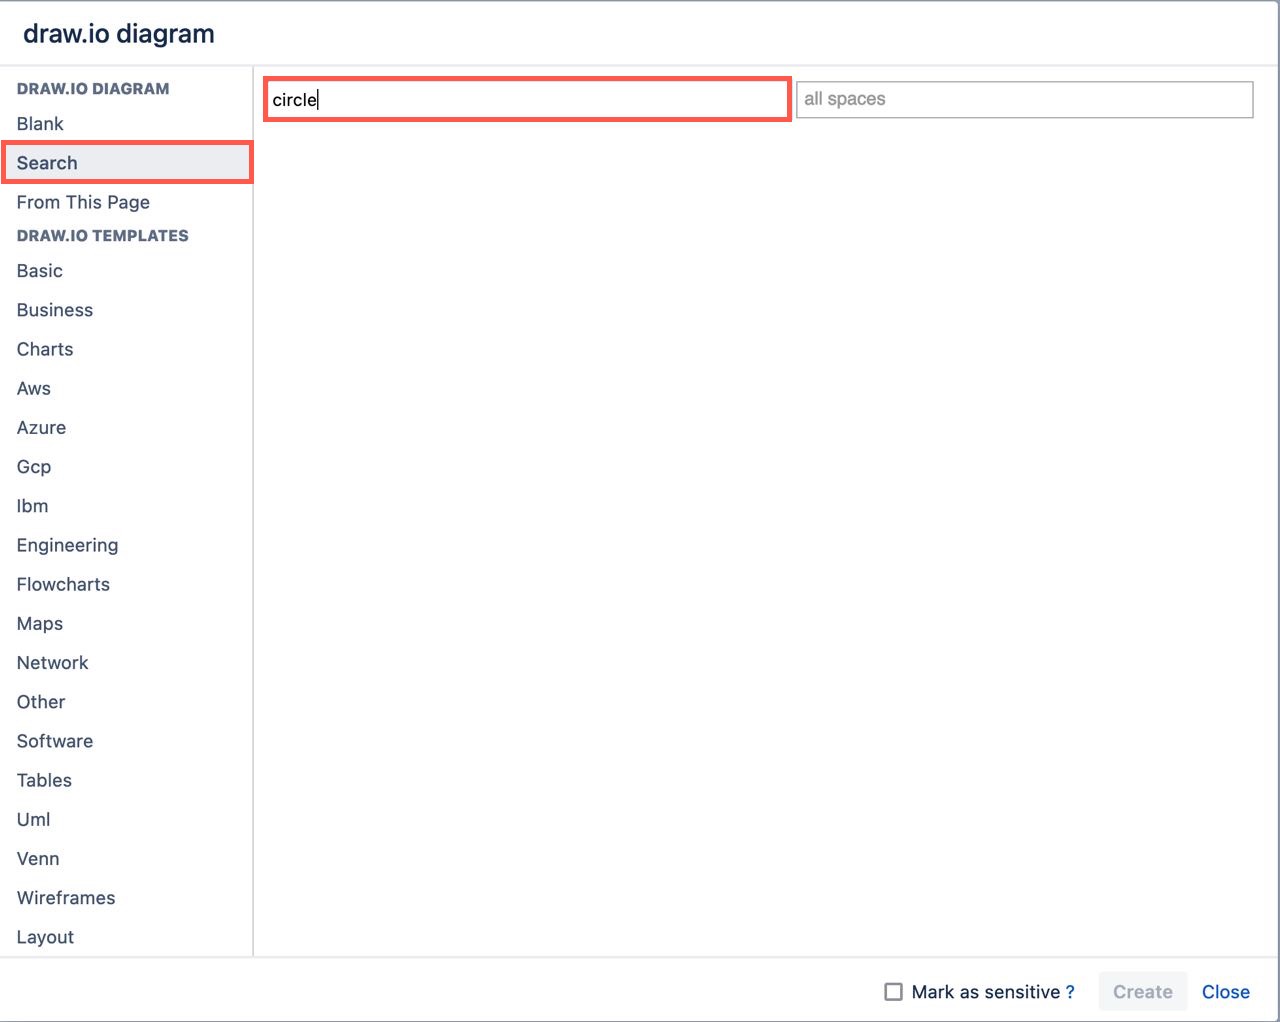
For this example, we'll modify the gitflow that we developed in our earlier post (also available as a template in draw.io).

Note: The diagram file used in this post has multiple pages - one for each method used to display feature flags in the gitflow. Open the file in the draw.io viewer and step through the pages to compare the four different methods.

Leaner trunk-based development

  • As the feature-flag based development cycle is lean with short-lived feature branches, controlled after release via flags, we'll merge directly to the main branch (or trunk).
  • Whenever a feature is merged to the main branch, open feature branches should pull those changes.

Gitflow diagrams are simple to draw and edit - they use the shapes in the General shape library with basic connectors between them. Follow the steps in our earlier post to create a gitflow that matches your branching structure.

Gitflow modified from the draw.io template for feature-based trunk development before applying feature flag tags
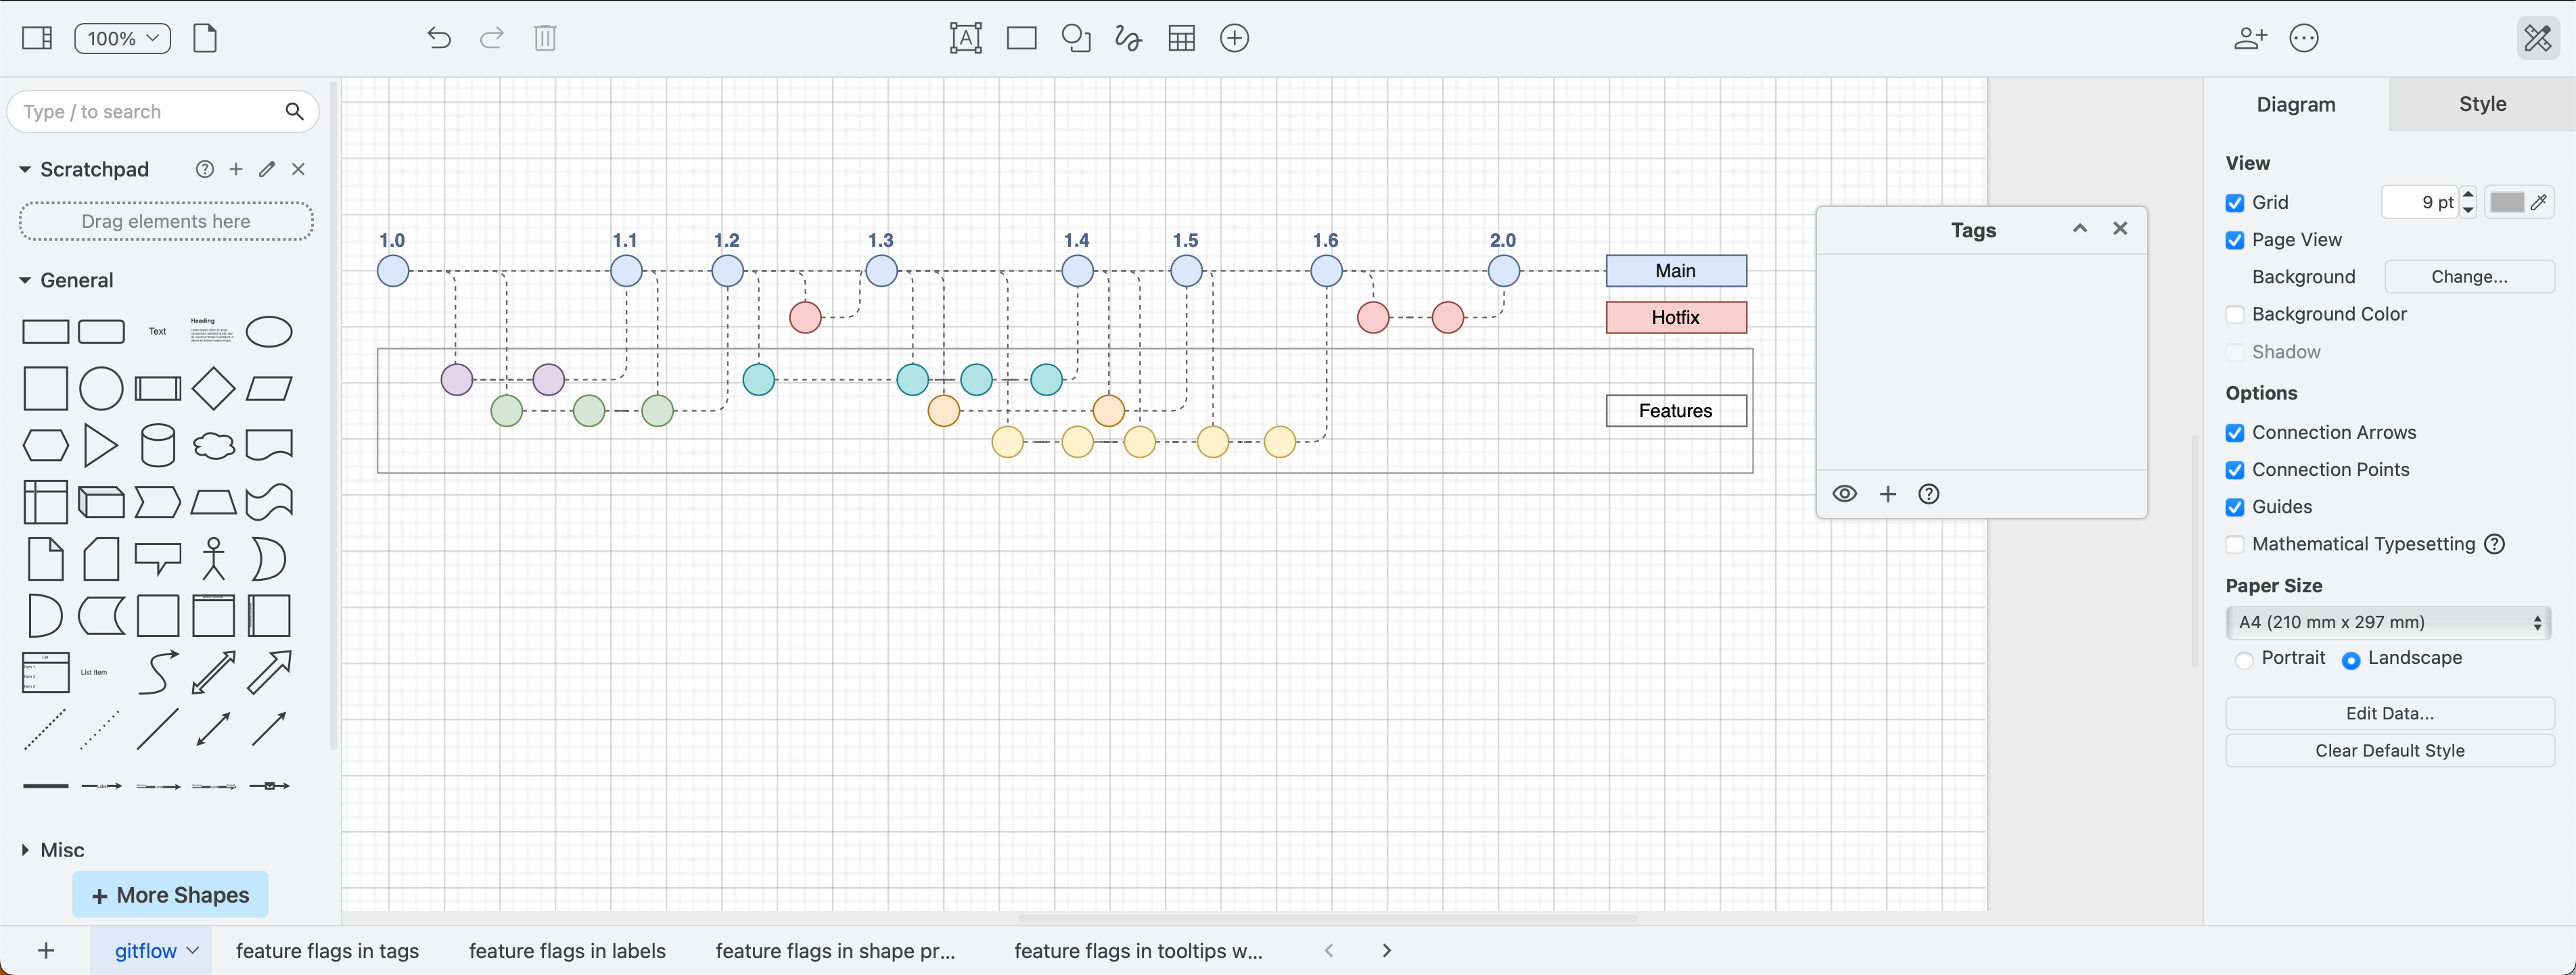
_A modified gitflow from the built-in template to show a trunk-based development structure with short-lived feature branches_

Use tags in your gitflow for feature flags

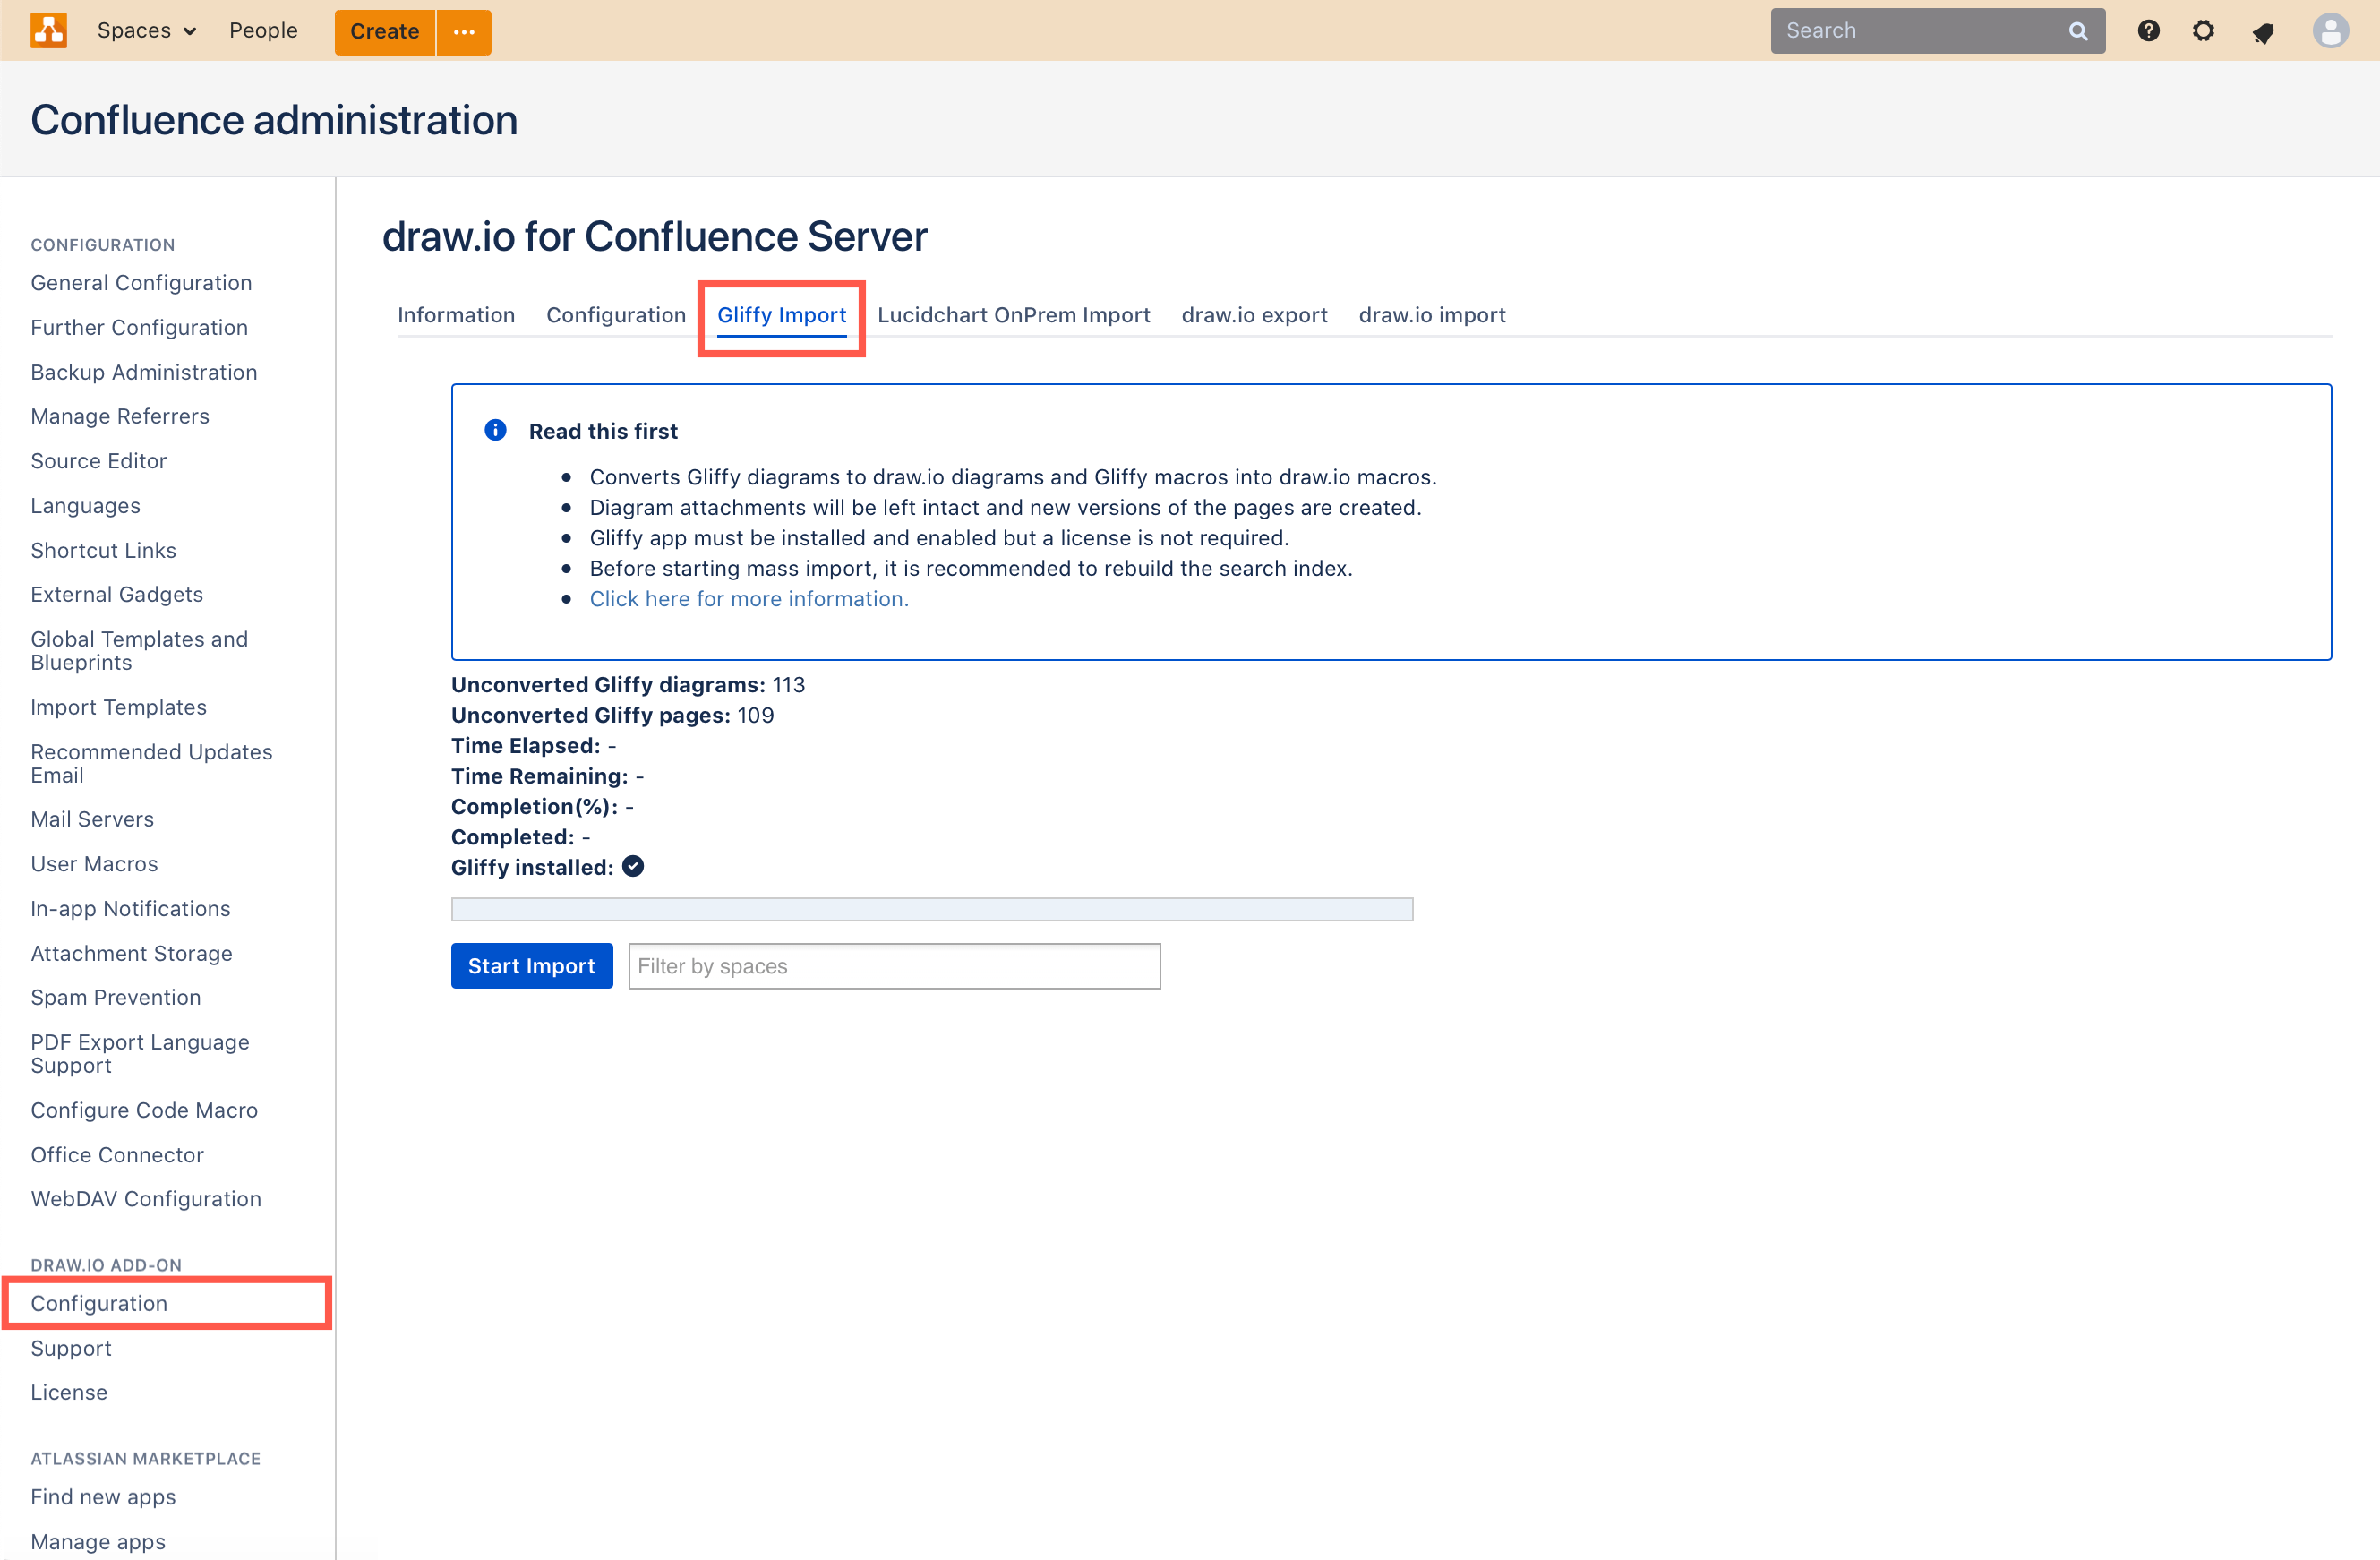
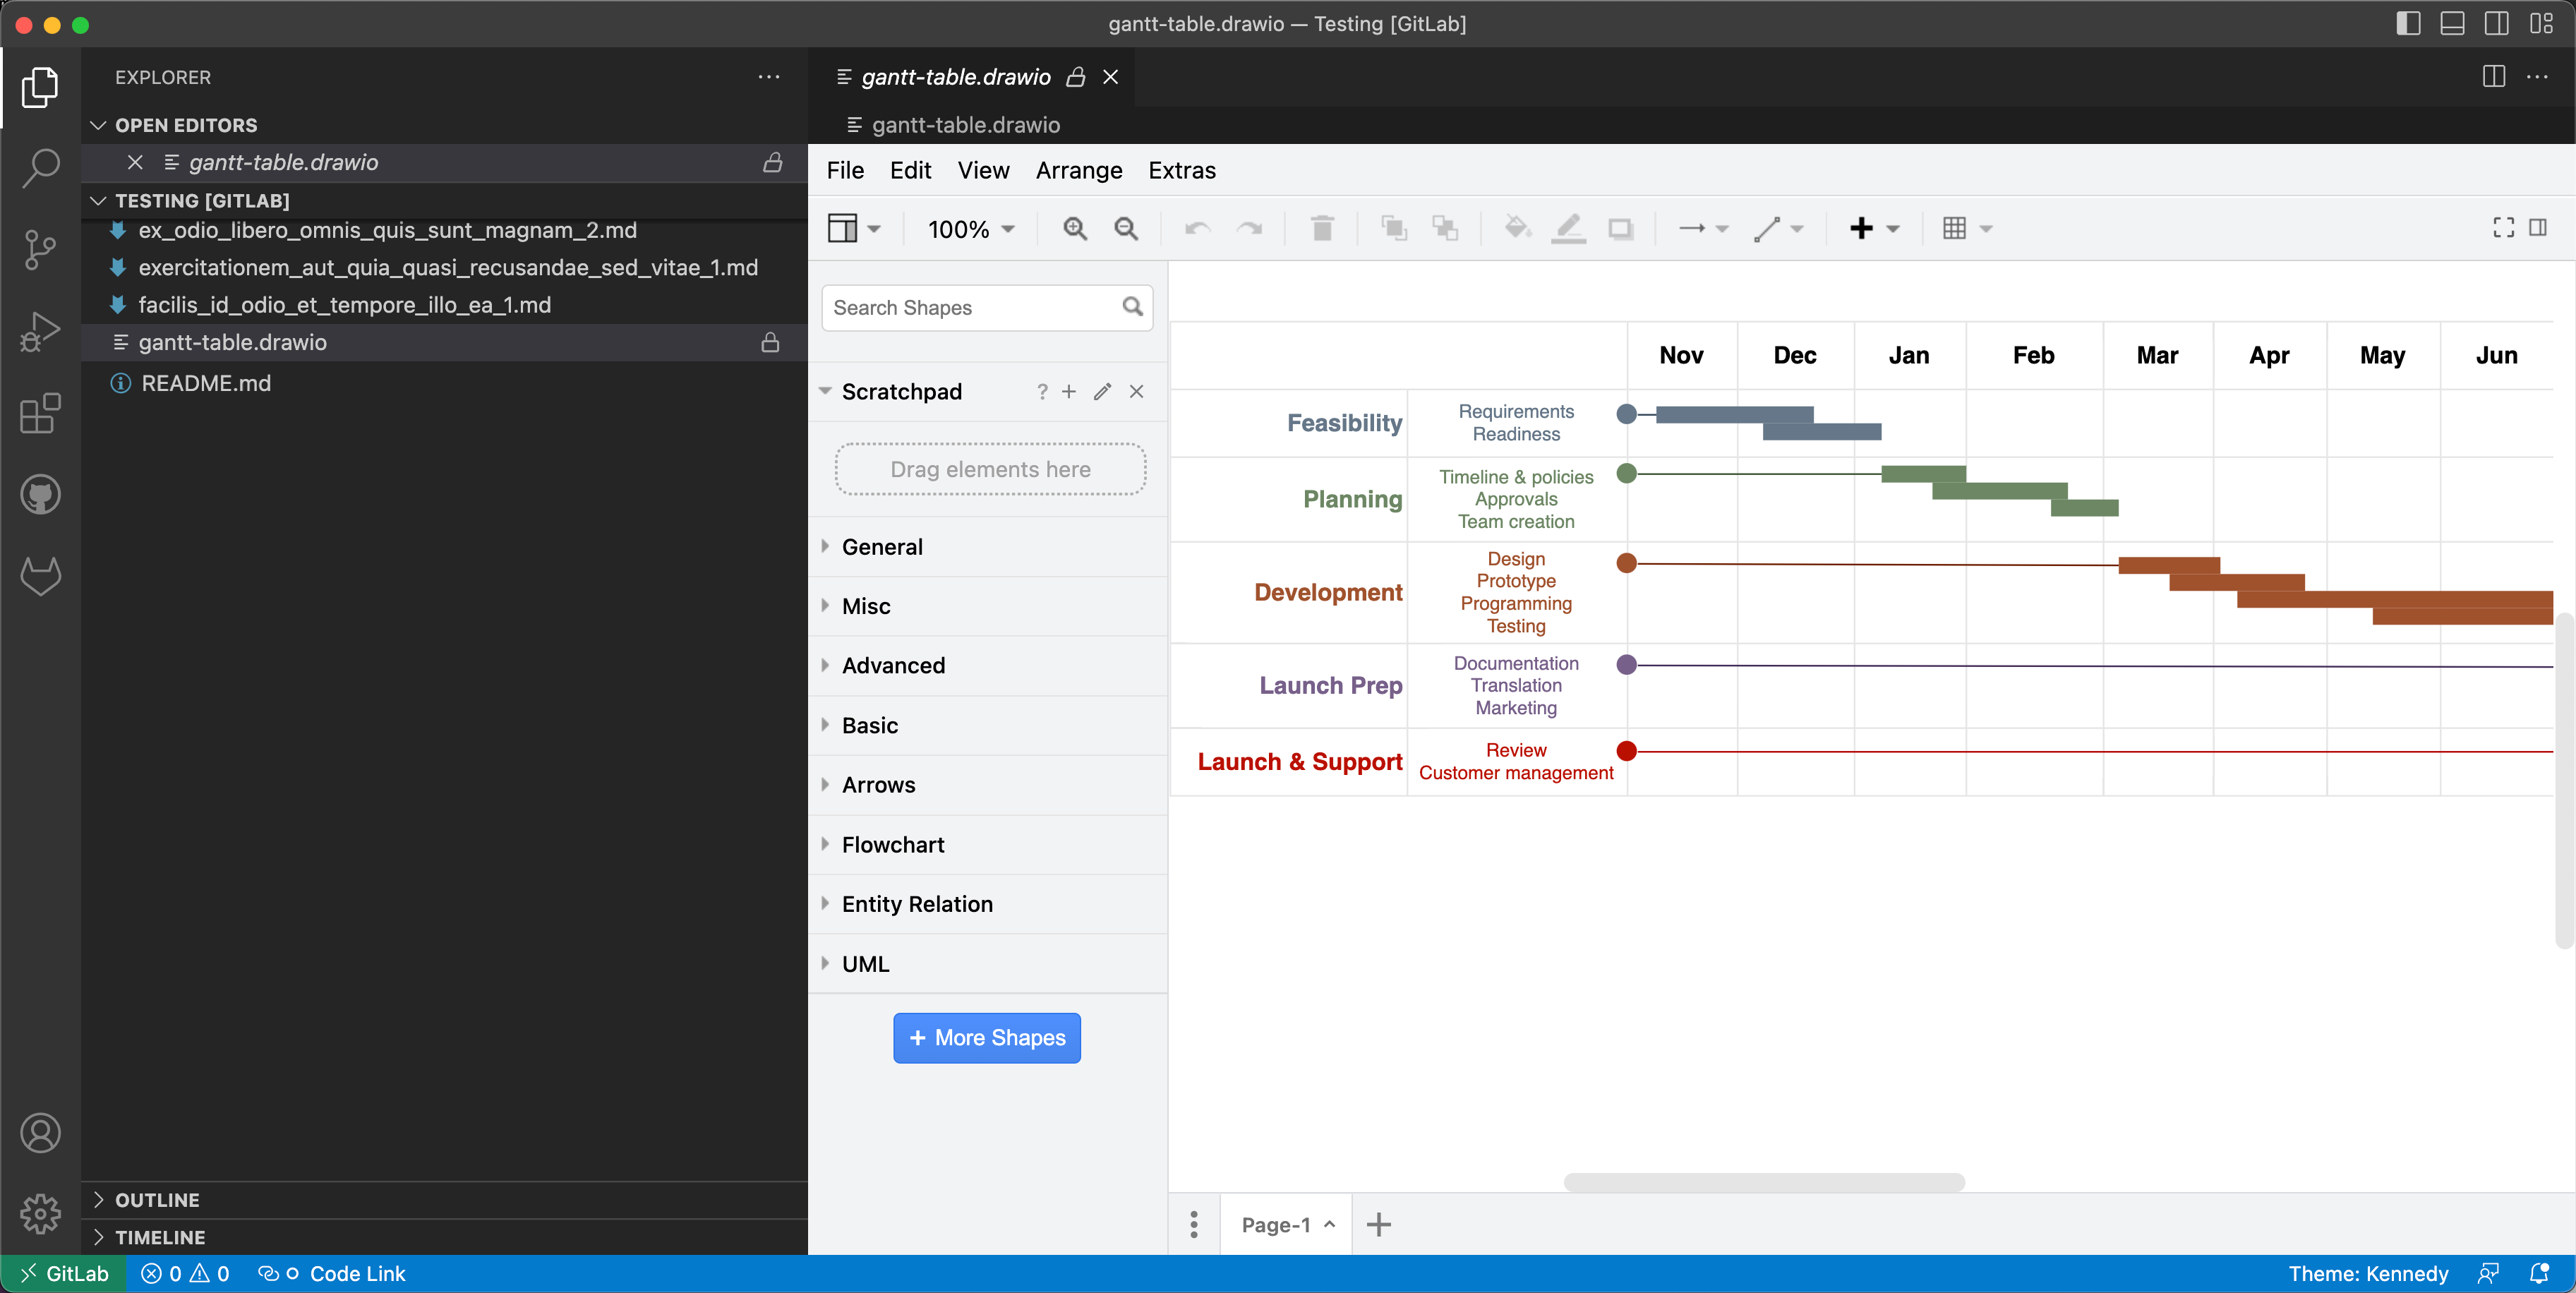
In a draw.io gitflow diagram, you can indicate feature flags in a number of ways, but the easiest is to add tags to shapes.

Tags let you hide or display tagged shapes and connectors, visualising how released software updates will appear to users when feature flags are enabled or disabled.

Add tags to shapes

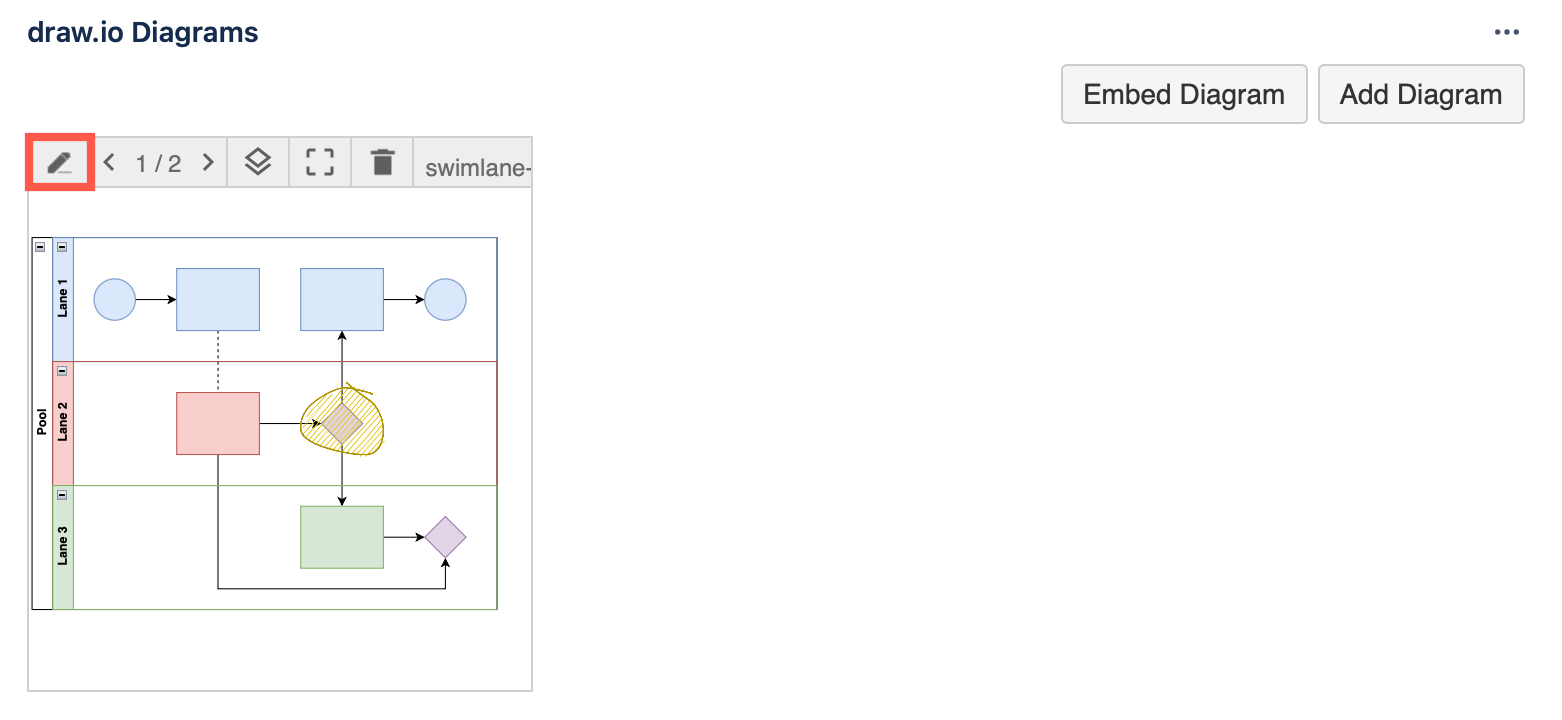
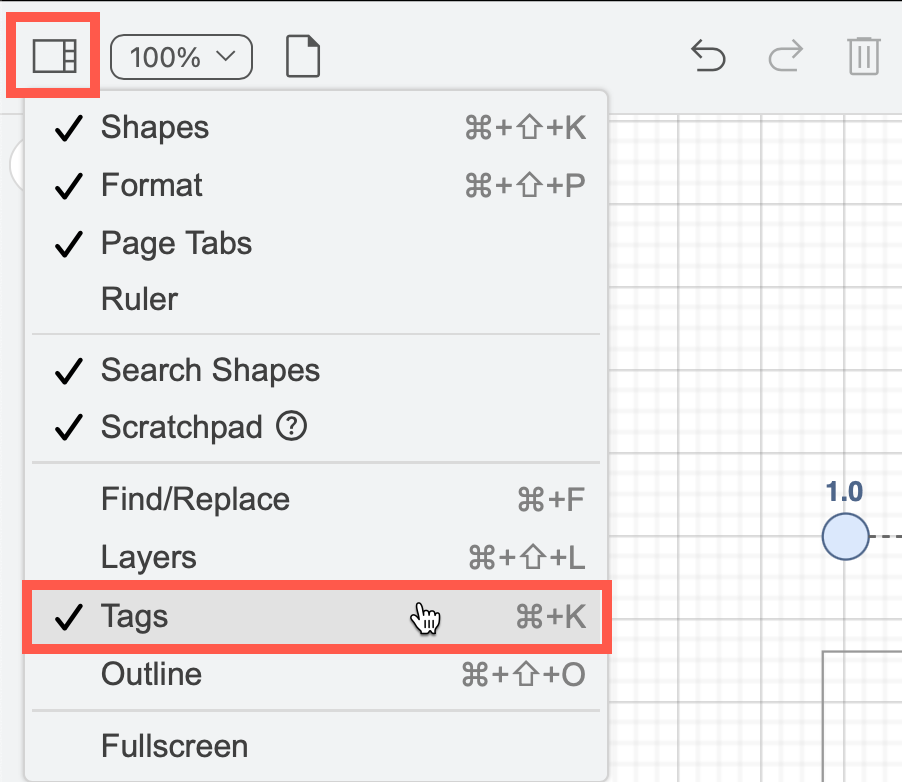
  • To open the Tags dialog, click on View in the left of the toolbar and enable Tags or press Cmd+K on macOS or Ctrl+K on Windows.
    Use the View menu on the toolbar to show the Tags dialog or press Ctrl+K/Cmd+K

  • Select the shapes and connectors you want to apply a new tag to, and click + in the Tags dialog. Enter the new tag name and press Enter.

  • Select one or more shapes, then click a checkbox to the right of an existing tag to add the tag to the selected shapes.

  • To remove a tag from a shape, select the shape, then deselect the checkbox to the right of its tag name.

Note: In this example, we've added the core tag to all trunk (main) versions to make it easier to visualise.

Gitflow with an added core feature flag to all trunk shapes in the gitflow diagram
Open this gitflow with all feature flag tags in our diagram viewer

Visualise feature flag-affected branches and releases

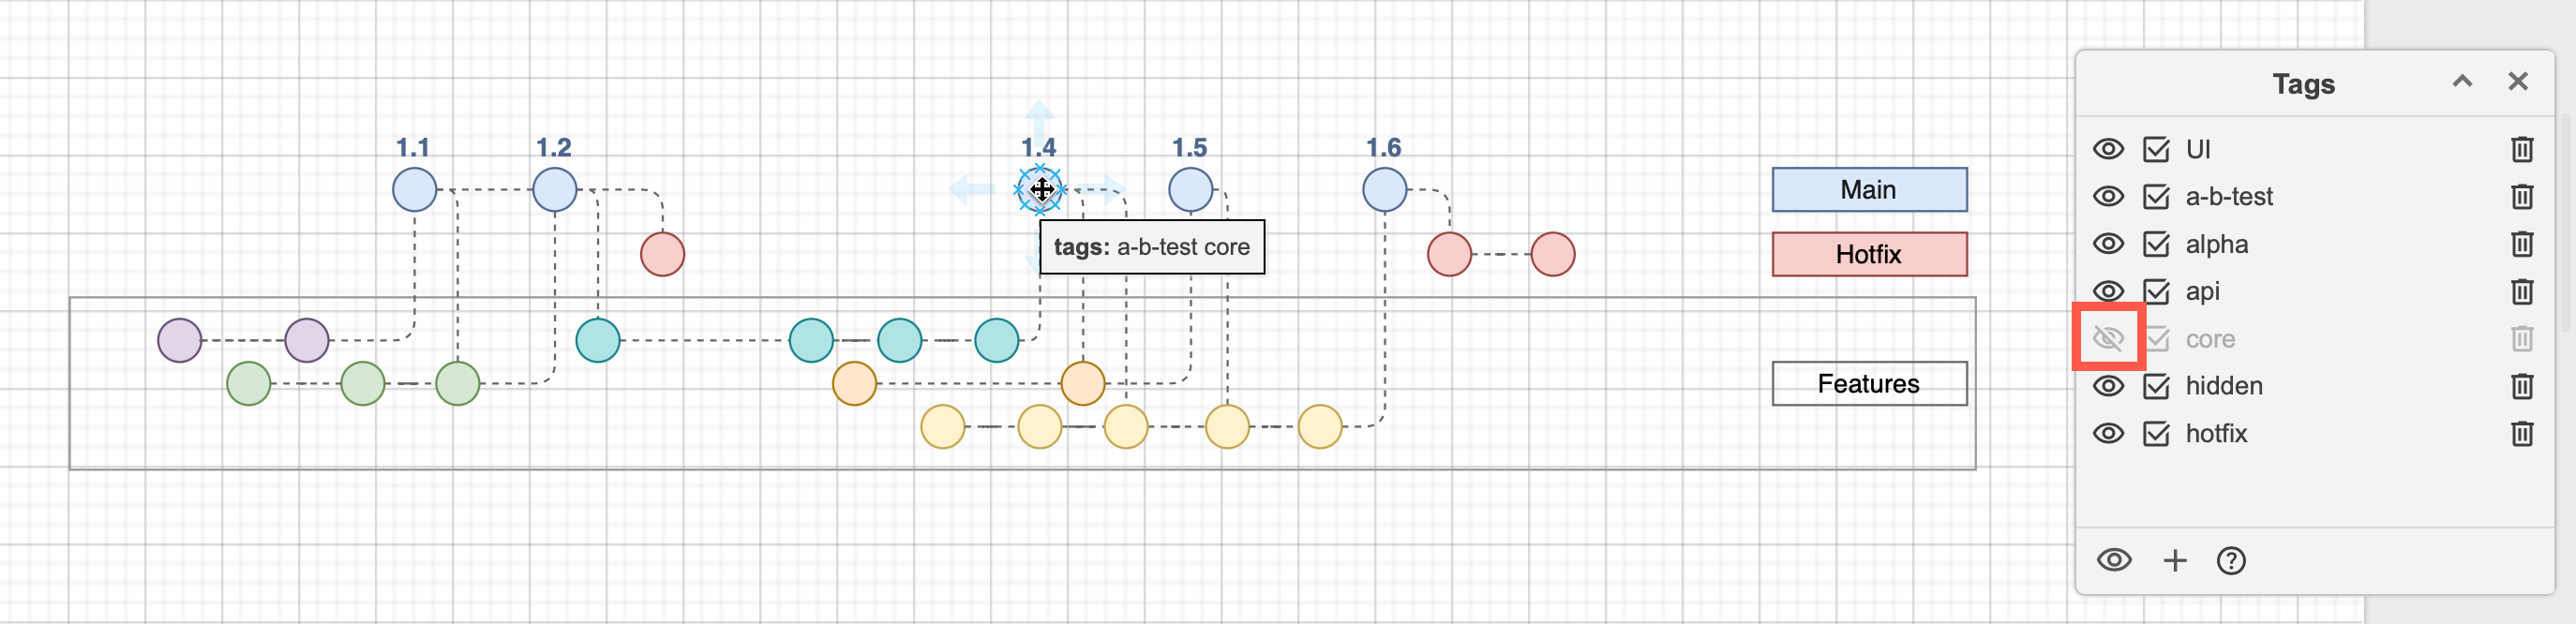
Now, with nothing selected in your diagram, click the eye symbols next to tags (feature flags) to see which feature branches and main versions they affect. If more than one flag is applied to a feature, both need to be hidden to hide those branches they affect.

For example, to see which feature branches are flagged as "api", hide all other branches. If you want to select just those shapes/connectors, click on the select checkbox next to the tag name.
Tags in draw.io let you clearly visualise which feature branches and main versions on the trunk are affected by feature flags and quickly select them

Reset to see all tagged shapes: Click the eye at the bottom of the Tags dialog to show all hidden tagged shapes.

Tips for working with tags in draw.io

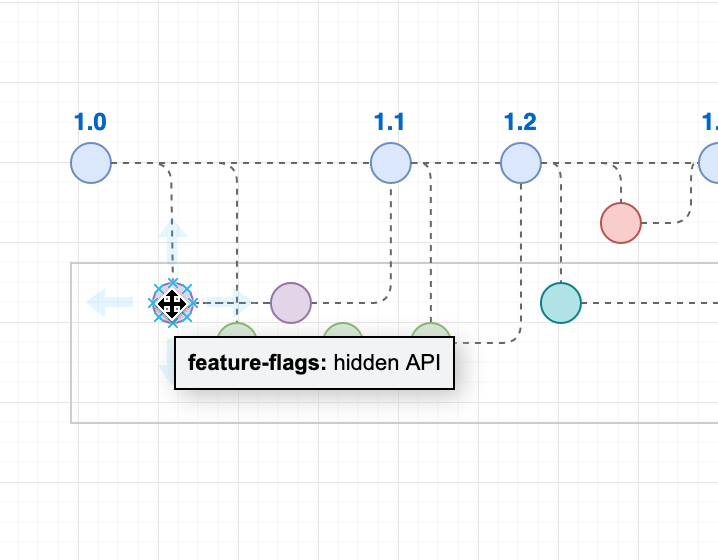
  • Hover over any shape to see their tags.
  • Note that connectors coming from or going to hidden shapes will not be displayed even if they are not tagged.
  • Hold down Shift and click on any of the eye symbols in the Tags dialog to hide or display all tags.

In our example Gitflow with feature flag tags, to see which versions on any branch have a feature flags applied, hide the core tag. The shapes that have disappeared are ones that have no feature flags - all customers will be able to see all features on those main versions.
Use an extra tag that applies to all versions on the trunk (main) branch so you can visualise which releases are not actually affected by any feature flags

Alternative methods to add feature flags to gitflows in draw.io

If you don't want the interactive visualisation of tags in the diagram editor or viewer, you could add feature flags in the following ways.


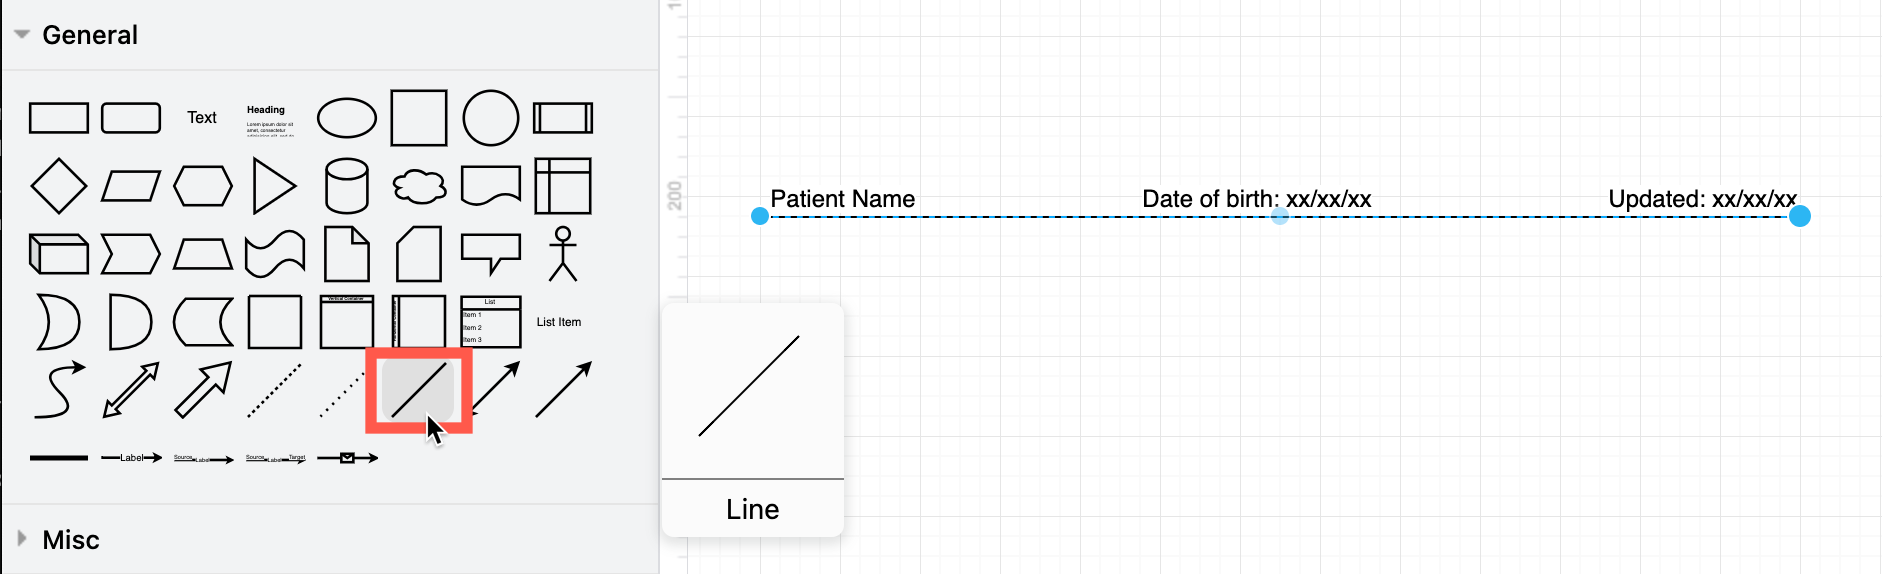
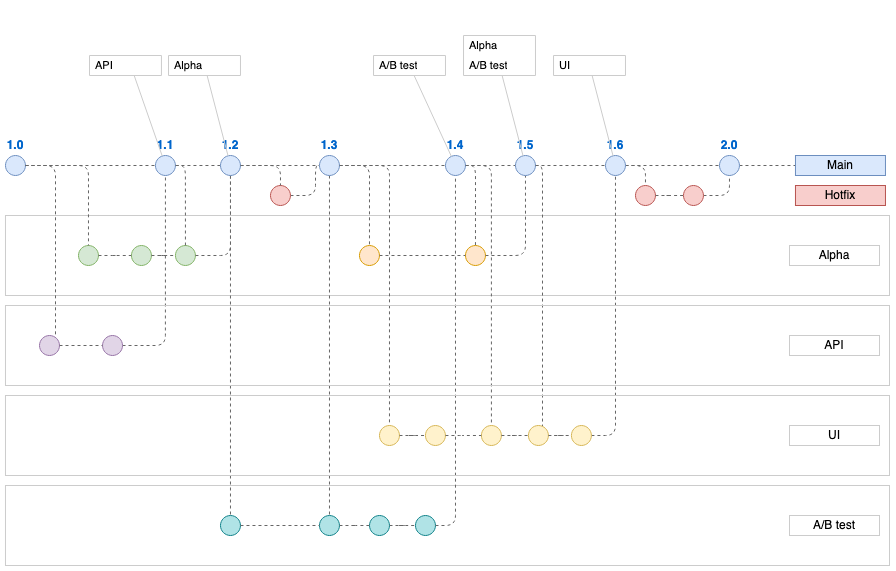
Feature flag labels on released versions

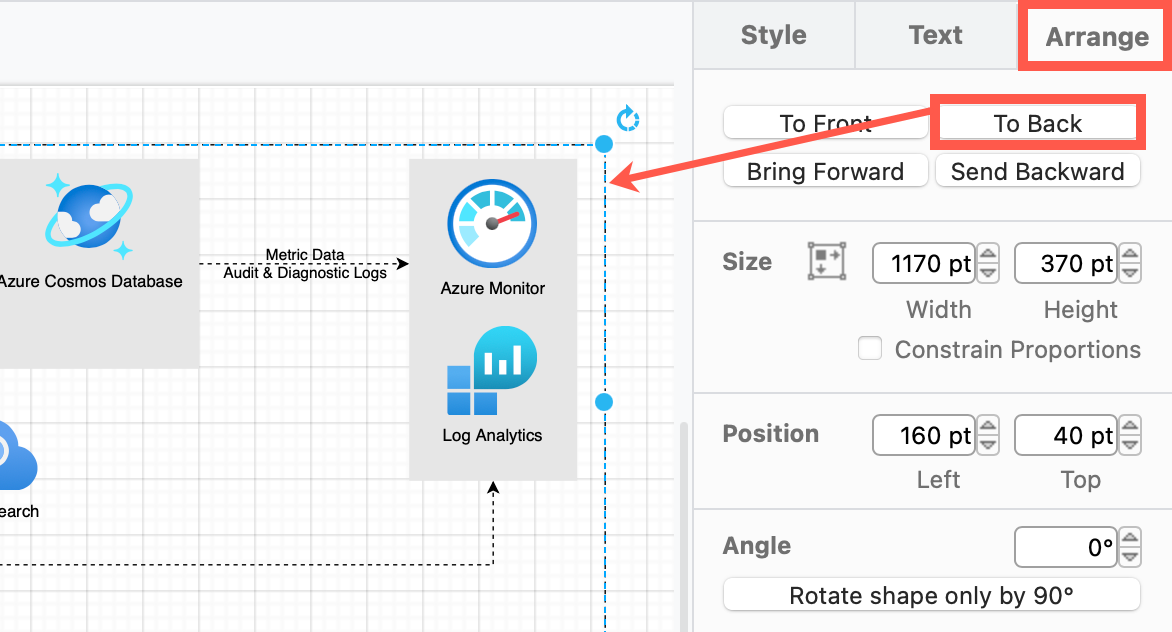
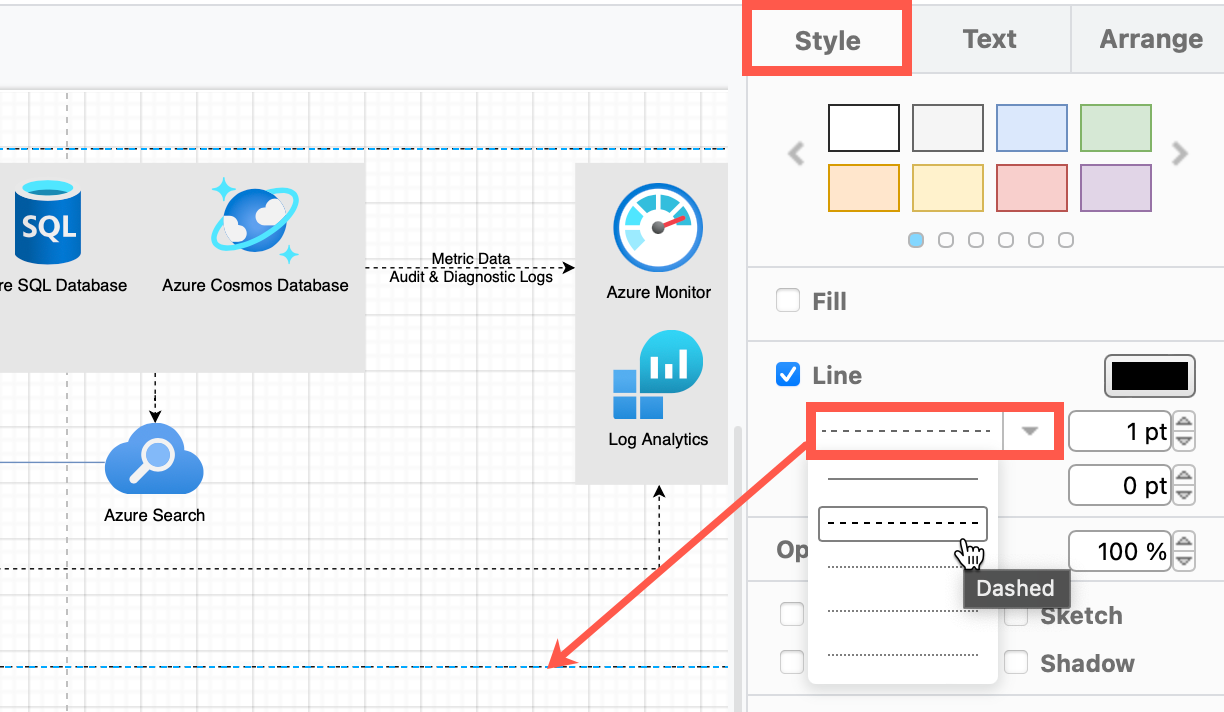
Add callouts with list shapes on the released versions to show which feature flags apply, and avoid cluttering the feature branches in the gitflow.

You could also use a list shape to list the feature flags on each main release
Open this gitflow with feature flags-labelled releases in the viewer


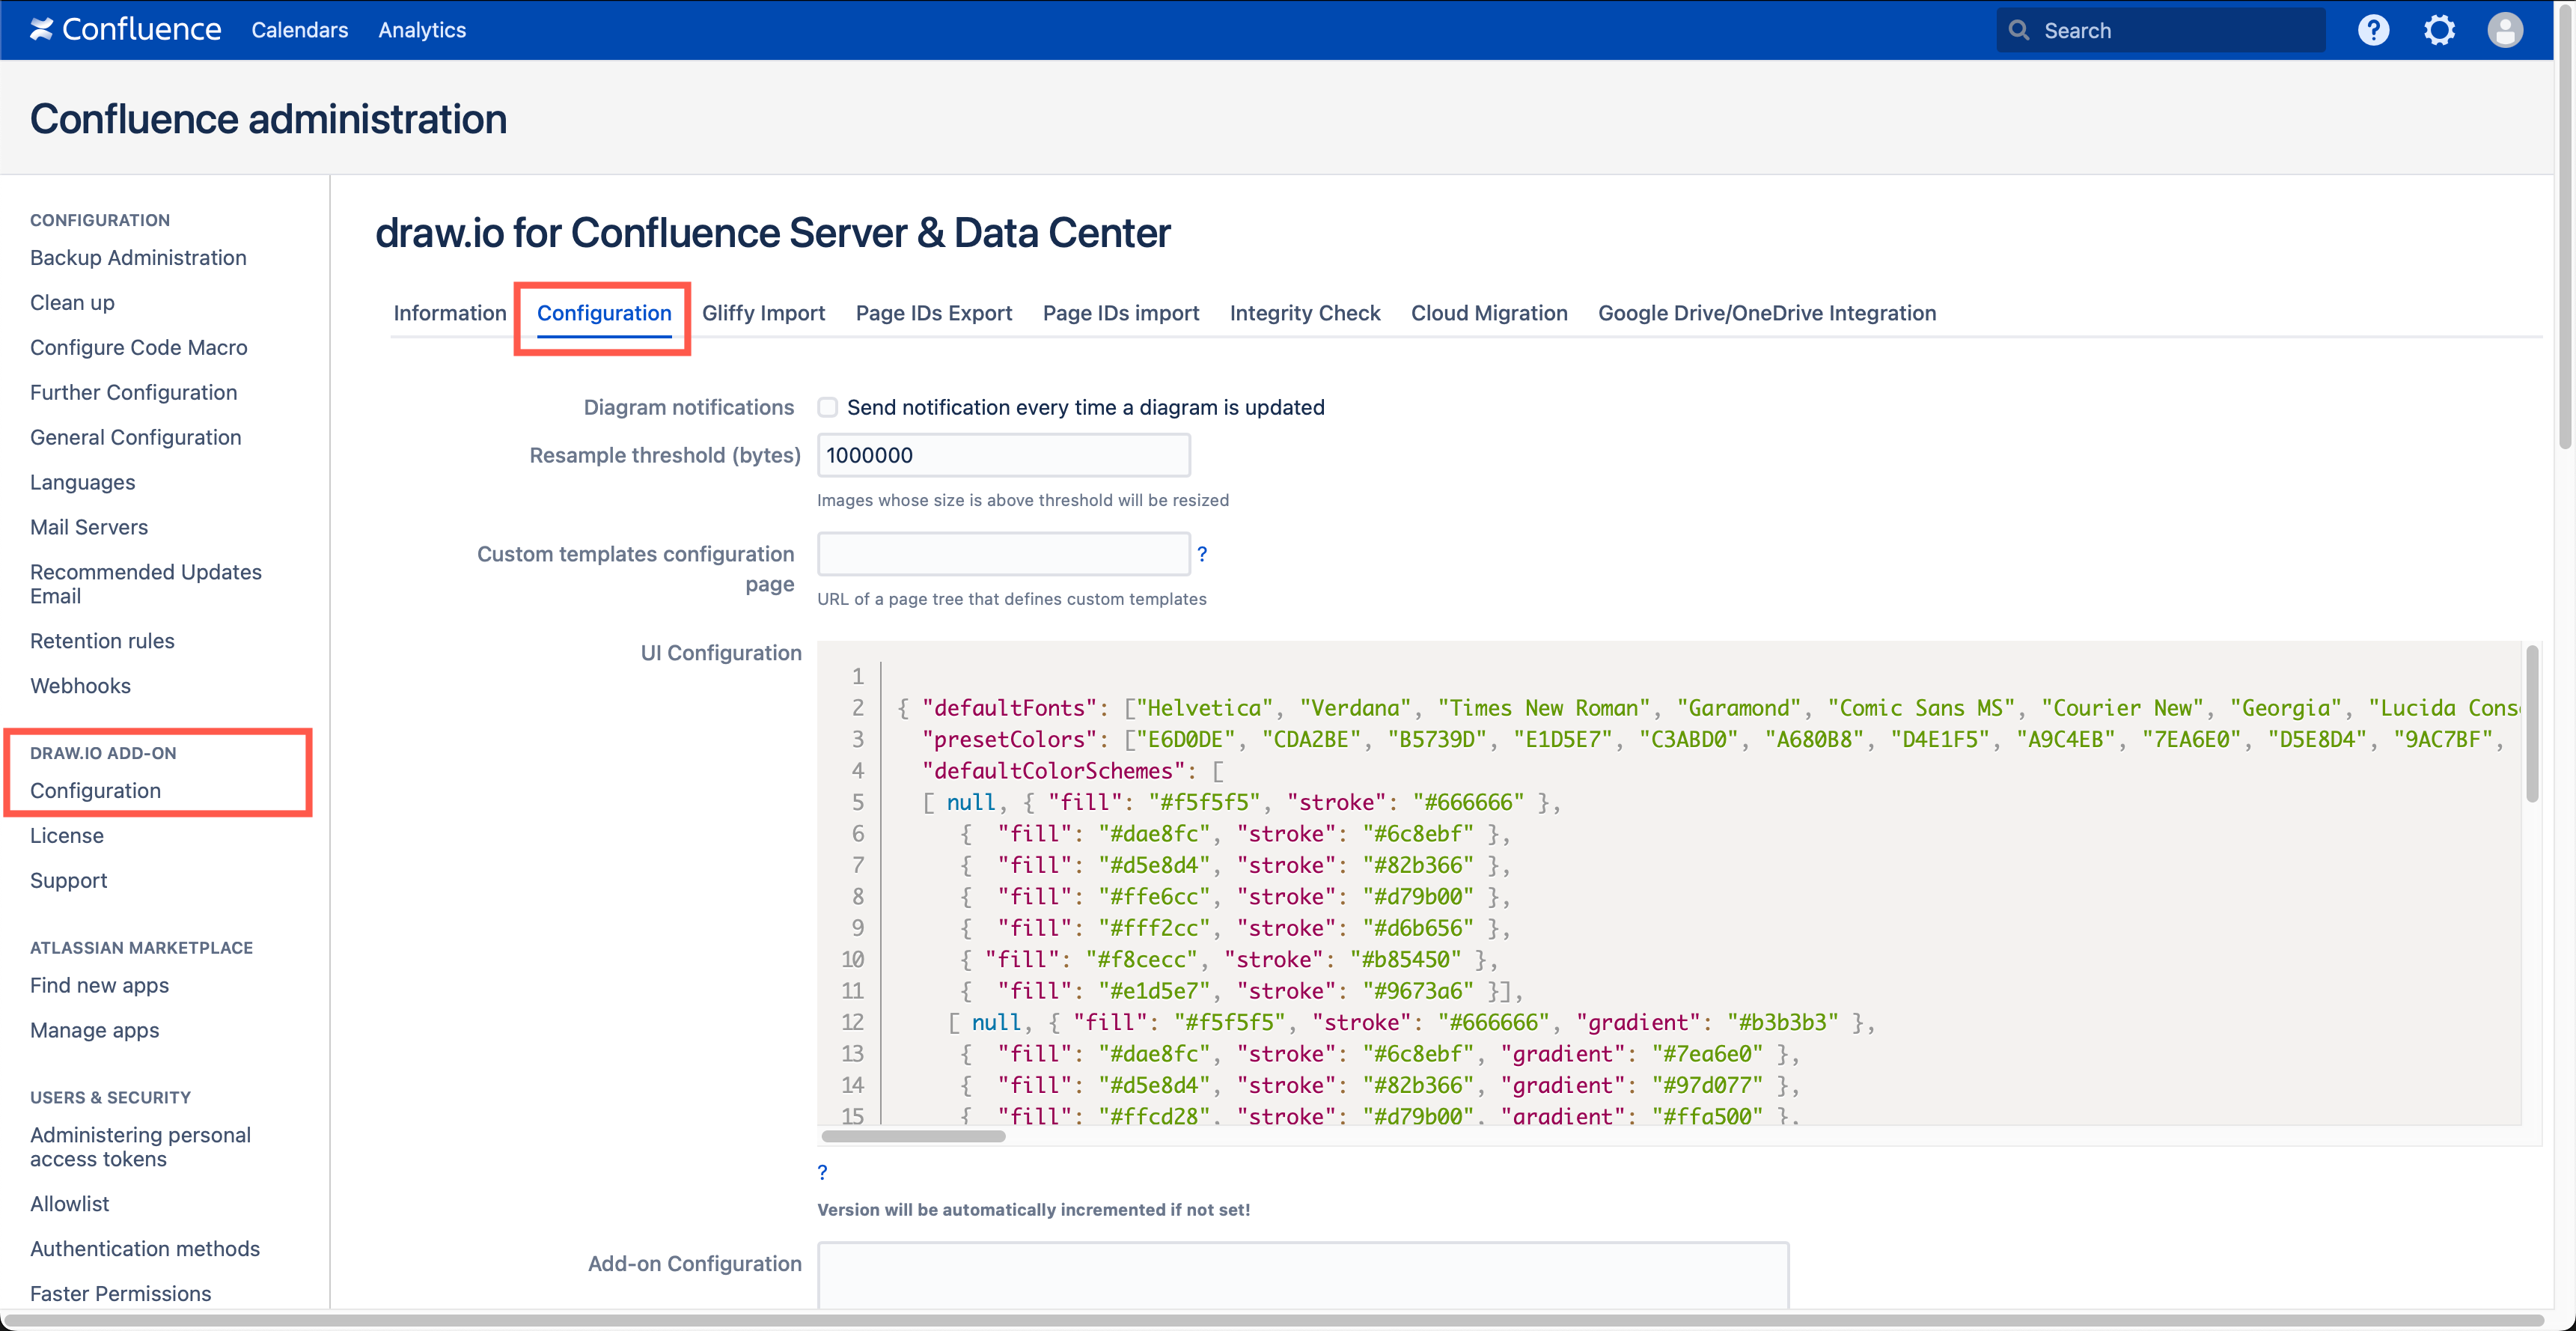
Feature flags in custom shape properties

Also called shape data, these could also indicate feature flags, as just like tags, they are displayed when you hover over a shape in your diagram.
Add feature flags to a custom shape property in your gitflow diagram

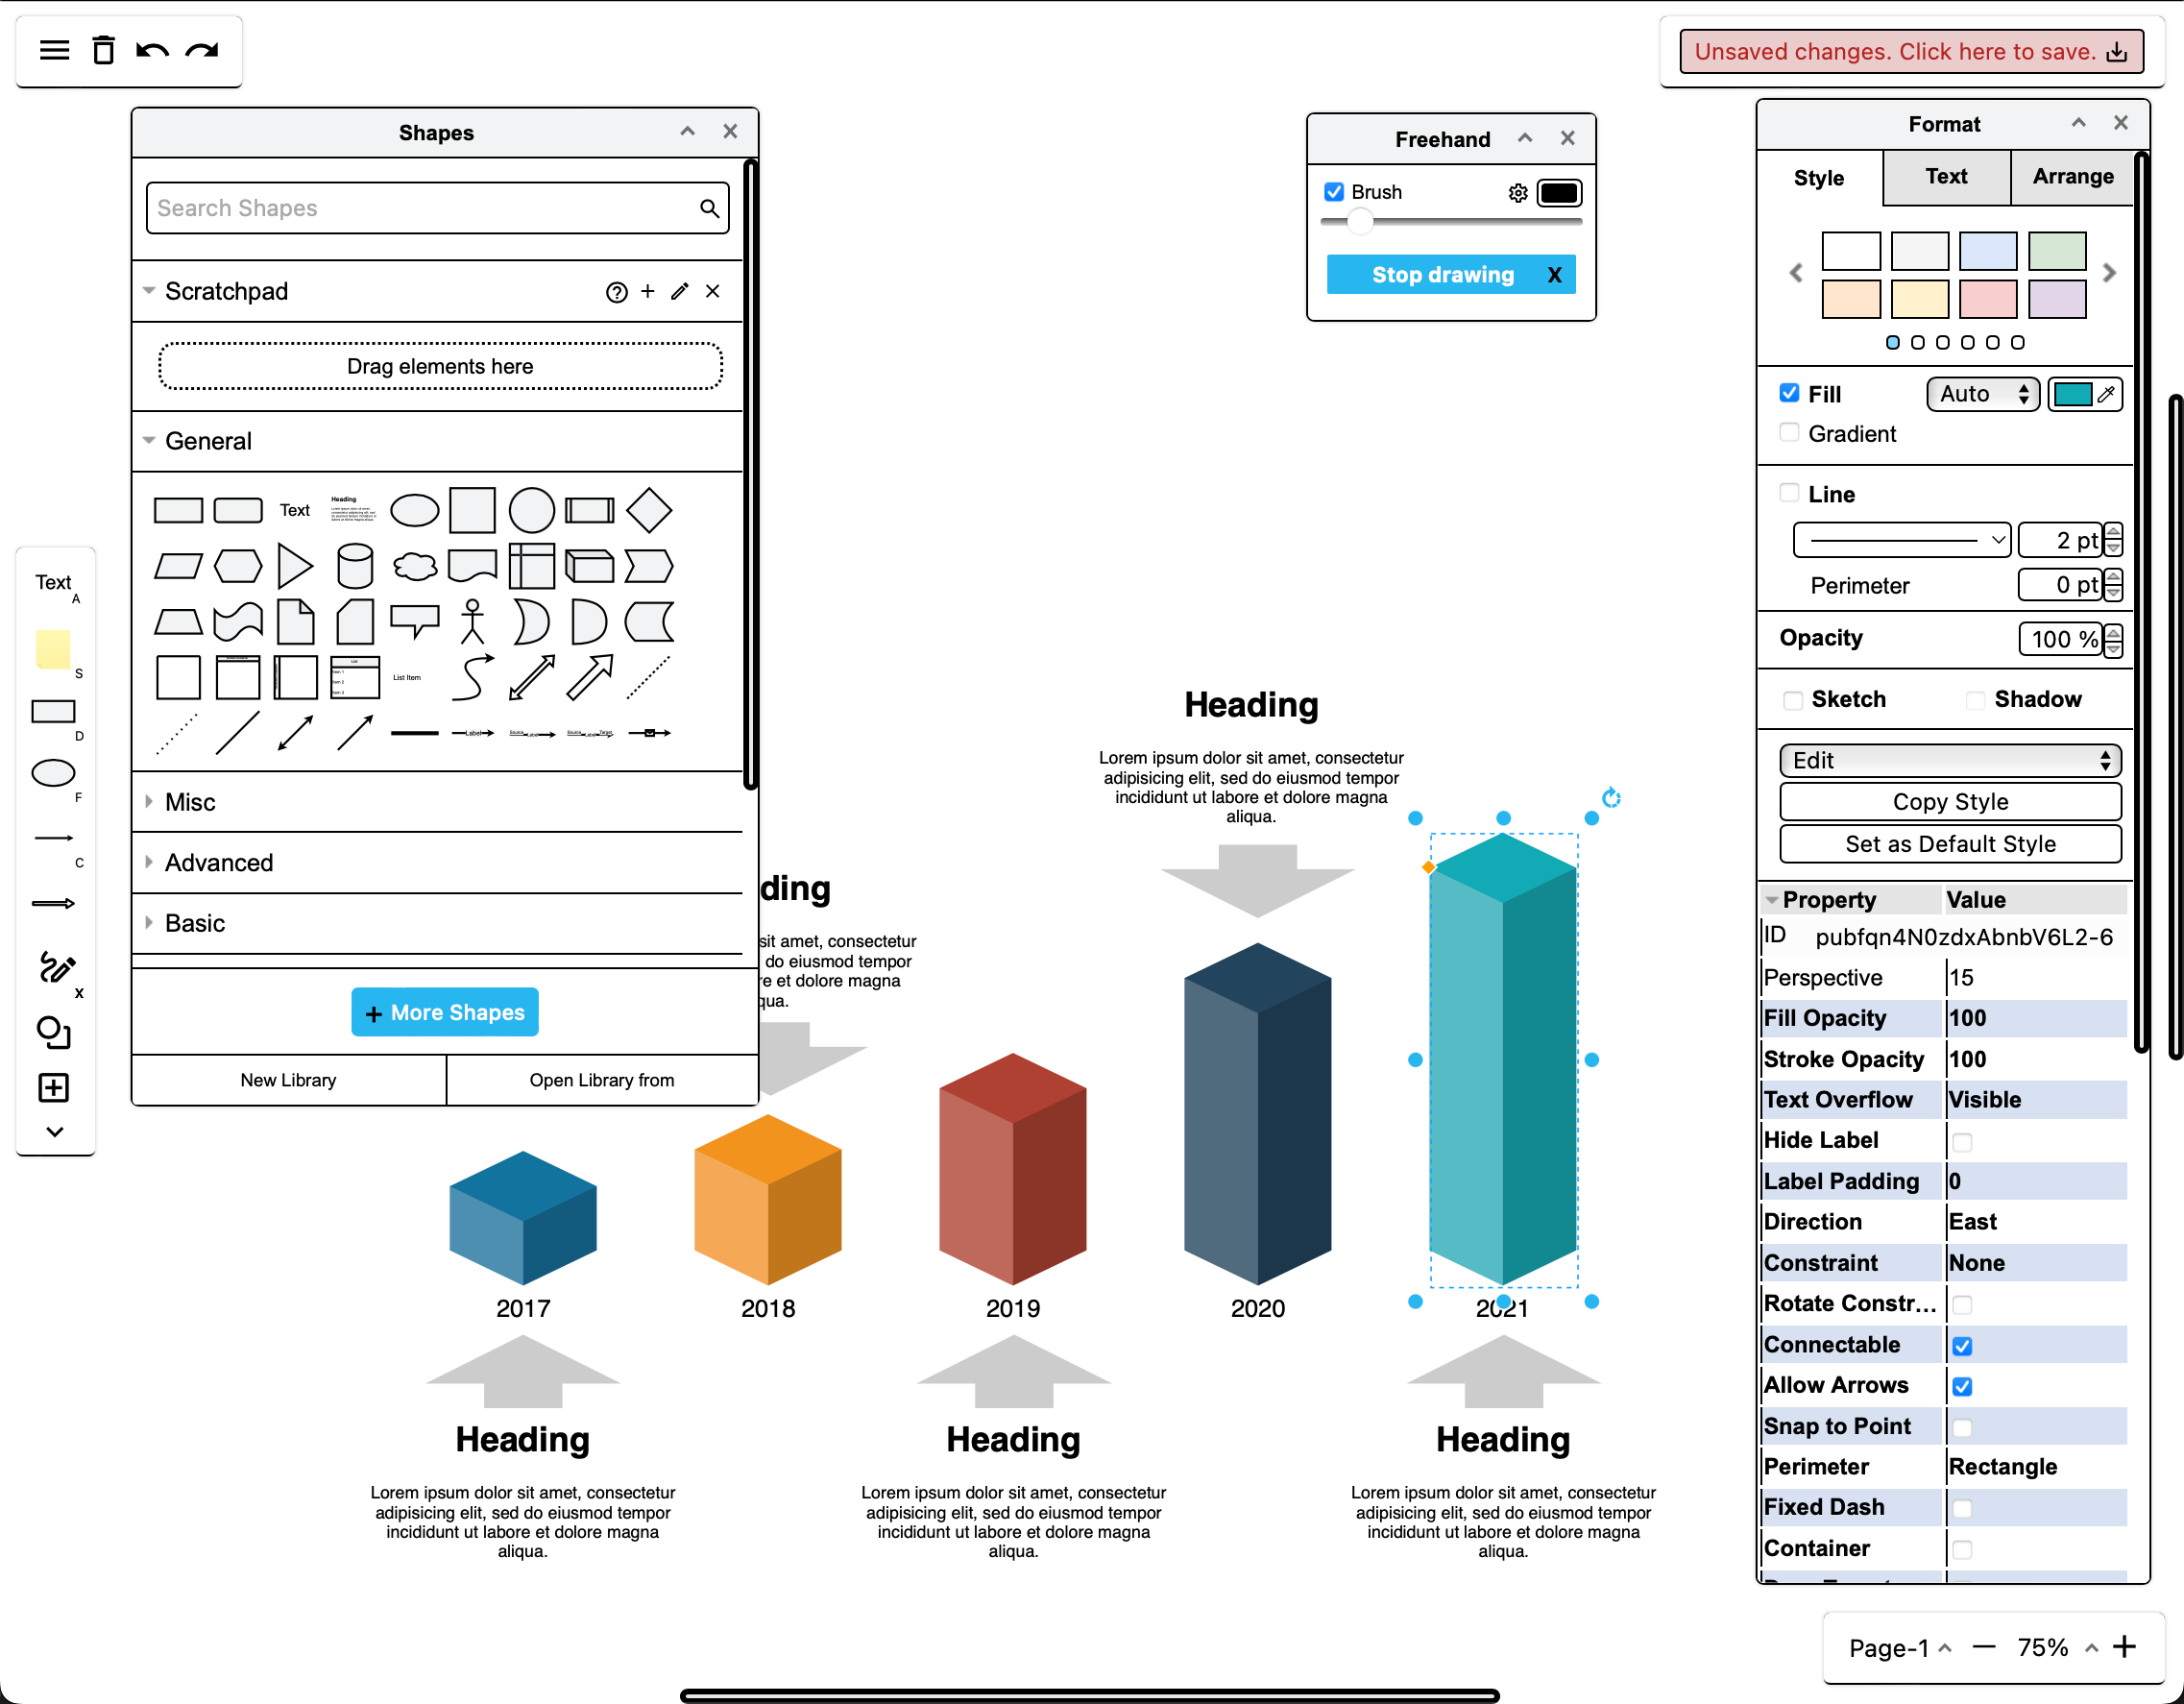
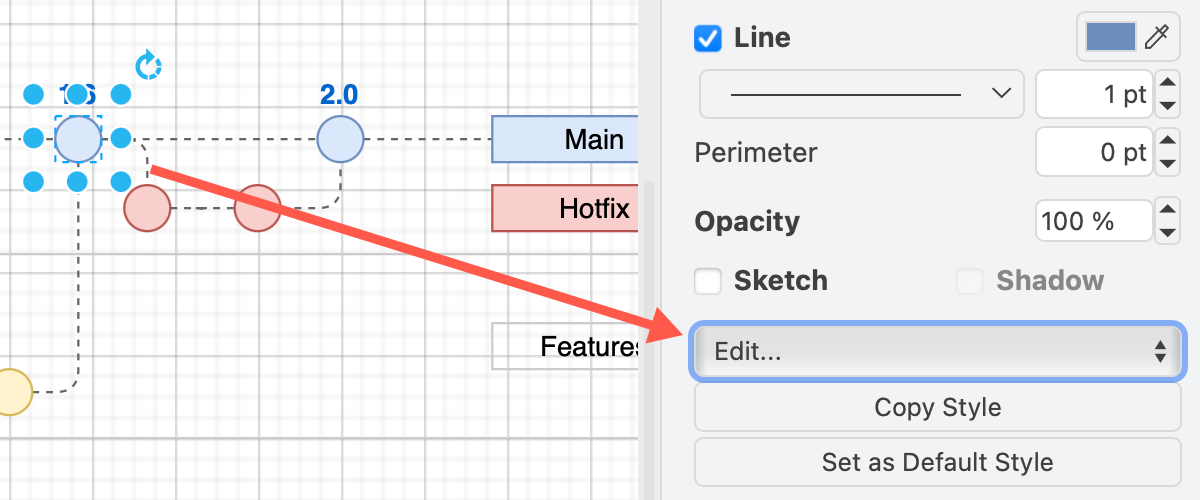
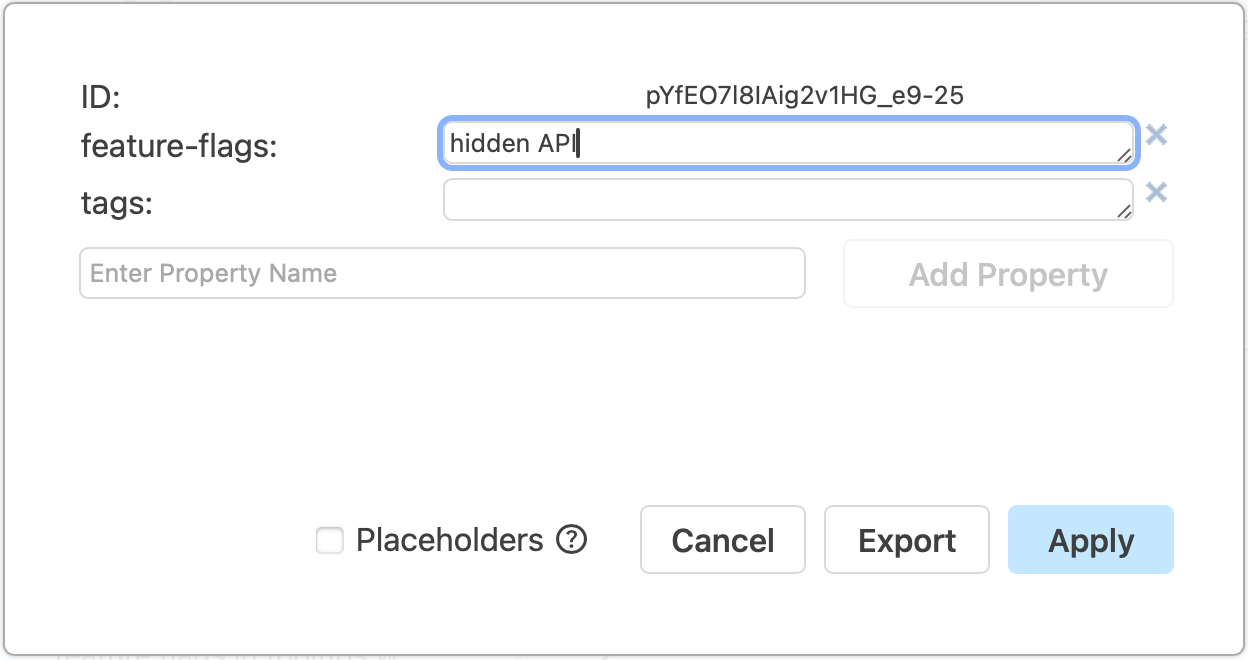
  1. Use the Edit drop down in the Style panel of the format panel on the right to edit, copy and paste shape data, or right-click on a shape then select Edit > Edit Data from the context menu.
    Add feature flags to a shape via Edit /> Data in the Style panel in draw.io
  2. Type the name of a new custom shape property in the Enter Property Name field and click Add Property.
  3. Add the feature flag names in the field next to the new shape property.
    Add feature flags to a custom shape property in your gitflow diagram

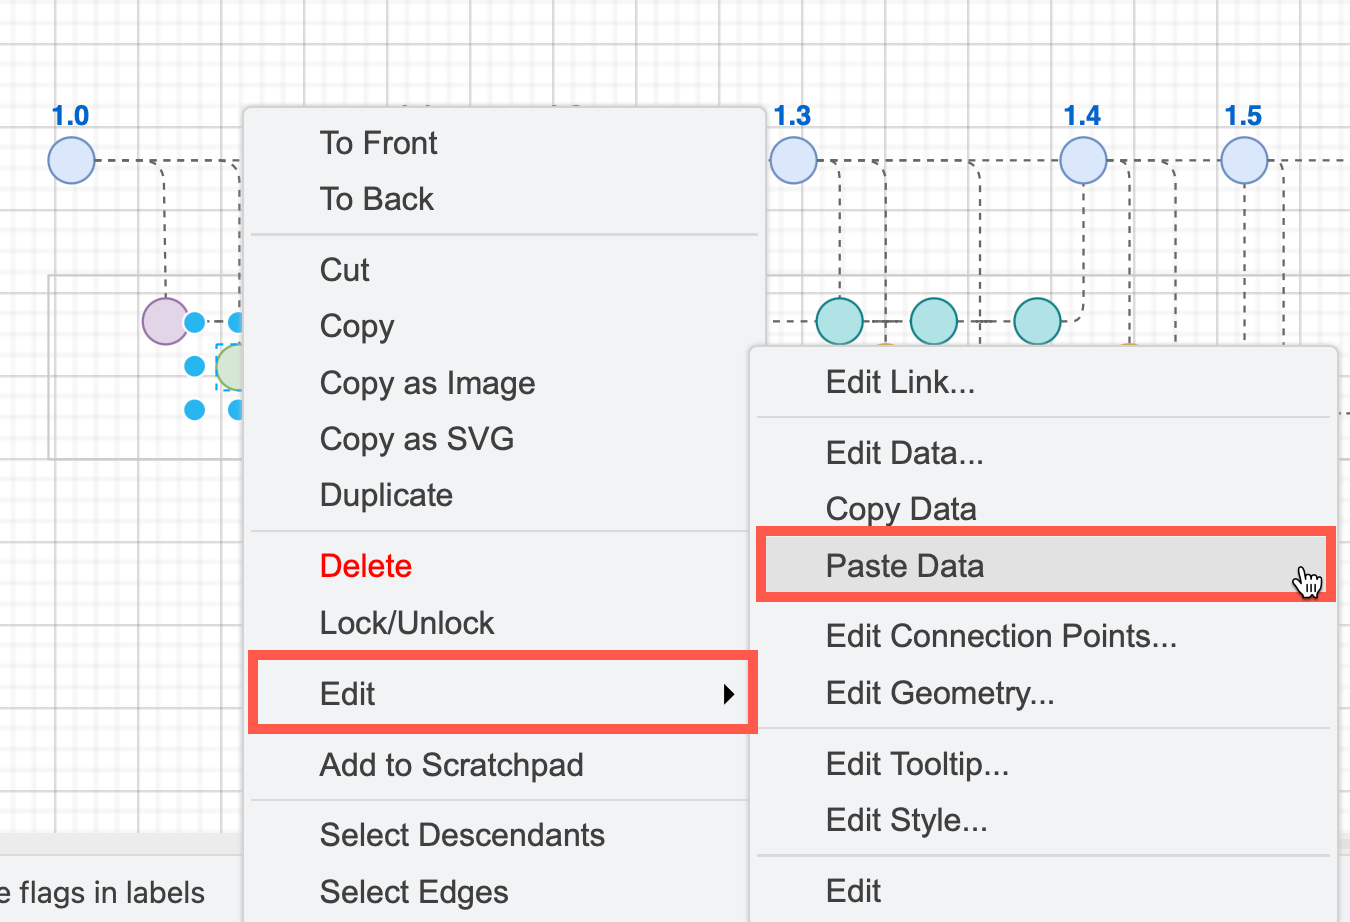
Tip: Copy and paste shape data to quickly duplicate custom properties on another shape via Edit > Copy Data and Edit > Paste Data in the right-click context menu.
Copy and paste tags on shapes via the right-click context menu in draw.io

Learn how to work with custom shape properties

Use custom shape properties to
Open this gitflow in the viewer to see feature flags in shape properties

Placeholder shape properties for automatic feature flags

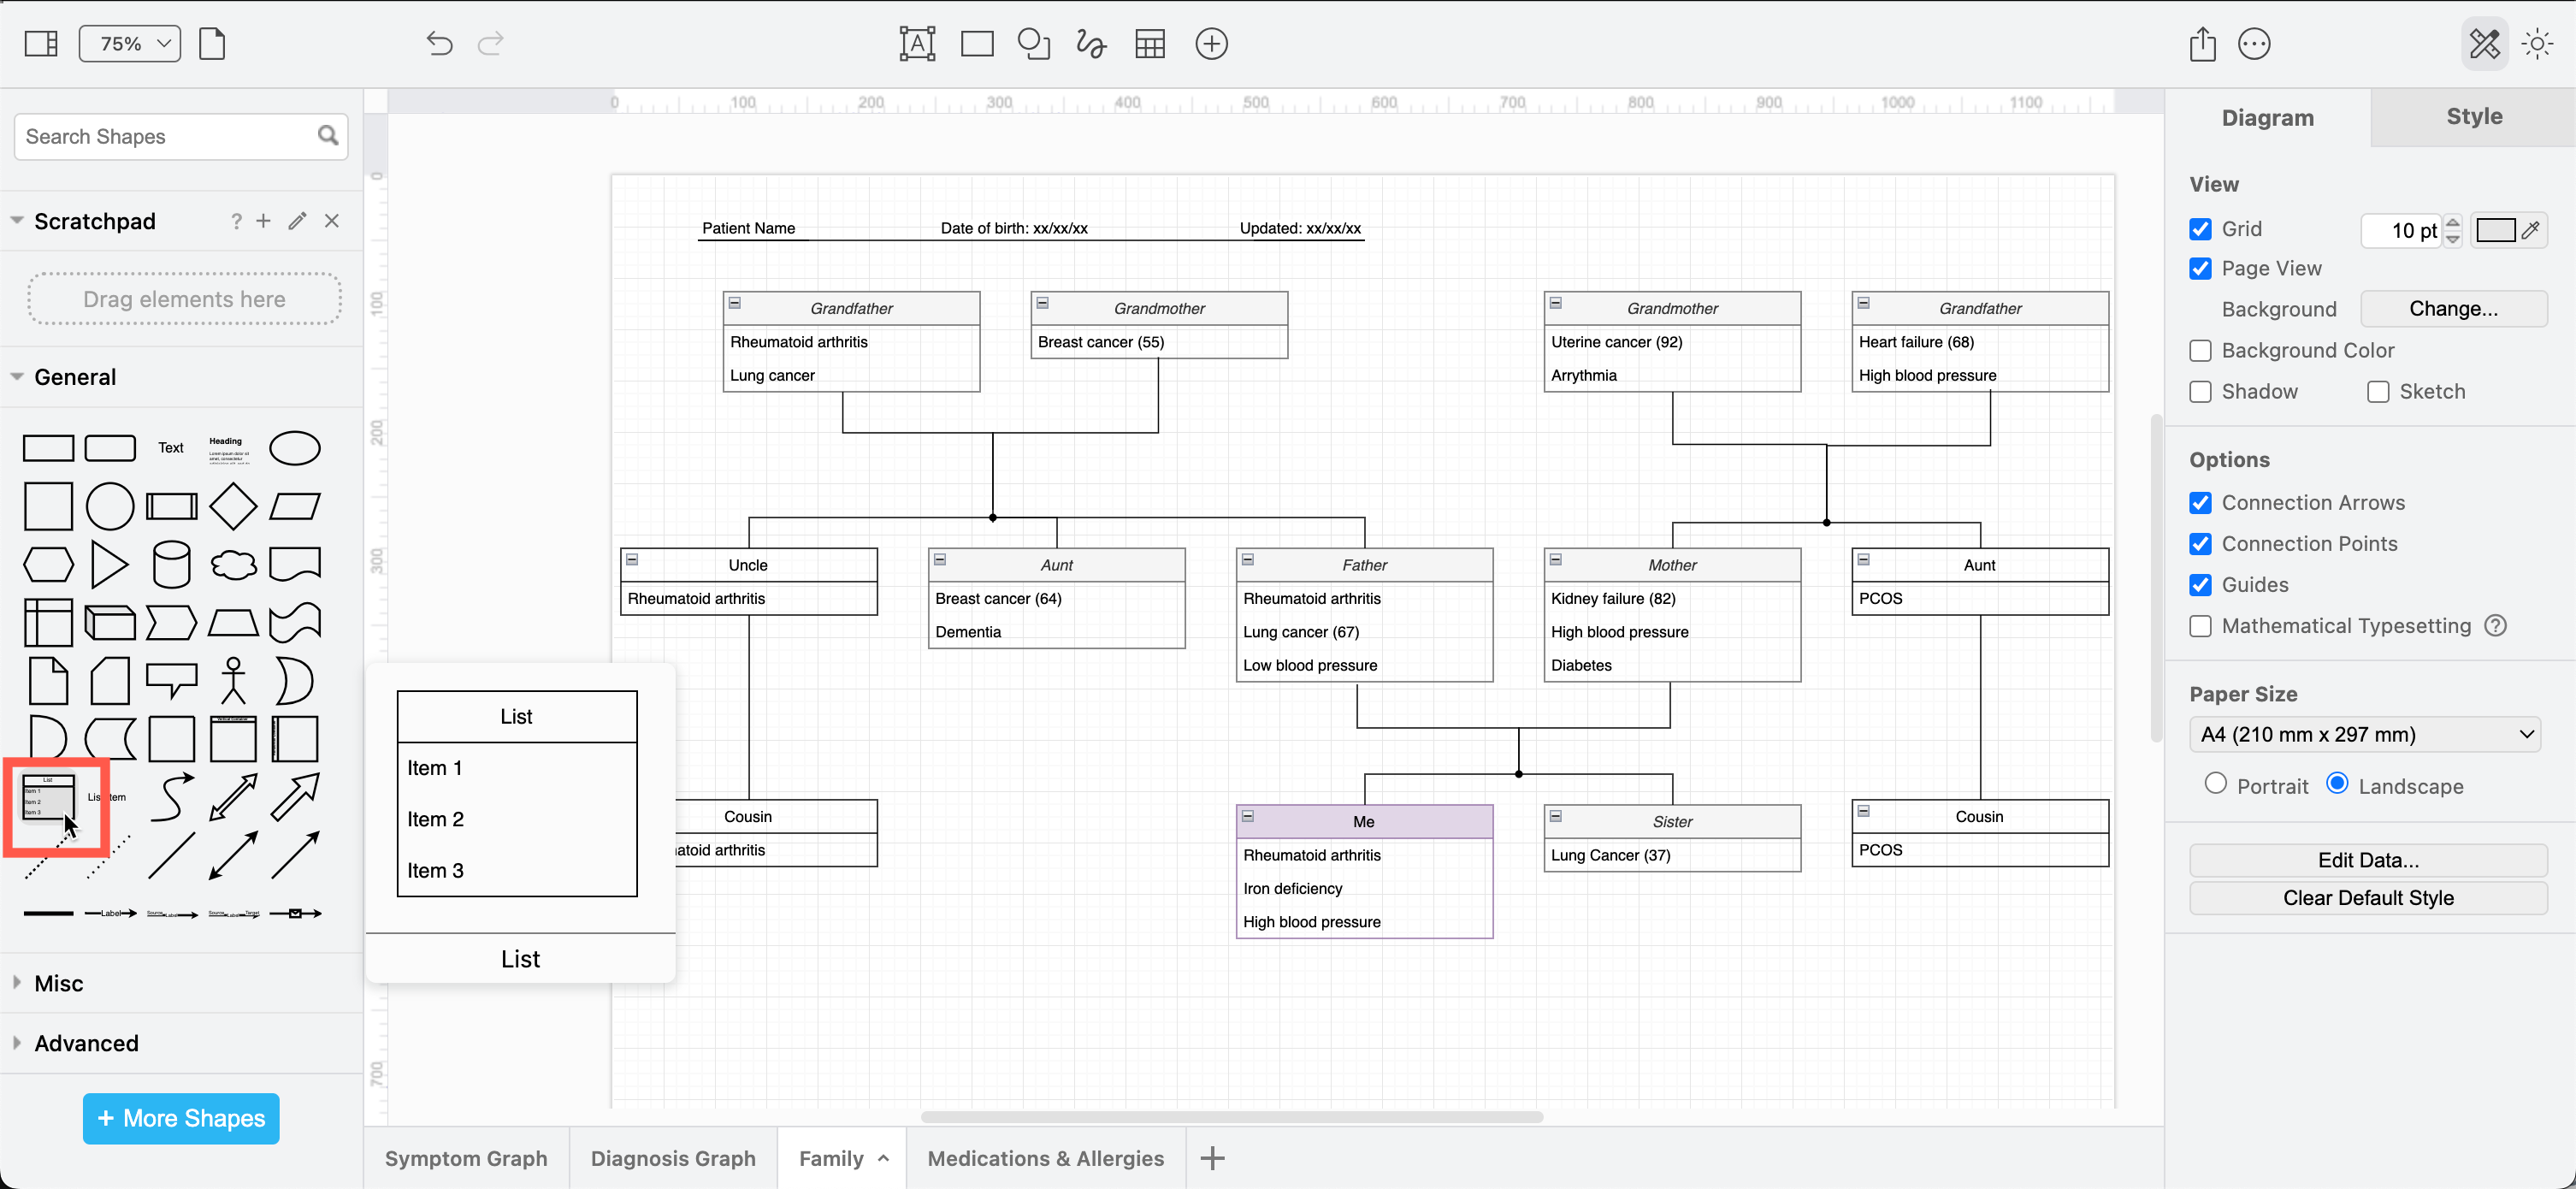
Using container shapes to indicate feature flags, and placeholders on all feature branch shapes can automatically update feature flags tooltips depending on which container they are in.

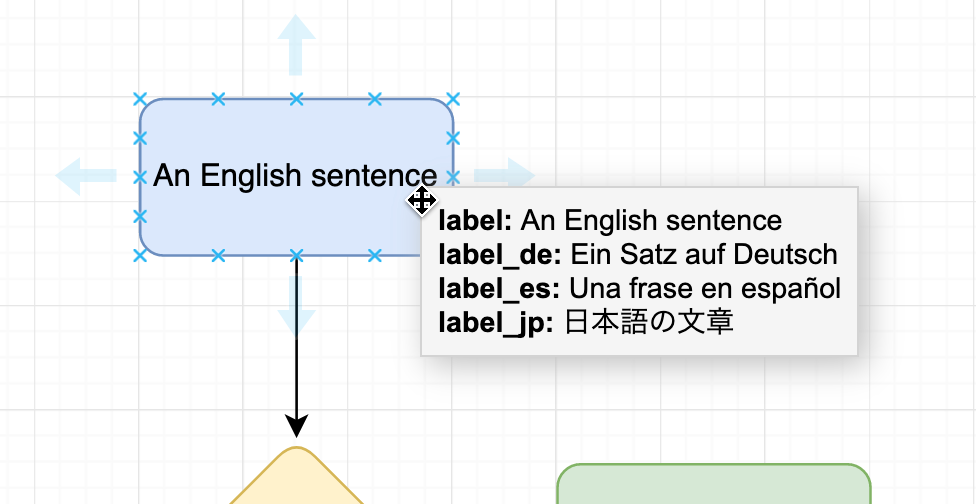
In this example, a tooltip shape property with a placeholder shows which feature flag container the branch is in when you hover over a shape. Additionally, the shapes used to label the containers also contain placeholder values.

  1. Select the shape that forms the container, expand its Properties in the Style tab in the format panel, and ensure the Container checkbox is selected.
    Make sure the shape for the feature flag is a container
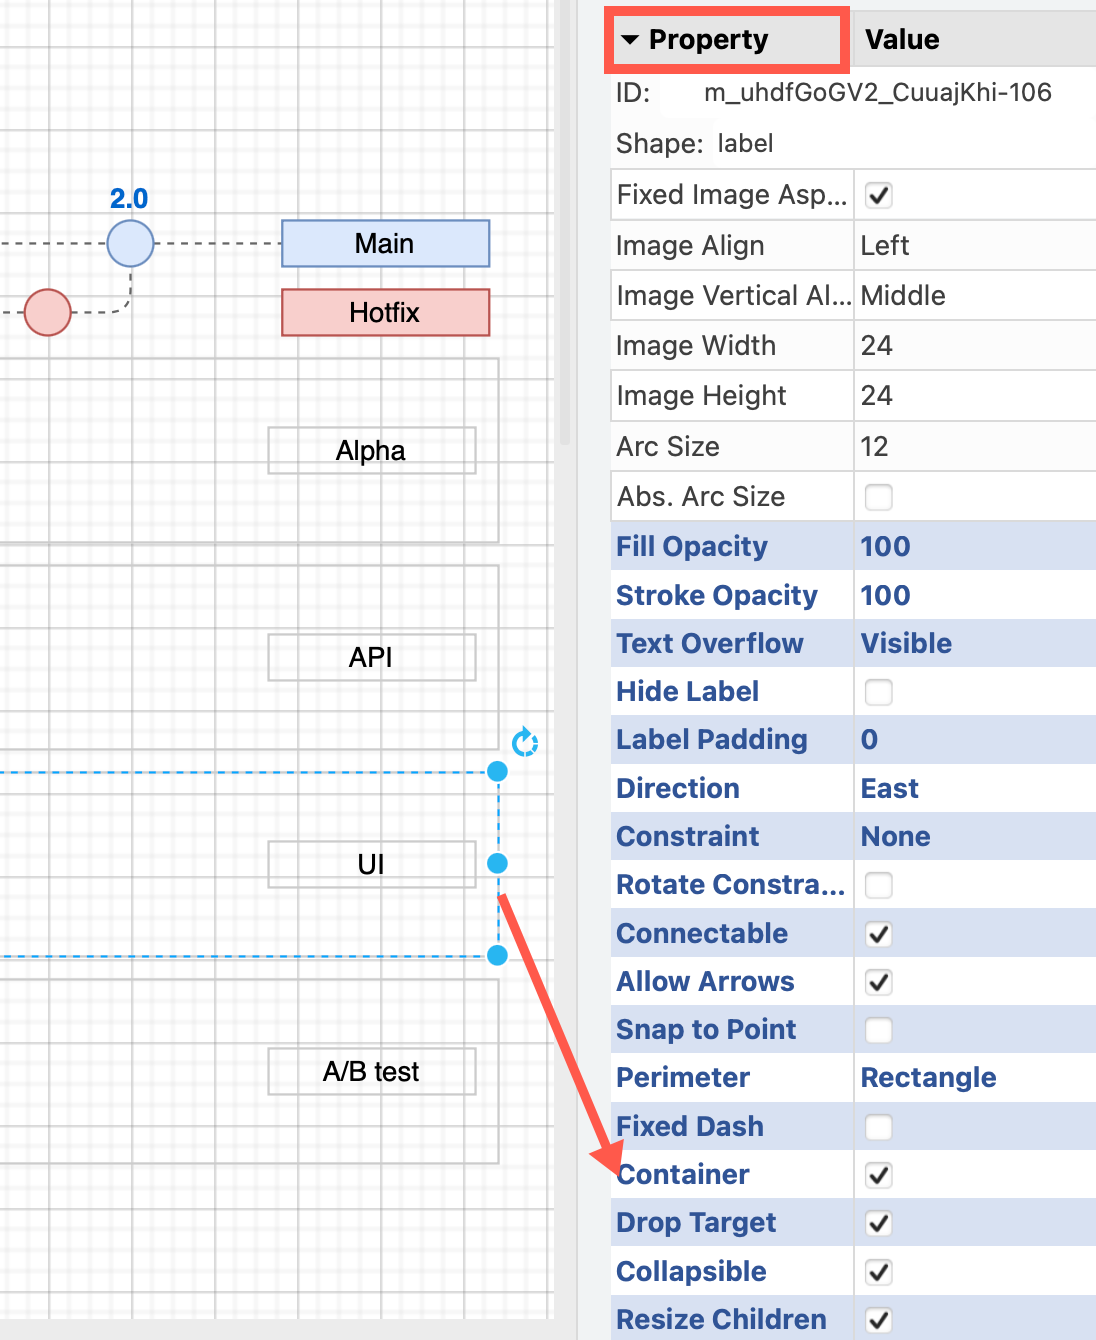
  2. Add the name of the feature flag to a custom shape property in the container shape, and ensure Placeholders is enabled.
    Add the name of the feature flag to a custom property in the container shape
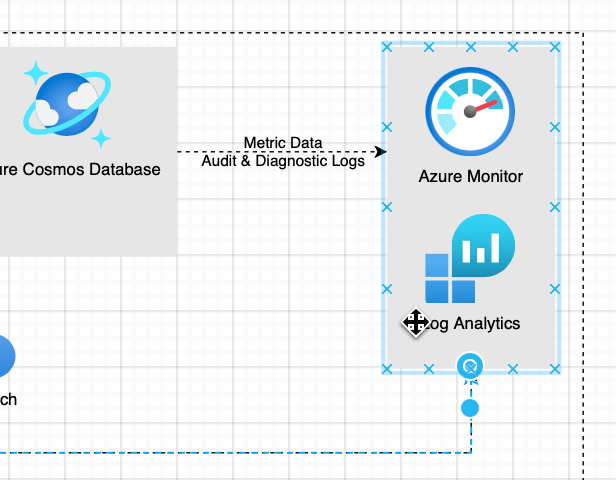
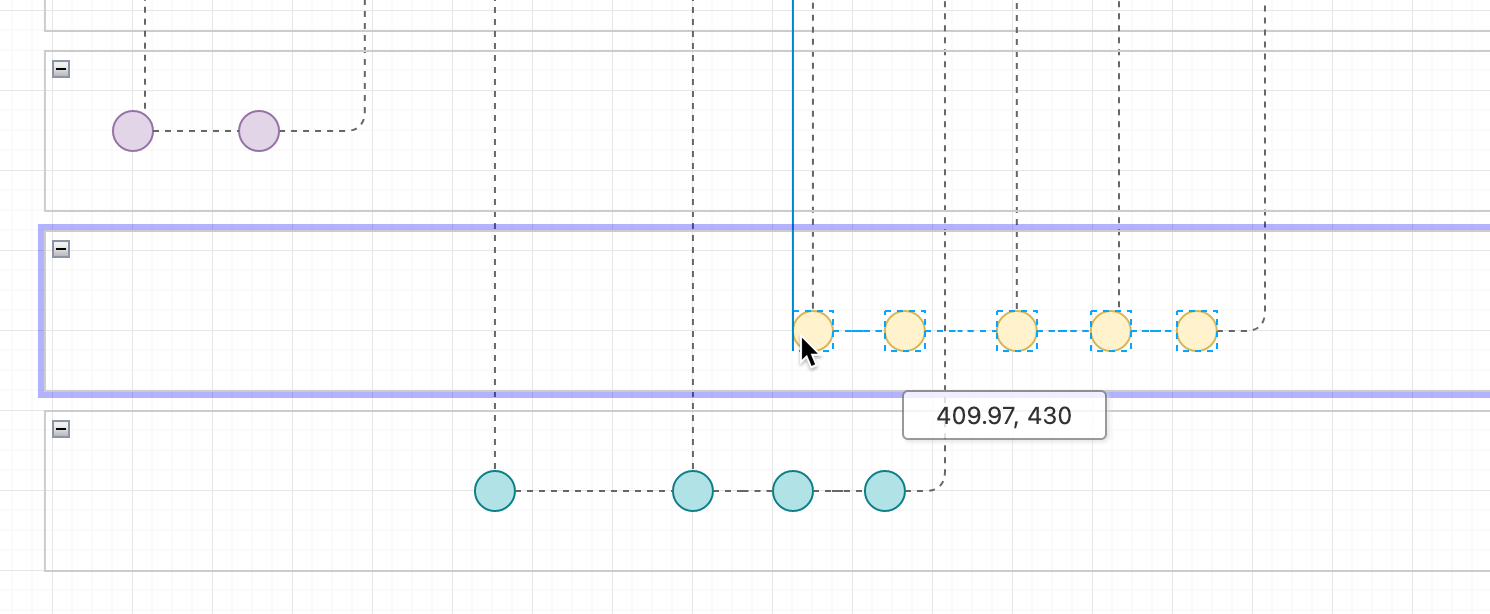
  3. Drag the feature branch shapes into the container shape, and drop them when the outline is purple.
    Add the name of the feature flag to a custom property in the container shape
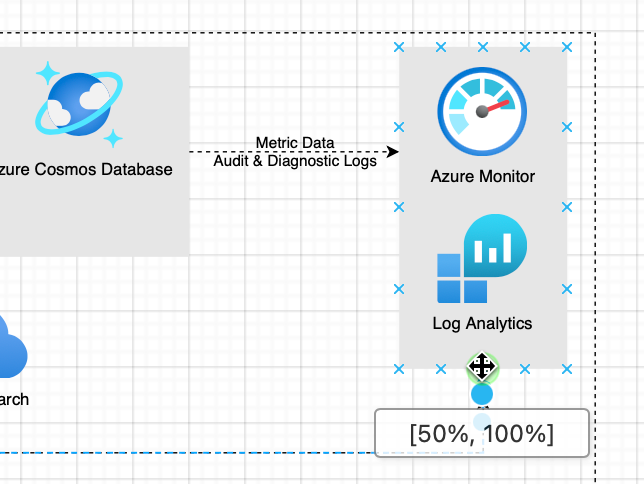
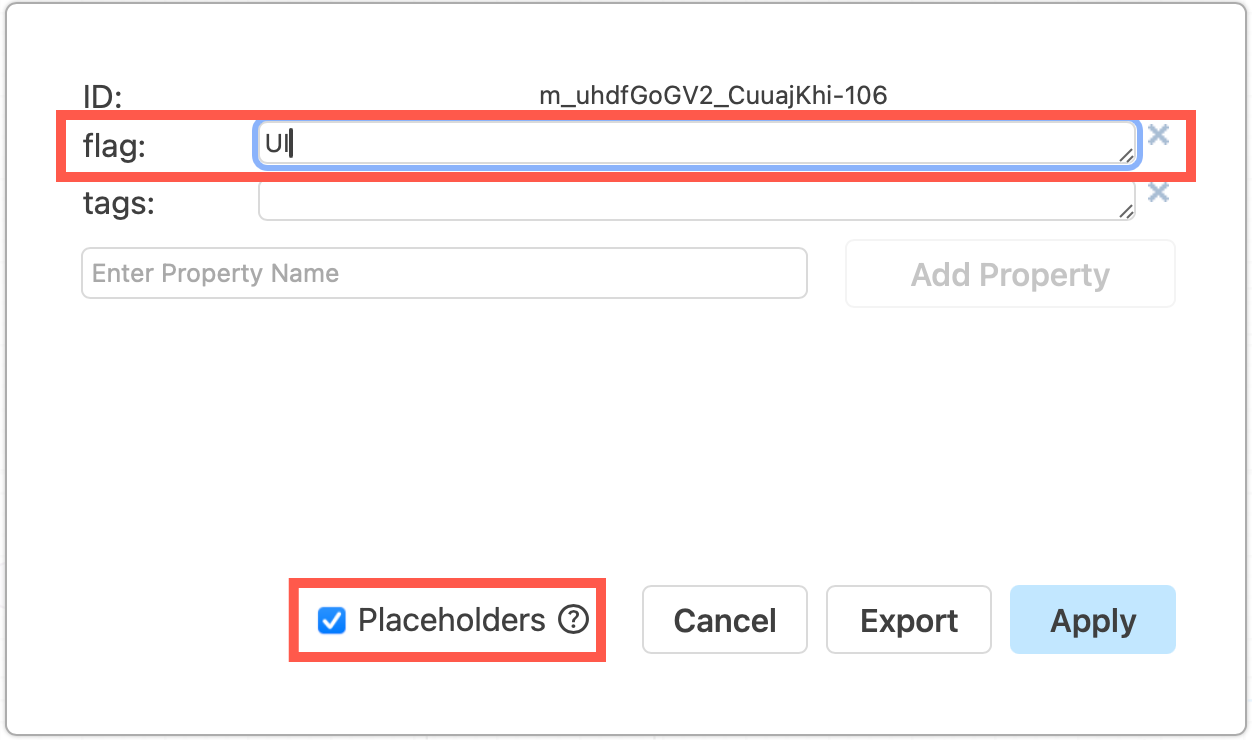
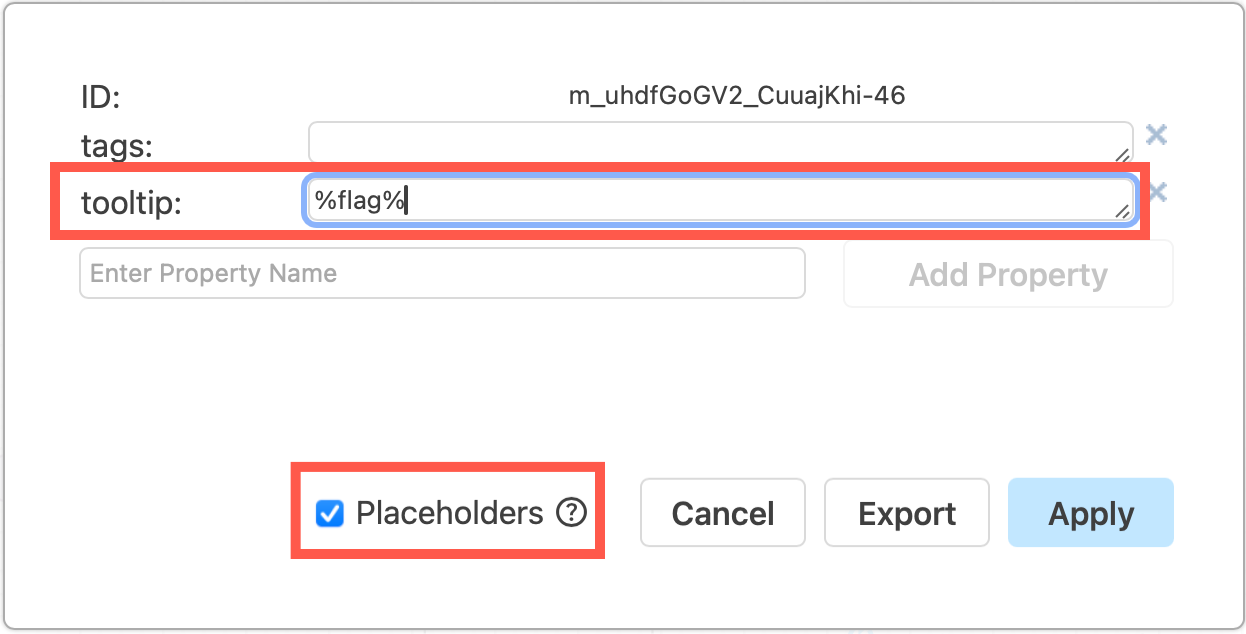
  4. Edit the shape properties of one of the feature branch shapes, ensure Placeholders is enabled and add the tooltip custom property with the value being the feature flag property you defined in step 2 surrounded with percentage characters: %flag%
    Add placeholders to shape properties to have labels and tooltips update automatically
  5. In the shapes used noting the the containers' feature flag, write the same shape property placeholder in the shape labels - e.g. %flag%

Keep in mind that shapes will only be able to have one feature flag if you use this method as placeholders respect scope, where the placeholder (or variable) takes the value of the container in which it is located.
Container shapes for feature flags show clearly which feature branches in the gitflow diagram use each flag, additional labels on the main branch show which feature flags apply to released versions
View this gitflow then click on Edit (the pencil) in the toolbar to open it in the editor and see how placeholder feature flags work

This structure clearly separates branches visually into each feature flag. You can combine this structure with list shapes on the trunk to show which flags apply to the actual release versions.

See how both the tooltips and the shape label changes when we move shapes to another container.
Use placeholders in shape properties and container shapes for feature flags in gitflow diagrams to automatically update shape data when you move shapes to another container

Learn more about placeholder shape properties